Measuring distances can be tricky, especially when you want quick and accurate results. What if you had a tool that makes this task easy, fast, and precise?
That’s exactly what a laser distance measurer does for you. Whether you’re working on a home project, checking room sizes, or planning a renovation, this device can save you time and effort. In this guide, you’ll discover how to use a laser distance measurer like a pro, unlocking its full potential to get the job done right every time.
Ready to simplify your measuring tasks? Let’s dive in!
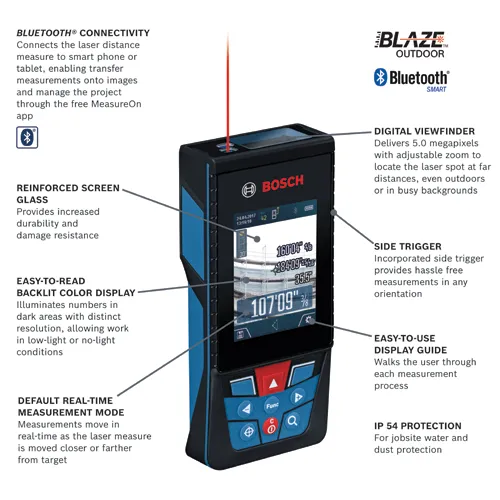
Credit: www.boschtools.com
Choosing The Right Laser Distance Measurer
Laser distance measurers help you get accurate measurements fast. Picking the right one can save time and effort.
There are different types and features. Your budget also matters when making a choice.
Types Of Laser Distance Measurers
Laser distance measurers come in several types. Each type fits different needs and uses.
- Basic Models:Measure distance only. Good for simple tasks.
- Area and Volume Models:Calculate area and volume from distance data.
- Advanced Models:Include features like Bluetooth, memory, and angle measurement.
- Professional Models:Designed for construction and survey work. Offer high accuracy and multiple functions.
Key Features To Consider
| Feature | Description | Why It Matters |
|---|---|---|
| Measurement Range | Maximum distance the device can measure | Choose based on your project size |
| Accuracy | How close the measurement is to the real value | Important for precise work |
| Display Type | Screen size and readability | Easier reading saves time |
| Battery Life | How long the device runs before charging | Long battery life prevents interruptions |
| Additional Functions | Features like area, volume, Pythagorean calculation | Adds value for complex measurements |
Budget Vs. Functionality
Laser distance measurers vary in price. Higher price often means more features and better accuracy.
- Set a budget that fits your needs.
- Basic models cost less but have fewer functions.
- Advanced models cost more but save time on complex tasks.
- Consider how often you will use the device.
- Think about the types of measurements you need most.
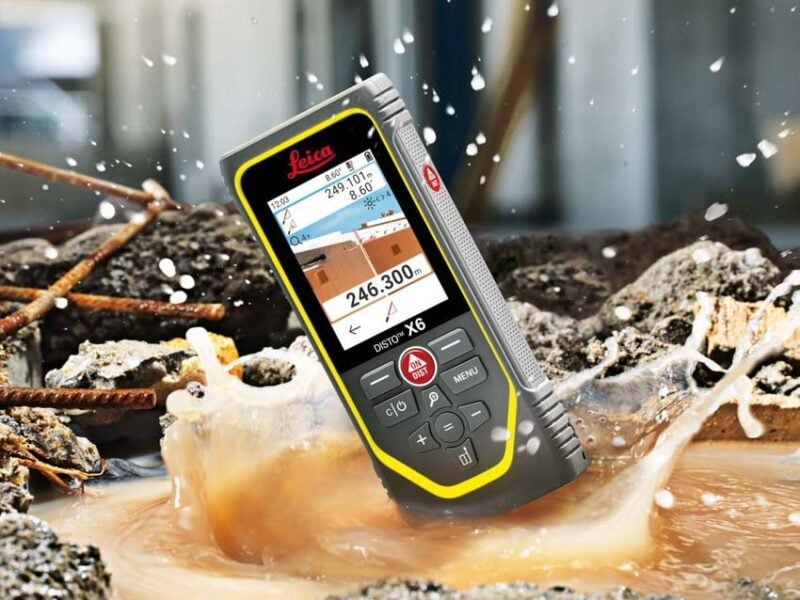
Credit: www.protoolreviews.com
Setting Up For Accurate Measurements
Using a laser distance measurer needs care to get correct results. You must prepare the area and device before measuring.
This guide helps you set up for accurate measurements with your laser tool.
Preparing The Measuring Environment
Clear the area of obstacles that can block the laser beam. Avoid shiny or glass surfaces that can reflect the laser inaccurately.
Choose a well-lit place but avoid direct sunlight on the laser path. Dust and fog can also affect the reading.
- Remove objects in the measuring path
- Use matte surfaces for better reflection
- Avoid direct sunlight on the laser line
- Keep the air clear of dust and smoke
Positioning The Device Correctly
Hold the laser measurer steady and level. Place it on a flat surface or use a tripod if available.
Point the laser straight at the target area. Avoid angles that can change the distance reading.
- Keep the device steady during measurement
- Position it on a flat surface or tripod
- Point the laser directly at the target
- Avoid tilting or angling the device
Calibrating Your Laser Measurer
Check your device’s calibration before use. Follow the manual to reset or adjust it for accuracy.
Test the laser by measuring a known distance. Compare the result to the actual distance to confirm accuracy.
- Read the manual for calibration steps
- Reset the device if needed
- Measure a known distance for testing
- Repeat calibration checks regularly
Techniques For Precise Distance Measurement
Using a laser distance measurer can save time and effort in many projects. It gives quick and accurate distance readings.
To get the best results, you need to use the right techniques. This guide covers key ways to measure distances precisely.
Measuring Over Long Distances
Long distances can be tricky to measure accurately. The laser beam may spread or lose strength over far ranges.
Hold the device steady and aim at a clear target. Use a tripod or stable surface if possible to reduce shaking.
- Choose targets with good contrast
- Measure during clear weather to avoid interference
- Use the device’s long-distance mode if available
Handling Obstacles And Reflective Surfaces
Objects like glass or shiny metal can reflect the laser and cause wrong readings. Obstacles may block the beam.
Try to find a direct line of sight to the target. Avoid aiming at reflective areas or use a target plate to improve accuracy.
- Move around to find a clear path
- Use a matte target if the surface is shiny
- Take care with glass surfaces, as they may reflect the beam
Using Multiple Measurements For Accuracy
Taking several measurements helps confirm the true distance. It reduces errors from device or user mistakes.
Measure the same distance two or three times. Use the average or the most common reading as your final result.
- Record each measurement carefully
- Check for outliers that seem very different
- Use the average to improve accuracy

Credit: www.youtube.com
Advanced Tips For Enhanced Accuracy
Using a laser distance measurer with care can improve your results. Small changes in setup and environment help get exact readings.
This guide shares tips on using tripods, handling temperature and light, and keeping your device in good shape.
Using Tripods And Mounts
Tripods keep your laser measurer steady and level. This reduces errors from hand shaking or uneven surfaces.
- Use a tripod with adjustable height for different angles.
- Attach the laser measurer firmly to avoid movement.
- Ensure the tripod is stable on the ground or surface.
- Check that the laser beam is aimed directly at the target.
Temperature And Light Considerations
| Condition | Effect on Accuracy | Tip |
|---|---|---|
| High Temperature | Can cause device parts to expand, affecting measurements | Let device cool before use in hot places |
| Low Temperature | Batteries drain faster, possibly reducing power | Keep device warm before measuring |
| Bright Light | Strong sunlight may interfere with laser visibility | Use shade or cover laser sensor |
| Low Light | Easier to see laser, but target may be hard to find | Use a reflective target for better results |
Regular Maintenance And Care
Clean your laser measurer often. Dirt or dust on the lens lowers accuracy.
Follow this checklist for upkeep:
- Wipe the lens with a soft, dry cloth after use.
- Store the device in a protective case to avoid damage.
- Check battery levels regularly and replace when low.
- Inspect for cracks or loose parts and fix them promptly.
Common Mistakes To Avoid
Using a laser distance measurer can make measuring easy and fast. But some mistakes can lead to wrong results.
This guide shows common errors and how to avoid them for better accuracy.
Incorrect Device Angling
Holding the device at the wrong angle can cause false readings. The laser should point straight to the target.
- Keep the device steady and level.
- Avoid pointing the laser at an angle.
- Use a tripod if needed for better stability.
Ignoring Manufacturer Guidelines
Each laser measurer has specific rules for use. Ignoring these can harm the device or lower accuracy.
| Guideline | Reason |
| Check battery level | Low power affects laser strength |
| Use recommended surfaces | Some surfaces reflect poorly |
| Keep lens clean | Dirt blocks the laser beam |
Overlooking Environmental Factors
Environmental conditions can change how the laser works. Ignoring these can cause errors.
- Bright sunlight can weaken the laser dot.
- Dust or fog can block the beam.
- Reflective or dark surfaces can distort measurements.
- Strong winds may move the device during measurement.
Integrating Laser Measurements With Other Tools
Laser distance measurers work well with other tools. Combining them improves accuracy and speed.
Using multiple tools helps you check measurements and organize data better.
Combining With Traditional Tape Measures
Tape measures are useful for short or awkward spaces. Use them to double-check laser readings.
This combination helps avoid mistakes in tricky measurements or corners.
- Measure long distances with laser for speed
- Use tape for small or curved areas
- Compare both for better accuracy
Using Measurement Apps And Software
Many laser measurers connect to apps on phones or tablets. These apps store and organize your data.
Software can create floor plans or 3D models using laser measurements.
- Sync data wirelessly from the laser device
- Edit and save measurements on your device
- Use apps for project planning and sharing
Exporting And Documenting Data
Laser measurers often let you export measurement data. You can save it as files on your computer.
Keeping good records helps track progress and avoid errors in projects.
- Export data as CSV, PDF, or image files
- Attach measurements to project reports
- Share files with team members or clients
Frequently Asked Questions
What Is A Laser Distance Measurer Used For?
A laser distance measurer calculates precise distances quickly. It’s ideal for construction, interior design, and DIY projects. It replaces tape measures, improving accuracy and efficiency.
How Do I Operate A Laser Distance Measurer?
Point the device at the target, press the measure button, and read the distance on the display. Ensure a clear line of sight for accurate results.
Can A Laser Distance Measurer Measure Long Distances?
Yes, most models measure distances up to 300 feet or more. Check your device’s specifications to confirm its maximum range.
Are Laser Distance Measurers Accurate?
Laser measurers provide accuracy within 1/16 inch to 1/8 inch. Accuracy depends on the model and environmental conditions like lighting.
Conclusion
A laser distance measurer simplifies measuring tasks. It’s precise and efficient. With practice, you can measure like a pro. Remember to follow the user manual. Safety comes first. Double-check measurements for accuracy. Choose a device that fits your needs. Many models are available.
Prices vary, so consider your budget. A good tool saves time and effort. It’s a worthy investment for many projects. Whether for home use or professional tasks, it’s handy. The more you use it, the more skilled you’ll become. Embrace this tool for easy measuring.