Are you tired of uneven cuts and crooked angles ruining your woodworking projects? A layout square might just be your new best friend.
This handy tool is a game-changer for anyone looking to achieve precise, accurate lines every time. Imagine the satisfaction of perfectly aligned edges and seamless joints in your projects. By mastering the use of a layout square, you can transform your craftsmanship and elevate your results.
Dive into these essential tips that will show you how to harness the full potential of a layout square, ensuring your work shines with professionalism and precision. Let’s unlock the secrets to achieving flawless lines together!
Choosing The Right Layout Square
A layout square helps you draw straight, accurate lines. Choosing the right one makes your work easier. It depends on the type, material, and size of the square.
Knowing the differences helps you pick the best layout square for your needs. This guide covers the main factors to consider.
Types Of Layout Squares
There are several types of layout squares for different tasks. Each type offers unique features for accuracy and ease of use.
- Speed Square:A triangular tool used for quick marking and measuring.
- Combination Square:Includes a ruler and adjustable head for multiple uses.
- Try Square:Simple L-shaped tool for checking right angles.
- Framing Square:Large L-shaped tool for framing and roofing work.
Material And Durability
The material affects the layout square’s lifespan and accuracy. Strong materials resist bending and wear.
| Material | Durability | Common Use |
| Steel | High | Heavy-duty and precise work |
| Aluminum | Medium | Lightweight and general use |
| Plastic | Low | Light tasks and beginners |
Size Considerations
Size affects how you use the layout square. Choose a size that fits your project and workspace.
- Small squares (6-7 inches) are easy to carry and fit in tight spaces.
- Medium squares (8-12 inches) work well for most woodworking tasks.
- Large squares (over 12 inches) suit framing and bigger projects.

Credit: www.wikihow.com
Preparing Your Workspace
Using a layout square needs a clean and organized workspace. This helps you draw straight and accurate lines. Preparing your area makes your work easier and safer.
Focus on clearing surfaces, good lighting, and fixing materials. These steps improve your accuracy and speed while working with a layout square.
Clearing And Leveling Surfaces
Remove all clutter from your work table or floor space. A flat, stable surface helps the layout square sit evenly. Uneven surfaces cause mistakes in line marking.
- Clear tools, papers, and debris from the workspace
- Check the surface with a small level tool
- Use shims or boards to fix any uneven spots
- Wipe the surface clean to avoid slipping
Lighting And Visibility
Good lighting helps you see marks and edges clearly. Avoid shadows and glare on your work area. Use bright, even light to reduce eye strain.
| Lighting Type | Best Use |
| Natural Light | Daytime work near windows |
| LED Desk Lamp | Focused light for detailed work |
| Overhead Fluorescent | Even illumination for large surfaces |
Securing Materials
Keep your workpieces steady to prevent slipping. Secure materials before marking lines with the layout square. This control improves precision and safety.
- Use clamps to hold wood or boards firmly
- Place non-slip pads under your materials
- Work on a stable table or bench
- Double-check that nothing moves before drawing lines
Basic Techniques For Accurate Lines
Using a layout square helps create clean, straight lines for projects. Accurate lines improve the overall quality of your work.
Learn simple methods to align, mark, and check your lines with a layout square. These tips make drawing easier and more precise.
Aligning The Square Correctly
Place the layout square so its edges match the reference edges of your material. Make sure the square sits flat without any gaps.
- Hold the square firmly against the edge.
- Check that the corner is tight and flush.
- Adjust the square until it does not move.
- Confirm the square is at a right angle.
Marking Straight Edges
Use a sharp pencil or marking tool to draw along the square’s edge. A clear mark helps guide your cuts or measurements.
| Tool | Purpose |
| Pencil | Draw thin, visible lines |
| Marking Knife | Score precise edges |
| Chalk | Mark on rough surfaces |
Double-checking Measurements
Check your measurements twice to avoid mistakes. Even small errors can affect your final result.
- Measure from the same starting point each time.
- Re-align the layout square before marking.
- Compare your marks with a tape measure or ruler.
- Ask someone else to verify the lines if possible.
Advanced Tips For Precision
Using a layout square correctly can improve your line accuracy. Simple methods help you draw clean, precise lines for your projects. This guide covers advanced tips for better results.
Learn how to use the square for angled lines, combine it with other tools, and avoid common mistakes. These tips save time and reduce errors during your work.
Using The Square For Angled Lines
To draw angled lines with a layout square, first set the square at the desired angle by pivoting it on one corner. Mark the angle lightly with a pencil before drawing the final line. Use the scale on the square for precise measurements.
- Place the square’s pivot point firmly on your work surface.
- Rotate the square until the desired angle aligns with your reference line.
- Check the angle using a protractor if needed for accuracy.
- Draw a light guide line before making the final mark.
Combining With Other Tools
Pair the layout square with rulers, protractors, or marking gauges to improve precision. This combination helps you measure and mark complex layouts quickly and accurately.
| Tool | Use | Benefit |
| Ruler | Measure long distances | Ensures straight, even lines |
| Protractor | Check angles | Confirms exact angle measurements |
| Marking Gauge | Mark parallel lines | Keeps lines consistent and even |
Avoiding Common Mistakes
Many users make simple errors that reduce line precision. Being aware of these mistakes helps keep your work clean and exact.
- Do not move the square while drawing the line.
- Always verify that the square is flat against the surface.
- Double-check angles before marking lines.
- Use sharp pencils for clean, thin lines.
- Clean the square to remove dust and debris.
Maintenance And Care
Taking care of your layout square helps keep its accuracy. Proper maintenance makes it last longer and work better.
Regular care includes cleaning, storing correctly, and checking calibration. These steps prevent damage and errors.
Cleaning After Use
Clean your layout square after each use to remove dirt and dust. Use a soft cloth to wipe the surface gently.
Avoid harsh chemicals that could damage the tool. If needed, use mild soap and water, then dry it completely.
Storage Tips
Store the layout square in a dry place to avoid rust or warping. Keep it in a protective case or pouch if possible.
Do not place heavy objects on top of it. Keep it away from extreme heat or cold to maintain its shape.
- Use a dedicated storage box or pouch
- Keep away from moisture and direct sunlight
- Place flat on a shelf or drawer
- Do not stack heavy items on it
Calibration Checks
Regularly check the square’s accuracy with a known straight edge or angle. This ensures your lines remain precise.
If you notice any errors, adjust or replace the tool. Accurate calibration helps keep your work clean and professional.
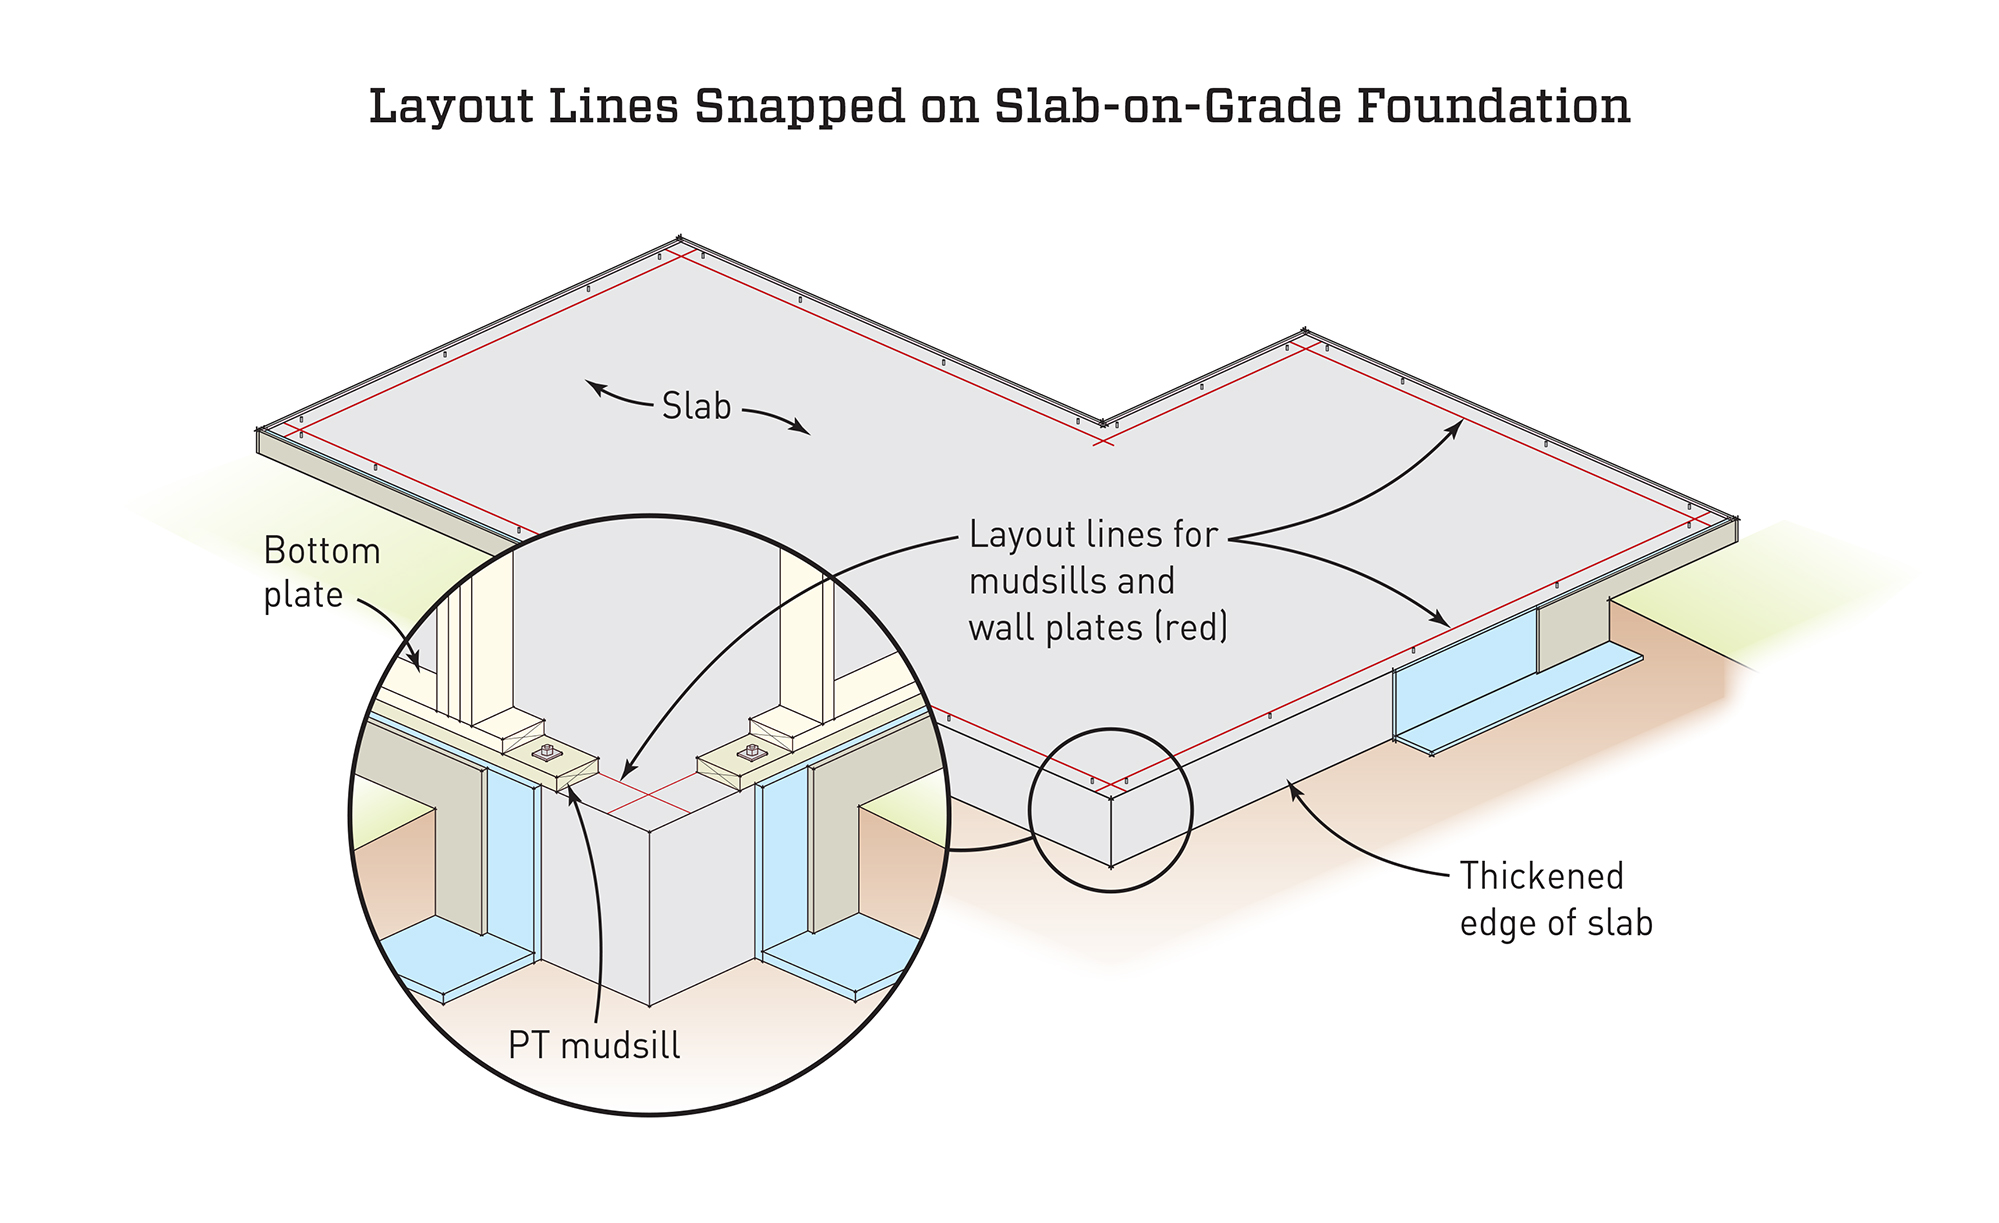
Credit: www.jlconline.com
Practical Projects To Practice Skills
Using a layout square helps create accurate lines in many projects. Practicing with simple tasks builds your confidence.
Try these projects to improve your skills with a layout square. Each one teaches you how to draw precise lines.
Simple Woodworking Layouts
Woodworking projects often need exact lines for cuts and joints. A layout square helps mark these lines clearly and correctly.
Practice by drawing lines for small shelves or boxes. Check that corners are square and edges are straight.
- Mark right angles for cutting wood pieces
- Draw parallel lines for uniform spacing
- Check measurements twice for accuracy
Diy Home Improvement Lines
Home projects like installing shelves or frames need straight, level lines. A layout square ensures your lines are precise.
Use the square to mark wall studs or to draw guide lines for tiling and painting. This reduces mistakes.
- Draw level lines for shelves or cabinets
- Mark studs and wall corners accurately
- Check angles when installing trim or molding
Crafting Accurate Templates
Templates help you repeat shapes exactly. A layout square keeps your template lines straight and angles right.
Create templates for cutting wood, fabric, or metal. Use the square to draft clean edges and corners.
- Draw square corners for box or frame templates
- Use the square to check symmetry and alignment
- Keep lines clear for easy tracing and cutting

Credit: www.wikihow.com
Frequently Asked Questions
What Is The Best Way To Hold A Layout Square?
Hold the layout square firmly against the edge of your material. Ensure it is flush and stable to get precise lines. This prevents slipping and inaccurate measurements. Always check alignment before marking to maintain accuracy.
How Do I Mark Accurate Lines With A Layout Square?
Place the layout square tightly on the workpiece edge. Use a sharp pencil to draw along the square’s edge. Apply consistent pressure and double-check measurements. This method ensures straight, accurate lines for cutting or assembly.
Can A Layout Square Be Used For Angle Measurements?
Yes, a layout square can measure right angles (90 degrees). It helps verify corners and mark perpendicular lines. However, it is not suitable for measuring other angles. Use a protractor for angles besides 90 degrees.
How Do I Maintain My Layout Square For Accuracy?
Keep your layout square clean and free from rust or debris. Store it in a dry place to avoid warping. Regularly check for damage or wear. Proper maintenance ensures long-term accuracy and reliable measurements.
Conclusion
Using a layout square helps create straight and accurate lines. Practice often to get comfortable with its use. Always check your measurements twice to avoid mistakes. A clear, steady hand improves your results. Keep your tools clean and in good shape.
With patience, your projects will look more professional. Try these tips to make drawing lines easier. Precision matters in every step you take. Remember, simple tools can make big differences.