
Tiling a room can transform a space from ordinary to extraordinary. But achieving that flawless finish requires precision and accuracy.
That’s where a laser level comes in. If you’ve ever struggled with crooked lines or uneven tiles, you’re not alone. Many DIY enthusiasts and even some professionals find it challenging to get those perfect alignments. But here’s the game-changer: by using a laser level, you can make your tiling projects easier and more precise.
Imagine the satisfaction of seeing a perfectly tiled wall or floor, knowing you did it yourself. Curious to learn how you can master this tool and elevate your tiling skills? Stick around, because we’re diving into the essential tips that will make your next project a breeze.
Choosing The Right Laser Level
Using a laser level can make tiling easier and more accurate. Picking the right one is important for your project.
This guide helps you choose the best laser level for tiling by explaining types, features, and budget tips.
Types Of Laser Levels
There are different laser levels for different tasks. Choose one that fits your tiling needs.
- Line Laser Levels: Project horizontal or vertical lines. Good for straight tile rows.
- Dot Laser Levels: Show points for marking spots. Less useful for long tile lines.
- Rotary Laser Levels: Spin a laser 360 degrees. Best for large areas and floors.
- Cross Line Laser Levels: Show both horizontal and vertical lines. Help align tiles in grids.
Features To Look For
Look for features that make tiling easier. Check the laser level’s accuracy and ease of use.
- Self-Leveling: Automatically adjusts to make straight lines.
- Visibility: Bright lasers are easy to see in different lights.
- Range: How far the laser can reach. Bigger areas need longer range.
- Mounting Options: Tripod or wall mounts help keep the laser steady.
- Power Source: Battery life and type affect how long it works.
Budget Considerations
Laser levels come at different prices. Balance cost with needed features for tiling.
Basic models work well for small projects. Higher-end ones offer more accuracy and range.
- Set a budget before shopping.
- Buy a laser level with good reviews for tiling.
- Consider extra costs like tripods or batteries.
- Think about how often you will use it.

Credit: www.youtube.com
Preparing The Work Area
Using a laser level helps keep tiles straight and even. Preparing the work area well makes the job easier.
Clear space and mark points before starting. Good lighting is important for accuracy.
Clearing And Cleaning The Surface
Remove all debris and dust from the surface. A clean surface helps the laser line stay visible.
Check for bumps or uneven spots. Fix these problems to avoid uneven tiles.
- Sweep or vacuum the area
- Wipe with a damp cloth if needed
- Fill holes and smooth rough spots
Marking Reference Points
Mark points on the wall or floor to guide your tile layout. Use the laser level to find straight lines.
Draw light pencil marks at key spots. These marks help keep tiles aligned during installation.
- Set the laser level at the starting point
- Mark where the laser line hits the surface
- Check marks are level and straight
Ensuring Proper Lighting
Good lighting helps you see the laser line clearly. Avoid bright sunlight that can wash out the laser.
Use additional lights if the area is dark. Position lights to reduce shadows on the surface.
- Turn off strong overhead lights if they cause glare
- Use portable lamps to brighten dim areas
- Wear safety glasses if needed to see the laser line
Setting Up The Laser Level
Using a laser level helps you place tiles evenly and straight. Setting it up right is key for good results.
This guide covers how to position, calibrate, and mount your laser level for tiling projects.
Positioning The Device
Place the laser level where it can cover the whole tiling area. Make sure it is stable and not in the way.
- Find a flat surface free from vibrations.
- Set the device at a height matching the tile layout.
- Check that the laser beam hits the desired starting point.
- Avoid placing it near direct sunlight or reflective surfaces.
Calibrating For Accuracy
Check your laser level’s accuracy before you begin. Calibration ensures tiles align perfectly.
| Calibration Task | What to Do |
| Check horizontal line | Place device, mark line on wall, rotate, compare marks |
| Check vertical line | Align with plumb line, adjust if needed |
| Adjust bubble levels | Use built-in bubble vials and adjust screws |
Using Tripods And Mounts
Tripods and mounts help keep your laser steady and at the right height.
- Choose a tripod with adjustable legs for uneven floors.
- Use wall mounts if space is limited or for better angle control.
- Secure the laser tightly to avoid movement during use.
- Check stability before turning on the laser.
Aligning Tiles With The Laser Line
Using a laser level helps you place tiles in a straight line. This tool makes tiling easier and more accurate.
Aligning tiles with the laser line ensures your work looks neat and professional. Follow these tips for best results.
Starting From The Right Spot
Pick a starting point that is level and visible. Use the laser line to mark where the first tile will go.
Begin tiling along the laser line to keep all tiles straight. Avoid starting in corners that are uneven.
Maintaining Consistent Spacing
Keep the same gap between tiles to create clean grout lines. Use tile spacers if needed.
Check the laser line often to make sure tiles stay aligned. Adjust spacing before the adhesive sets.
- Use spacers to keep gaps even
- Check alignment every few tiles
- Correct any shifts quickly
Adjusting For Uneven Surfaces
Uneven walls or floors can make tiles misalign. Use the laser line to spot these issues early.
Shim or level the surface before tiling. Adjust tile height slightly to match the laser line for a smooth finish.
- Check surface with laser line first
- Add shims to low spots
- Press tiles to adjust height
Common Challenges And Fixes
Using a laser level for tiling can make the job easier. Yet, some problems may arise during the project. Knowing how to fix these issues saves time and frustration.
This guide covers common challenges with laser levels in tiling. It also offers simple fixes to keep your work accurate and smooth.
Dealing With Laser Visibility Issues
Sometimes the laser line is hard to see. Bright sunlight or shiny surfaces can reduce visibility. You need clear lines to place tiles correctly.
- Use laser glasses designed to improve line visibility.
- Work in shaded areas or reduce direct light on the laser path.
- Adjust the laser brightness if your tool has this feature.
- Place a contrasting background behind the laser line.
Handling Obstacles And Corners
Walls, pipes, or corners can block the laser beam. This makes it hard to keep the line straight across all tiles.
| Obstacle | Fix |
|---|---|
| Wall corner | Use a laser with a 360-degree rotating head to cover all sides. |
| Pipes or fixtures | Place the laser on a tripod to adjust its height and angle. |
| Uneven surfaces | Use a line laser that self-levels to stay accurate. |
Correcting Misalignment
Tiles may not line up perfectly even with a laser level. Small shifts or tool setup errors cause this problem.
- Check if the laser level is placed on a steady, flat surface.
- Recalibrate the laser before starting the tile layout.
- Mark reference points on the wall to guide tile placement.
- Use a spirit level to double-check alignment in difficult spots.
- Adjust tiles slightly as you go to keep the lines straight.
Credit: medium.com
Safety Tips And Best Practices
Using a laser level can make tiling projects easier and more accurate. It helps you keep tiles straight and even.
To use a laser level safely and well, follow these tips. They protect you and keep your equipment working longer.
Protecting Your Eyes
Laser levels send out strong light beams. These beams can hurt your eyes if you look at them directly.
Always avoid staring into the laser beam. Wear safety glasses if you work near the laser for a long time.
- Do not point the laser at anyone’s face
- Use laser safety glasses for added protection
- Turn off the laser level when not in use
Maintaining The Equipment
Keep your laser level clean and dry to make it last longer. Dust and water can damage the device.
Store the laser level in its case when not in use. Check the batteries often and replace them when low.
- Wipe the laser lens gently with a soft cloth
- Do not expose the device to extreme heat or cold
- Keep the equipment in a safe place to avoid drops
- Test the laser level before starting your project
Working Efficiently
Set up your laser level on a stable surface or tripod. Make sure it is level before you start tiling.
Use the laser lines to guide your tile placement. This saves time and reduces mistakes.
- Mark your tile layout before placing tiles
- Work in small sections to keep lines clear
- Check the laser level often during the project
- Move the laser carefully to avoid losing alignment
Advanced Techniques For Precision
Using a laser level for tiling projects helps achieve straight and even lines. Advanced techniques improve accuracy and reduce errors.
These tips show how to use laser levels effectively for precise tile placement and complex layouts.
Using Multiple Laser Lines
Multiple laser lines create reference points on different surfaces. This helps keep tiles aligned on walls and floors at the same time.
Cross lines and horizontal lines guide tile placement evenly across corners and edges.
- Set the laser level to project both vertical and horizontal lines.
- Adjust the height to match the tile layout.
- Use lines on adjacent walls for corner alignment.
- Check laser lines regularly for movement or shifts.
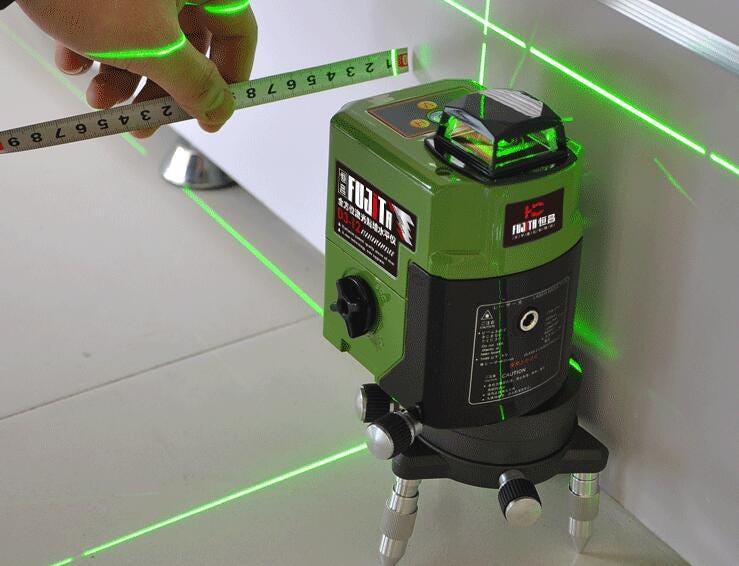
Combining With Other Tools
Use a laser level with a tape measure and a carpenter’s square. These tools help confirm measurements and angles.
Combining tools ensures tiles fit perfectly in irregular spaces and maintains straight lines.
- Measure distances with a tape for exact tile cuts.
- Use a carpenter’s square to check 90-degree angles.
- Mark tile edges with a pencil using laser lines as a guide.
Measuring Complex Layouts
Complex layouts need detailed measurements. Laser levels help map out shapes and patterns before tiling.
Use laser lines to mark curves, diagonal lines, and uneven surfaces accurately.
- Project laser lines along the layout outline.
- Mark intersections and edges clearly on the surface.
- Use a combination of straight and angled laser lines.
- Double-check measurements before cutting tiles.

Credit: huepar.com
Frequently Asked Questions
What Is The Best Way To Use A Laser Level For Tiling?
Align the laser level with your starting point to ensure straight lines. Use it to mark reference lines on walls or floors before placing tiles. This ensures precise alignment and a professional finish.
How Do I Set Up A Laser Level For Wall Tiling?
Mount the laser level at a suitable height and angle for your wall. Turn it on to project a horizontal or vertical line. Adjust until the line is perfectly level, then mark your tile layout along the laser line.
Can A Laser Level Improve Tile Spacing Accuracy?
Yes, a laser level helps maintain consistent tile spacing by projecting straight, visible lines. These guide tile placement, reducing gaps and misalignment. This improves overall tile layout and appearance.
What Safety Tips Should I Follow Using A Laser Level?
Avoid direct eye exposure to the laser beam. Use protective eyewear if needed. Set the laser level on a stable surface to prevent falls. Always turn off the device when not in use.
Conclusion
Using a laser level helps keep your tiles straight and even. It saves time and reduces mistakes. Always check the level before starting your work. Take your time to set it up properly. Small adjustments make a big difference. Remember, a steady hand and clear guide ensure a smooth finish.
Practice with the laser level to feel confident. Your tiling project will look neat and professional. Stick to these tips for the best results. Simple tools, smart work, great outcomes.
