Are you planning a construction project or a DIY task involving concrete? If so, you know that marking layout lines accurately is crucial for success.
But let’s face it—concrete isn’t the easiest surface to work with. The wrong approach can lead to wasted time, effort, and resources. That’s why we’ve put together this essential guide just for you. Imagine the satisfaction of precise lines that lead to flawless results every time.
You don’t want to miss out on these expert tips that promise to make your job easier and more efficient. Keep reading, and discover the secrets to mastering layout lines on concrete, ensuring your project is a triumph from start to finish.
Choosing The Right Tools
Marking layout lines on concrete requires precise tools. Picking the right tool helps ensure accuracy.
Each tool suits different jobs and site conditions. Understanding their uses makes marking easier.
Types Of Marking Tools
Several tools help mark concrete surfaces. Choose based on the project size and detail needed.
- Chalk lines:Snap straight lines over long distances.
- Markers and pencils:Mark small areas or details.
- Laser levels:Project level or plumb lines with high accuracy.
- Measuring tapes:Measure distances before marking.
- String and stakes:Set reference points on large sites.
Advantages Of Chalk Lines
Chalk lines create quick, visible marks on concrete. They are simple and cost-effective tools.
- Easy to snap long straight lines.
- Clear and bright marks that are easy to see.
- Chalk dust cleans off concrete easily.
- Useful for both indoor and outdoor jobs.
- Affordable and widely available.
Using Laser Levels
Laser levels offer precise line marking on concrete. They reduce guesswork and speed up layout work.
| Benefit | Explanation |
| High accuracy | Projects level and plumb lines within millimeters. |
| Hands-free operation | Can be set and left to project lines steadily. |
| Works in low light | Laser lines are bright and easy to see indoors. |
| Multiple line types | Can project horizontal, vertical, and cross lines. |
| Reduces errors | Minimizes manual measuring mistakes. |
Preparing The Concrete Surface
Marking layout lines on concrete needs a smooth and clean surface. This makes the lines clear and long-lasting. Proper preparation helps avoid mistakes and fading.
Below are key steps to prepare the concrete before marking. Each step improves the surface for better results.
Cleaning And Drying
Remove dust, dirt, and debris from the concrete. Use a broom or pressure washer. Allow the surface to dry fully before marking. Wet concrete can cause marks to blur or not stick well.
- Sweep the surface to clear loose dirt.
- Use a pressure washer for deep cleaning.
- Let the concrete air dry for several hours.
- Check for moisture by touching the surface.
Removing Existing Marks
Old marks can confuse new layout lines. Remove paint or chalk marks using these methods. Cleaning old marks ensures clear, accurate lines.
| Method | Description | Tools Needed |
| Scraping | Use a putty knife or scraper to lift marks. | Putty knife, wire brush |
| Chemical Remover | Apply remover to dissolve paint or chalk. | Paint stripper, gloves |
| Sanding | Sand the surface lightly to erase marks. | Sandpaper, power sander |
Surface Texture Considerations
The roughness of concrete affects how well marks show. Smooth surfaces hold lines better. Rough surfaces may need extra steps for clean lines.
Tips for managing surface texture:
- Fill deep pits or cracks before marking.
- Use a primer if the surface is very rough.
- Test marking tools on a small area first.
Accurate Measurement Techniques
Marking layout lines on concrete requires precise measurement. Accurate marks help avoid mistakes and save time.
Use the right tools and methods to ensure your measurements are correct from start to finish.
Using Measuring Tapes Correctly
Choose a sturdy measuring tape with clear markings. Hold the tape flat against the concrete surface to avoid slack.
- Pull the tape straight without bending.
- Read the measurement at eye level for accuracy.
- Lock the tape to keep it steady while marking.
- Measure twice to confirm the length.
Employing String Lines
String lines help create straight and level layout lines over long distances. Secure the string tightly between two points.
| Tip | Reason |
| Use a chalk line reel | For easy snapping of straight lines |
| Keep string taut | Prevents sagging and inaccurate marks |
| Align string with reference points | Ensures correct placement of layout lines |
| Check string height | Maintains level marks across the surface |
Double-checking Measurements
Always verify your measurements before marking. Small errors can cause big problems during construction.
Follow these checks to be sure:
- Measure the distance twice or more.
- Compare measurements with your plan or blueprint.
- Use different tools to cross-check lengths.
- Mark reference points clearly to avoid confusion.
Marking Methods For Different Projects
Marking layout lines on concrete helps guide the work and keep it precise. Different projects need different marking methods. Using the right method saves time and reduces mistakes.
This guide explains how to mark lines for foundations, driveways, patios, and decorative concrete. Each section covers tips and common tools used.
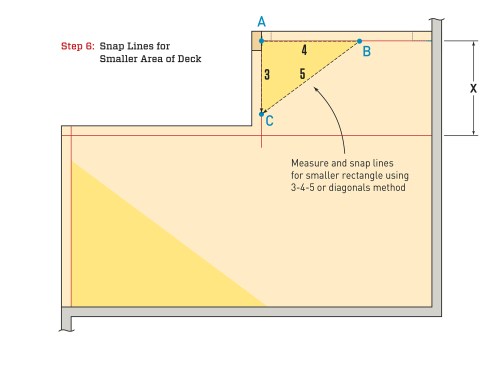
Layout Lines For Foundations
Foundation lines must be very accurate to ensure the building is level and square. Use chalk lines or string stretched tightly between stakes.
Mark corners with stakes and snap chalk lines to connect them. Use a laser level to check line height and alignment.
- Set up wooden stakes at corners
- Stretch mason’s string between stakes
- Snap chalk lines for clear marks
- Use a laser level for height checks
Marking For Driveways And Patios
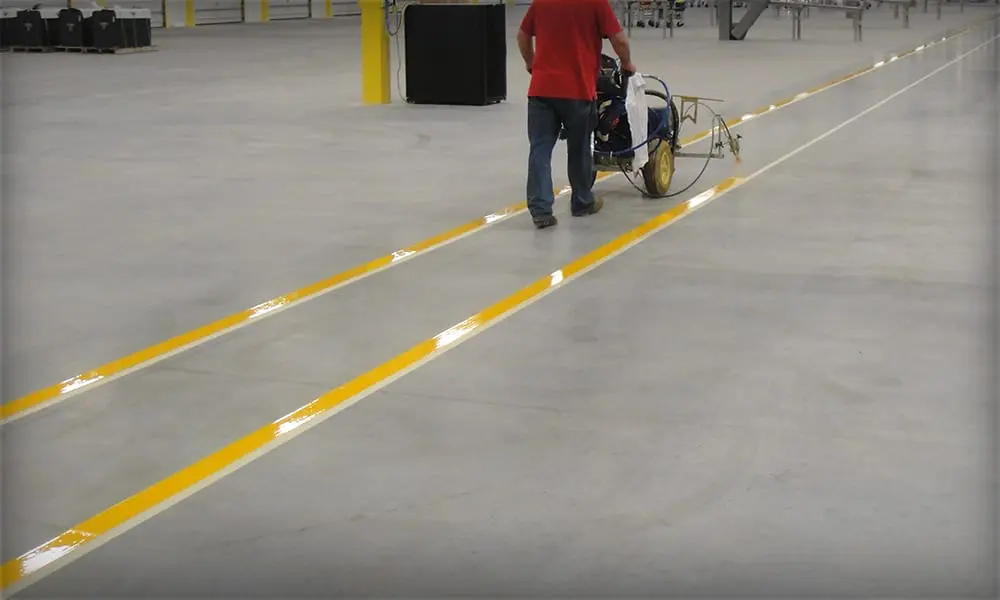
Driveways and patios usually need smooth curves or straight edges. Use flexible marking paint or string lines to show shapes.
Spray paint works well on rough surfaces. For straight edges, stretch string tight. For curves, lay down a garden hose to trace the shape.
- Use marking paint for visible lines
- Stretch string for straight edges
- Shape curves with garden hoses
- Double-check measurements before pouring
Guidelines For Decorative Concrete
Decorative concrete needs careful marking to plan patterns and textures. Use chalk or pencil on wet concrete or tape on dry surfaces.
For stamped or stained concrete, mark clear lines where patterns or colors change. Use templates or stencils for accurate shapes.
- Mark lines lightly with chalk or pencil
- Use tape to protect areas before staining
- Apply stencils for repeated patterns
- Plan layout before starting work
Maintaining Markings During Work
Marking layout lines on concrete helps guide your work. Keeping these lines visible is very important.
This guide covers how to protect and maintain your marks during the project.
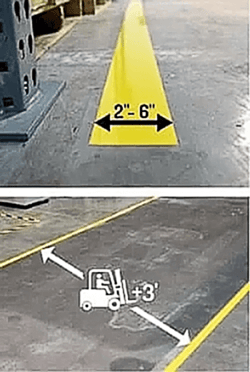
Protecting Lines From Weather
Weather can wash away or fade your markings. Rain, wind, and sun can cause this damage quickly.
To protect lines, cover them with plastic sheets or tarps. Secure covers so wind does not move them.
- Cover marks during rain or strong sun
- Avoid heavy foot traffic on marked lines
- Use waterproof marking tools for longer life
Reapplying Faded Marks
Marks can fade as work goes on. Check lines often to see if they need refreshing.
Use the same tools and colors to reapply marks. This keeps the layout clear and consistent.
- Inspect lines daily for fading or smudges
- Reapply marks with chalk, paint, or markers
- Mark over old lines carefully to avoid confusion
Using Temporary Vs Permanent Marks
Temporary marks are easy to remove and good for short jobs. Permanent marks last longer but are harder to erase.
Choose the type based on your project needs and time frame.
- Temporary marks: chalk lines, washable markers
- Permanent marks: paint, scribe lines
- Use temporary marks for quick layout checks
- Use permanent marks when layout must last through all work
Credit: www.asgservices.com
Common Mistakes To Avoid
Marking layout lines on concrete is a key step in many construction projects. Making mistakes can cause delays and extra costs.
Learn about common errors and how to avoid them. This helps ensure your lines are clear and accurate.
Overlapping Lines
Drawing lines over one another can cause confusion and mistakes. Overlapping lines make it hard to see the true layout.
- Use different colors for each set of lines.
- Erase or remove old lines before marking new ones.
- Work in sections to avoid crowding the area.
Ignoring Surface Irregularities
Concrete surfaces are not always flat or smooth. Ignoring bumps or cracks causes inaccurate lines.
| Surface Problem | Effect on Layout Lines | How to Fix |
|---|---|---|
| Cracks | Lines may skip or break | Fill cracks or mark around them |
| Bumps | Lines become uneven | Smooth surface or adjust line path |
| Stains | Lines hard to see | Clean surface before marking |
Using Inappropriate Tools
Choosing the wrong tools can ruin your layout lines. Some tools do not work well on concrete.
- Use chalk lines made for concrete surfaces.
- Avoid markers that wash away easily.
- Use a straight edge or level for accuracy.
- Consider laser guides for complex layouts.
Safety Tips While Marking
Marking layout lines on concrete needs care and attention. Safety helps avoid injuries and mistakes.
Follow safety rules to protect yourself and others on the job site. Use the right tools and gear.
Handling Tools Safely
Always hold tools firmly and use them as they are meant to be used. Avoid rushing when marking lines.
Keep tools clean and check them before use. Broken or dull tools can cause accidents.
- Inspect tools for damage before starting work
- Use tools only for marking, not for other tasks
- Store tools safely when not in use
- Keep hands away from sharp or moving parts
Protective Gear Recommendations
Wear the right protective gear to keep yourself safe while marking concrete. Gear protects you from dust and injuries.
Use gloves to protect your hands and safety glasses to guard your eyes. A dust mask helps when marking dusty surfaces.
- Wear sturdy gloves to prevent cuts and scrapes
- Use safety glasses to protect eyes from debris
- Put on a dust mask to avoid inhaling particles
- Wear closed-toe shoes with good grip
Working In Low-light Conditions
Marking lines in low light can be risky. Use extra lighting to see clearly and avoid mistakes.
Wear a headlamp or use portable work lights. Make sure your work area is safe and free from tripping hazards.
- Use bright, portable lights to illuminate the area
- Wear a headlamp for hands-free lighting
- Clear the work zone of obstacles and debris
- Take breaks if your eyes feel strained
Credit: resources.duralabel.com
Credit: www.jlconline.com
Frequently Asked Questions
How Do I Mark Straight Layout Lines On Concrete?
Use a chalk line or string for straight lines. Snap the chalk line to leave a clear mark on the concrete surface. This method is quick and ensures accuracy for your layout.
What Tools Are Best For Marking Concrete Lines?
Chalk lines, pencil markers, and concrete markers work best. Chalk lines offer clear, straight markings, while pencils and markers help with detailed lines on smooth concrete.
Can I Use Paint To Mark Layout Lines On Concrete?
Yes, spray paint designed for concrete is effective. It provides visible, durable lines but should be used carefully to avoid overspray and permanent marks.
How To Ensure Accuracy When Marking Concrete Layout Lines?
Measure twice and use a level or straight edge. Accurate measurements and leveling tools help prevent mistakes and ensure your layout is precise.
Conclusion
Marking layout lines on concrete sets the foundation for any project. Clear lines help you work faster and avoid mistakes. Use the right tools and take your time to ensure accuracy. Remember, clean and straight lines make your concrete look professional.
Practice these tips to improve your marking skills. With patience and care, you can achieve great results every time. Keep your workspace organized and double-check measurements often. Simple steps lead to strong, precise concrete work.