Are you tired of uneven wooden surfaces ruining your DIY projects? A power planer might be the perfect tool to save the day.
Imagine the satisfaction of running your hand over a perfectly smooth piece of wood, free of bumps and imperfections. In this guide, you’ll discover how to use a power planer to transform rough, uneven wood into a flawless masterpiece. Whether you’re a woodworking novice or a seasoned pro, mastering the power planer is a game-changer.
It’s time to take your woodworking skills to the next level. Read on to unlock the secrets of leveling wood like a pro and watch your projects come to life with newfound precision and beauty.
Choosing The Right Power Planer
A power planer helps you smooth and level wooden surfaces quickly. Choosing the right one depends on your project needs and skill level. This guide covers key points to consider before buying.
Knowing the types of power planers, their important features, and safety gear will improve your woodworking experience. Read on to learn more.
Types Of Power Planers
Power planers come in different styles. Picking the right type depends on the work size and detail level you want.
- Handheld Planers:Lightweight and easy to use. Best for small jobs and quick fixes.
- Benchtop Planers:Larger and more powerful. Ideal for big boards and flat surfaces.
- Thickness Planers:Used to make wood boards a uniform thickness. Good for precise work.
Key Features To Consider
Look for these features to get the best performance and comfort from your power planer.
| Feature | Why It Matters |
| Motor Power | Stronger motors handle tougher wood and larger jobs. |
| Blade Width | Wider blades cover more area, speeding up work. |
| Depth Adjustment | Allows control of how much wood is removed per pass. |
| Dust Collection | Keeps your workspace clean and reduces health risks. |
| Ergonomic Design | Comfortable grips reduce fatigue during long use. |
Safety Gear Essentials
Using safety gear protects you from accidents and injuries while planing wood.
- Wear safety goggles to protect your eyes from wood chips.
- Use hearing protection to guard against loud motor noise.
- Put on a dust mask to avoid breathing fine wood dust.
- Wear gloves for a better grip and hand protection.
- Choose close-fitting clothes to prevent catching on the tool.

Credit: www.msn.com
Preparing Wood For Planing
Preparing wood before using a power planer helps you get a smooth and even surface. This step saves time and makes your work easier.
It is important to choose the right wood, mark uneven areas, and secure the piece well. These actions help avoid mistakes and keep you safe.
Selecting The Wood
Pick wood that fits your project size and type. Avoid wood with large knots or cracks, as they can cause problems while planing.
Make sure the wood is dry and not warped. Wet wood can clog the planer and warped wood is hard to level properly.
- Choose straight and dry wood pieces
- Avoid wood with big knots or cracks
- Pick wood size that fits your planer and project
Marking High And Low Spots
Look closely at the wood surface to find uneven spots. Mark these areas with a pencil or chalk to guide your planing.
Marking helps you focus on the high spots to remove. It also shows low spots that need less or no planing.
- Use a pencil or chalk for clear marks
- Mark both high and low spots clearly
- Check marks before starting the planer
Securing The Workpiece
Fix the wood firmly on your workbench. This stops movement and keeps the wood steady while planing.
Use clamps or a vise to hold the wood. A secure workpiece helps you plane safely and accurately.
- Place the wood on a stable surface
- Use clamps or a vise to hold it tightly
- Check stability before turning on the planer
Setting Up The Power Planer
Setting up your power planer correctly makes it easier to level wood smoothly. This guide covers key steps to prepare your tool.
Careful adjustments and checks help avoid mistakes and improve the finish quality of your work.
Adjusting Cutting Depth
Set the cutting depth based on how much wood you want to remove. Start with a shallow cut to avoid damage.
- Turn off and unplug the planer before adjusting.
- Locate the depth adjustment knob or lever.
- Rotate or move it to set the desired depth.
- Test the setting on scrap wood.
- Adjust as needed for smooth, even cuts.
Checking The Blades
Sharp blades are essential for clean cuts. Dull or damaged blades cause rough surfaces and strain the motor.
| Blade Condition | Action Needed |
| Sharp and clean | Ready to use |
| Dull or nicked | Sharpen or replace |
| Rusty or dirty | Clean thoroughly |
| Loose blade | Tighten securely |
Power And Speed Settings
Adjust power and speed to match the wood type and project needs. Higher speed works for soft wood; slow speed suits hardwood.
Use the controls on your planer to:
- Set the speed dial according to wood hardness
- Check the power switch is functioning smoothly
- Ensure the cord is not damaged or tangled
Planing Techniques For Leveling
Using a power planer helps make wood surfaces smooth and even. Learning the right techniques ensures good results and safety.
This guide explains how to use a power planer properly for leveling wood.
Starting The Planer Correctly
Place the planer flat on the wood before turning it on. This prevents uneven cuts and damage to the wood.
Start the planer only when it is fully on the wood surface. This helps keep the cut smooth from the beginning.
- Check the blades are sharp and secure
- Hold the planer firmly with both hands
- Place the front of the planer flat on the wood
- Turn on the planer once it is stable
Maintaining Consistent Pressure
Apply steady pressure on the planer as you move it. Too much force can cause gouges or uneven surfaces.
Let the planer’s weight do most of the work. Press down just enough to keep the blades in contact with the wood.
- Keep your grip firm but relaxed
- Press evenly across the planer base
- Avoid pushing too hard or too light
- Adjust pressure based on wood hardness
Moving The Planer Smoothly
Move the planer forward in a straight line. Smooth movement helps create an even surface without marks.
Keep a steady speed. Going too fast or too slow can cause uneven planing or damage.
- Start each pass at the wood edge
- Keep the planer flat and level
- Use long, steady strokes
- Overlap passes slightly for full coverage
Troubleshooting Common Issues
Using a power planer can make wood leveling faster and easier. Sometimes, problems happen during the work. Knowing how to fix these issues helps you get smooth results.
This guide covers common issues like tear-out, uneven surfaces, and blade dullness. Follow these tips to keep your wood projects looking great.
Dealing With Tear-out
Tear-out happens when the planer lifts and tears the wood fibers. This creates rough patches and damages the surface.
To reduce tear-out, always plane with the grain of the wood. Avoid planing across the grain because it pulls fibers up.
- Use sharp blades to make clean cuts
- Set a shallow depth of cut to remove less wood at once
- Slow down the feed speed for smoother passes
- Check the wood for knots or defects before planing
Uneven Surfaces
Uneven surfaces happen when the planer does not cut the wood evenly. This can leave high and low spots on the wood.
Make sure the wood is flat and stable before planing. Hold the planer steady and move it at a consistent speed.
- Check the planer’s base plate for damage or dirt
- Use a straight edge to check the wood’s flatness after planing
- Make several light passes instead of one deep cut
- Support long boards well to prevent bending
Blade Dullness
Dull blades do not cut wood properly. They cause rough surfaces and strain the planer’s motor.
Replace or sharpen blades regularly to keep the planer working well. Check blades for chips or damage before use.
- Remove blades carefully following safety instructions
- Use a sharpening tool or service for best results
- Keep spare blades on hand for quick swaps
- Clean blades after each use to prevent buildup
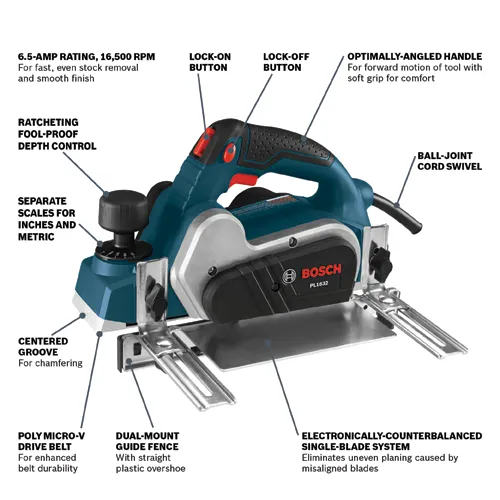
Credit: www.boschtools.com
Finishing Touches
After using a power planer, the wood surface needs extra care. Finishing touches help make the wood smooth and even. This ensures your project looks clean and professional.
These steps include sanding, checking for levelness, and cleaning the tool and workspace. Each step is important for the best final result.
Sanding For Smoothness
Sanding removes small bumps and marks left by the planer. It creates a smooth surface ready for finishing or painting.
- Use fine-grit sandpaper for best results
- Sand along the grain of the wood
- Apply even pressure to avoid uneven spots
- Clean dust between sanding passes
Checking For Levelness
Make sure the wood is flat and level after planing and sanding. This helps your project fit together properly and look neat.
| Tool | Purpose | How to Use |
| Spirit Level | Check flatness | Place on wood surface and look for bubbles |
| Straightedge | Find high or low spots | Lay across wood and check for gaps |
| Feeler Gauge | Measure gaps | Slide between straightedge and wood to find uneven areas |
Cleaning And Maintenance
Clean your power planer and work area after finishing. This keeps the tool ready for the next job and improves safety.
- Remove wood chips and dust from the planer
- Check blades for sharpness and replace if dull
- Wipe the tool with a dry cloth
- Store in a dry place to prevent rust

Credit: www.findbuytool.com
Frequently Asked Questions
What Is A Power Planer Used For In Woodworking?
A power planer smooths and levels wood surfaces quickly. It removes thin layers of wood to create an even finish. It’s ideal for flattening rough boards and adjusting thickness. This tool saves time and effort compared to manual planing.
How Do You Safely Operate A Power Planer?
Always wear safety goggles and ear protection before use. Secure the wood piece firmly to prevent movement. Hold the planer with both hands and move it steadily along the grain. Avoid forcing the tool to prevent kickback and ensure smooth cuts.
Can A Power Planer Fix Uneven Wood Surfaces?
Yes, a power planer efficiently levels uneven wood surfaces. It shaves off high spots to create a flat, smooth finish. Multiple light passes produce the best results, reducing the risk of gouges. It’s perfect for preparing wood for further finishing.
What Type Of Wood Is Best For Power Planing?
Softwoods like pine and cedar are easier to plane. Hardwoods such as oak and maple require more effort and sharper blades. Avoid planing wood with nails or screws to prevent blade damage. Always inspect wood for defects before planing.
Conclusion
Using a power planer makes wood leveling easier and faster. Always keep the tool steady and move it smoothly. Check your progress often to avoid removing too much wood. Practice on scrap pieces before working on your project. Safety matters—wear goggles and keep hands away from blades.
With care and patience, you will get a smooth, even surface every time. Give yourself time to learn, and enjoy the process of shaping wood. This tool helps create professional-looking results with simple steps.