Imagine having a tool in your toolbox that can instantly boost your DIY skills and precision. That’s exactly what a speed square does for you.
This simple yet versatile tool can transform your woodworking, carpentry, or any construction project by ensuring your measurements are spot-on. But maybe you’re not quite sure how to unlock its full potential yet. Don’t worry, you’re not alone. Many people overlook the power of a speed square because they aren’t familiar with its capabilities.
In this guide, you’ll discover how to use a speed square effectively, making your projects more accurate and professional-looking. Ready to take your craftsmanship to the next level? Let’s dive in and explore how this tool can become your best ally in achieving perfect measurements every time.
Credit: creators.yahoo.com
Speed Square Basics
The speed square is a simple tool used in carpentry and construction. It helps measure angles and mark straight lines quickly.
This guide explains the main features of a speed square and its common uses for accurate measurements.
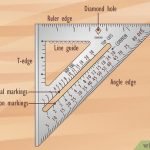
Design And Features
A speed square looks like a small triangular ruler. It usually has a flat base and a right angle. The tool is made from metal or plastic for durability.
- The base is called the “lip” or “fence” and rests against the edge of the material.
- One side has degree markings for measuring angles.
- It includes common angle marks like 45 and 90 degrees.
- There are also scales for inches or centimeters to measure length.
- Some have notches to help draw parallel lines.
Common Uses
Speed squares help carpenters and builders make quick and accurate marks. This tool is useful for many tasks on the job site.
| Use | Description |
| Marking 90-degree angles | Place the lip on the edge and draw a square line. |
| Finding 45-degree angles | Align the tool to mark common angled cuts. |
| Measuring angles | Use the degree scale to check or mark other angles. |
| Drawing straight lines | Use the edge as a straight ruler. |
| Marking rafters | Use special scales for roof framing measurements. |
Measuring With A Speed Square
A speed square is a simple tool that helps you measure and mark wood or other materials. It is useful for carpentry and DIY projects.
You can use a speed square to draw straight lines, measure angles, and check if corners are square. Learning to use it well makes your work more accurate.
Marking Straight Lines
Place the speed square’s right angle against the edge of the material. Hold it firmly to keep it from moving.
Use the ruler edge of the speed square to draw a straight line across the surface. This helps you cut or measure evenly.
- Align the square’s lip with the edge of the wood
- Hold the square steady with one hand
- Draw a line along the straight edge
Measuring Angles
Speed squares have angle markings from 0 to 90 degrees. You can use these marks to measure and mark angles easily.
Place the square’s pivot point at the corner of your material. Rotate the square until the desired angle lines up with the edge.
- Find the angle scale on the speed square
- Set the pivot point on the corner
- Turn the square to match the needed angle
- Mark along the straight edge for the angle line
Checking For Square
To check if two edges meet at a right angle, place the speed square’s inside corner against them. The tool helps find perfect 90-degree corners.
If the edges match the speed square’s sides without gaps, the corner is square. This step is key for accurate building and fitting parts.
- Place the square’s inside corner on the joint
- Check if both edges touch the square fully
- Look for any gaps between the tool and the material
- Adjust the materials if the corner is not square
Advanced Techniques
The speed square is a versatile tool beyond basic measurements. Learning advanced techniques lets you work faster and more accurately. Use these methods to improve your woodworking and construction projects.
Below are key techniques for using the speed square’s unique features. These include using notches for repeated marks, scribing lines, and using the protractor functions for angle measurements.
Using The Notches For Repetitive Marks
The speed square has several notches along one edge. These notches help you make quick and consistent marks on your material. They work well for tasks like marking stud spacing or repeated cuts.
- Place the square’s lip against the edge of the board.
- Insert a pencil tip into the desired notch.
- Slide the square along the board’s edge, keeping the lip tight.
- Make a mark at each notch location.
- Repeat to get evenly spaced marks without measuring each time.
Scribing Lines
Scribing lines means drawing a clear, straight line parallel to an edge. The speed square helps you do this quickly and precisely. Use the flat edge and the notches to guide your pencil or marking tool.
Follow these tips for clean scribing lines:
- Hold the square’s lip firmly on the board edge.
- Place a pencil or marking knife in the notch for the line spacing you want.
- Draw the line by sliding the square along the board’s edge.
- Use a sharp marking knife for thin, precise scribe lines.
- Double-check the line’s straightness before cutting or assembling.
Protractor Functions
The speed square also works as a simple protractor. It lets you mark and check angles easily. Use the pivot point at the square’s corner and the degree markings along the hypotenuse.
| Angle | Use |
| 45° | Common for roof rafters and miter cuts |
| 30° | Marking bevel cuts for trim or molding |
| 60° | Used for certain framing angles and chamfers |
| 90° | Check squareness of corners and edges |
Tips For Accuracy
Using a speed square correctly helps you get precise measurements. Accuracy is key for clean cuts and proper angles.
This guide shares simple tips to improve your measurement skills with a speed square.
Proper Positioning
Hold the speed square firmly against the edge of your workpiece. The flat side should rest flush on the material.
- Place the pivot point at the edge for angle measurements.
- Keep your hand steady to avoid slipping.
- Check that the square sits flat without gaps.
- Align the measurement marks clearly with your cut line.
Avoiding Common Mistakes
Errors often come from rushing or poor tool setup. Watch out for these common issues.
| Common Mistake | How to Fix |
| Not holding the square tight | Use both hands to keep it steady |
| Reading the wrong scale | Double-check the markings for inches or degrees |
| Measuring on a warped surface | Choose a flat spot or clamp the material |
| Using a damaged square | Inspect for dents or worn edges before use |
Maintaining The Tool
Keep your speed square in good shape to ensure ongoing accuracy.
- Clean the square after each use to remove dust and debris.
- Store it in a dry place to avoid rust and corrosion.
- Check for any damage before starting your work.
- Sharpen the edges if they become dull or rounded.
Applications In Carpentry
The speed square is a simple tool that helps carpenters measure and mark angles quickly. It saves time and improves accuracy on the job site.
Carpenters use the speed square in many ways, especially for framing, roofing, and building stairs. This guide explains its main uses in these tasks.
Framing And Layout
Speed squares help mark straight lines and square corners on wood. They are perfect for framing walls and laying out studs.
- Place the square against the edge of the board to mark a 90-degree line.
- Use the angle markings to mark common roof pitches.
- Mark cut lines quickly for studs and joists.
- Check if corners are square during assembly.
Roofing Angles
The speed square helps measure and mark angles for roof rafters. It simplifies cutting precise angles for better roof fit.
| Angle Type | Use of Speed Square |
| Common Rafter | Mark the plumb cut and seat cut angles |
| Hip Rafter | Use the square to find the correct bevel angle |
| Valley Rafter | Measure and mark the opposite angle of hip rafters |
Stair Construction
Speed squares help measure stair stringers and ensure accurate rise and run angles. They speed up marking steps for cutting.
- Measure the rise and run for each step using the square’s markings.
- Mark the stringer board with rise and run lines.
- Check angles to keep stairs level and safe.
- Use the square to transfer measurements from stringers to treads and risers.

Credit: www.wikihow.com

Credit: www.wikihow.com
Frequently Asked Questions
What Is A Speed Square Used For In Carpentry?
A speed square helps mark angles, measure, and guide cuts quickly. It’s essential for accurate framing and roofing tasks. This tool simplifies layout work, improving precision and efficiency on the job site.
How Do You Measure Angles With A Speed Square?
Place the pivot point on the material’s edge. Rotate the square until the desired angle aligns with the edge. Use the degree markings to get precise angle measurements for cuts or layouts.
Can A Speed Square Replace A Protractor?
Yes, a speed square can replace a protractor for most woodworking angles. It offers quick angle measurements and marking, making it practical for carpentry but less suitable for complex geometric tasks.
How Do I Use A Speed Square For Marking Cut Lines?
Hold the speed square firmly against the material’s edge. Use the straight edge to draw a precise cut line. This ensures accurate, clean cuts for your project components.
Conclusion
Using a speed square makes measuring easier and more precise. It helps you mark straight lines and angles quickly. Practice with your speed square to build confidence. Small mistakes become less likely with careful use. Keep your tool clean and store it properly.
Accurate measurements save time and materials. Trust your speed square for many projects ahead. Simple steps lead to better results every time.