Are you frustrated with poor TV or internet signals? The culprit might be a faulty coaxial cable connection.
Learning how to crimp coaxial cable connectors can save you from signal headaches and costly technician visits. Imagine the satisfaction of fixing the issue yourself with just a few simple tools. In this guide, you’ll discover the step-by-step process to ensure a secure and reliable connection.
You’ll find out how to enhance your signal quality and enjoy uninterrupted viewing or browsing experiences. Don’t let a simple cable problem disrupt your entertainment or work. Dive in and empower yourself with the skills to master your coaxial cable connections.
Tools And Materials Needed
Crimping coaxial cable connectors requires the right tools and materials. Using proper equipment helps ensure a strong connection.
This guide covers the types of cables, connectors, and essential tools you need for crimping.
Types Of Coaxial Cables
Coaxial cables come in different sizes and types. Each type serves different purposes in TV and internet setups.
- RG6: Common for home TV and internet.
- RG59: Used for older or short-distance setups.
- RG11: Thicker cable for long-distance signals.
Choosing The Right Connectors
Choose connectors that match your cable type and use. Connectors must fit tightly to avoid signal loss.
- F-Type connectors: Most common for RG6 and RG59.
- BNC connectors: Used in professional video setups.
- N-Type connectors: For outdoor or heavy-duty use.
Essential Crimping Tools
Good crimping tools make the job easier and the connection stronger. Use tools designed for coaxial cables.
- Coaxial cable stripper: Strips outer layers cleanly.
- Coaxial cable cutter: Cuts cables without crushing.
- Crimping tool: Compresses the connector firmly.
- Compression tool (optional): For compression-type connectors.

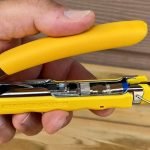
Credit: tyclon.com
Preparing The Cable
Preparing the coaxial cable correctly is important for a good connection. Follow careful steps to get the cable ready for the connector.
Start by measuring and cutting the cable. Then strip the outer jacket carefully. Finally, expose the inner conductor for the connector.
Measuring And Cutting The Cable
Measure the length of cable you need for your project. Use a tape measure or ruler for accuracy.
Cut the cable straight using a sharp cable cutter. Avoid crushing or bending the cable.
- Measure twice to avoid mistakes
- Use the right cutter for clean cuts
- Cut in a well-lit area
Stripping The Outer Jacket
Remove the outer jacket of the coaxial cable to expose the shielding. Use a coax cable stripper tool for best results.
Set the stripper to the cable size. Rotate it around the cable to cut the jacket without damaging inner parts.
- Do not cut too deep
- Remove only the jacket length needed
- Keep the shielding intact
Exposing The Inner Conductor
After removing the outer jacket, fold back the shielding wires carefully. This keeps them out of the way.
Use a wire stripper to remove the insulation around the inner conductor. Expose enough wire for the connector.
- Handle the inner conductor gently
- Expose the right length for the connector
- Keep the conductor clean and straight
Attaching The Connector
Attaching a coaxial cable connector is a key part of making a good connection. It helps the cable send signals without problems.
You must follow the right steps to attach the connector securely and safely. This guide explains the process clearly.
Sliding On The Connector Parts
Start by sliding the connector parts onto the cable. This usually means placing the crimp ring and connector body on the cable.
Make sure each part is in the right order before you prepare the cable end. This helps avoid mistakes later.
- Slide the crimp ring onto the cable first
- Next, slide the connector body
- Keep parts aligned and ready for the next step
Positioning The Cable Correctly
Strip the cable end carefully to expose the inner conductor and shielding. Position the cable so the conductor fits inside the connector.
The cable must be straight and fully inserted. Check that the shielding touches the connector’s metal parts for a good connection.
- Strip the cable to the right length
- Insert the inner conductor fully into the connector
- Make sure the shielding is under the connector’s metal sleeve
Ensuring Proper Contact
Check that the inner conductor is tight inside the connector pin. The shielding should also have good contact with the connector body.
Use a crimp tool to press the crimp ring firmly. This holds the cable and connector parts together for a strong signal path.
- Verify the conductor is secure and does not move
- Crimp the ring tightly around the cable shielding
- Inspect the connection for any loose parts
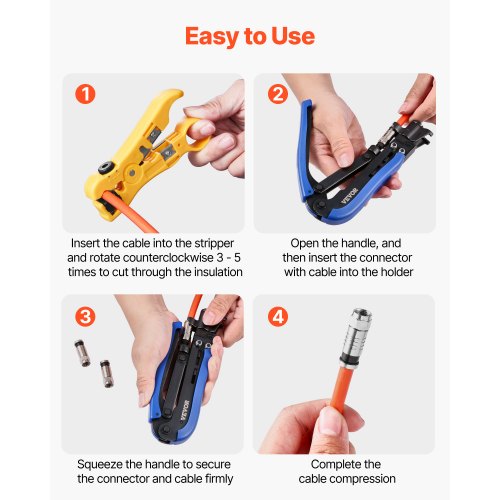
Using The Crimping Tool
Crimping coaxial cable connectors ensures a strong, reliable connection. Using the right crimping tool helps secure the connector to the cable.
This guide explains how to set up the tool, crimp the connector, and check the quality of the crimp.
Setting Up The Crimp Tool
Start by choosing the correct die size for your connector and cable. Adjust the tool to fit the connector securely before crimping.
- Identify the connector type and size
- Select the matching die on the crimp tool
- Adjust the tool’s tension if available
- Clean the tool to remove dirt or debris
- Test the tool on a spare connector if possible
Crimping The Connector Securely
Place the connector into the crimping tool jaws. Align it carefully so the tool crimps the right part of the connector.
Squeeze the handles firmly and evenly. Hold the pressure for a few seconds. Release the tool and remove the crimped connector.
Checking The Crimp Quality
| Check Point | What to Look For | Action if Faulty |
| Connector Fit | Connector should not move on the cable | Re-crimp with correct die size |
| Cable Core Exposure | Core wire must be fully inside connector | Trim cable and reattach connector |
| Crimp Shape | Even and firm crimp without cracks | Adjust tool tension and crimp again |
| Signal Test | Check signal strength if possible | Replace connector if signal is weak |
Testing The Connection
After crimping coaxial cable connectors, testing the connection is important. This ensures the signal will travel properly.
Testing helps find any issues early. It saves time and prevents signal loss later.
Visual Inspection
Look closely at the crimped connector. Check if the connector is tight and straight on the cable.
Make sure the cable’s center conductor is not bent or cut. The shield should be evenly spread inside the connector.
- Connector fits snugly on the cable
- No loose strands of wire
- Center pin is straight and extends slightly
- No cracks or damage on the connector
Using A Cable Tester
Use a cable tester to check if the connection works well. It measures signal strength and continuity.
Connect the tester to both ends of the cable. The tester shows if wires are connected correctly or broken.
- Attach tester leads to cable ends
- Turn on the tester and read results
- Look for any open or short circuits
- Check signal strength if tester shows it
Troubleshooting Common Issues
If the test fails, check the connector again. Loose crimps or damaged cables cause problems.
Try these fixes to improve the connection:
- Re-crimp the connector tightly
- Trim damaged cable ends before attaching
- Make sure the center conductor is clean
- Use the right crimping tool size

Credit: mgs4u.com
Tips For Durable Connections
Crimping coaxial cable connectors correctly helps ensure a strong and lasting connection. Small mistakes can cause signal loss or damage the cable. Follow simple tips to make connections that last.
This guide covers ways to avoid cable damage, keep connectors working well, and maintain your setup for long-term use.
Avoiding Cable Damage
Protecting the cable from harm during installation is key. Bending or cutting the cable too much can break the wires inside.
- Use a proper cable stripper to avoid cutting the inner conductor.
- Do not bend the cable at sharp angles; keep bends gentle.
- Avoid pulling the cable hard to prevent internal damage.
- Keep the cable clean and free from dirt before crimping.
- Check the cable for cracks or splits before attaching connectors.
Maintaining Connector Integrity
Connector strength depends on how well you attach it. Proper tools and care help connectors stay tight and secure.
| Connector Part | Tip for Durability |
| Outer Shield | Fold evenly over cable jacket for strong hold |
| Center Conductor | Trim straight and insert fully into connector pin |
| Crimp Tool | Use a correct-size tool for firm, even pressure |
| Connector Housing | Ensure no gaps or loose areas after crimping |
Best Practices For Long-term Use
Keep your connections working well over time by following these simple habits.
- Inspect connectors regularly for corrosion or wear.
- Use weatherproof covers if cables are outdoors.
- Do not twist or pull cables after installation.
- Store extra cable and connectors in dry places.
- Replace damaged parts promptly to avoid signal issues.
Credit: www.vevor.com
Frequently Asked Questions
What Tools Are Needed To Crimp Coaxial Cable Connectors?
You need a coaxial cable stripper, crimping tool, and connectors. These tools ensure clean cuts and secure connections. Proper tools prevent signal loss and damage. Always use quality tools for best results.
How Do I Prepare The Coaxial Cable Before Crimping?
Strip about half an inch of the cable jacket carefully. Expose the shield and center conductor without damaging them. Fold back the shield braid neatly. Proper prep ensures a strong, reliable connection.
What Is The Correct Crimping Technique For Coax Connectors?
Place the connector on the prepared cable end firmly. Insert the connector into the crimping tool’s correct slot. Apply steady pressure until the connector is secure. Avoid over-crimping to prevent damage.
How To Test The Connection After Crimping Coaxial Cables?
Use a cable tester or continuity tester to check signal flow. Ensure there are no shorts or breaks in the connection. Testing confirms the cable will perform well without signal issues.
Conclusion
Crimping coaxial cable connectors is easier than it seems. Follow each step carefully for a strong connection. Use the right tools to avoid damage. Check the fit to ensure good signal quality. Practice makes the process faster and cleaner. Proper crimping helps your devices work better.
Keep your workspace neat and organized. Stay safe by handling tools with care. Now, you can confidently crimp your coaxial cables at home. Simple steps lead to reliable results every time.