Is your toolbox a chaotic mess where finding the right drill bit feels like a treasure hunt? You’re not alone.
Organizing drill bits might seem like a mundane task, but it can save you precious time and frustration in the long run. Imagine reaching for the perfect drill bit in seconds, without rummaging through a cluttered box. In this guide, you’ll discover practical, easy-to-implement strategies to keep your drill bits neatly arranged.
Say goodbye to chaos and hello to efficiency! Ready to transform your toolbox and make your DIY projects smoother and more enjoyable? Let’s dive into the secrets of organizing drill bits effectively.

Credit: www.velcro.com
Choosing The Right Toolbox
Organizing drill bits makes your work faster and safer. Picking the right toolbox helps keep bits tidy and easy to find.
Toolboxes come in many sizes and styles. Knowing what to look for saves time and frustration.
Size And Compartments
Choose a toolbox that fits your drill bits and tools. Too small means crowded bits; too big wastes space.
Compartments keep drill bits separated by size or type. This helps you find the right bit fast.
- Look for adjustable compartments to fit different bit sizes
- Separate sections prevent bits from mixing and getting lost
- Clear lids or trays help you see bits without opening everything
Material And Durability
Toolboxes need to protect your drill bits from damage and rust. Strong materials last longer and keep bits safe.
Plastic cases are light and resist rust. Metal boxes are tougher but may weigh more.
- Choose hard plastic for lightweight and rust resistance
- Metal boxes offer better impact protection
- Look for waterproof or water-resistant options
Portability Features
Carrying your drill bits is easier with a toolbox designed for transport. Look for handles and secure closures.
Good portability means you can take your bits anywhere without losing or damaging them.
- Strong handles make carrying easier
- Locks or latches keep the box closed during travel
- Compact size fits in bags or tool carts

Credit: www.amazon.com
Types Of Drill Bit Holders
Organizing drill bits keeps your toolbox neat and helps find bits quickly. Different holders suit various needs and toolbox styles.
Here are common types of drill bit holders that can help you store bits safely and in order.
Magnetic Strips
Magnetic strips hold drill bits firmly using magnets. You can attach them inside or outside your toolbox.
They allow easy access and quick bit changes. Keep bits visible and reduce clutter on your workbench.
Plastic Cases
Plastic cases come with slots molded to fit different drill bit sizes. They keep bits separated and protected.
- Often labeled for bit size identification
- Stackable for space saving
- Portable and easy to carry
Foam Inserts
Foam inserts fit inside your toolbox drawer. They have cutouts to hold each bit tightly in place.
| Type | Benefits | Best Use |
| Open-cell foam | Soft, holds bits gently | Light use, easy access |
| Closed-cell foam | Durable, water-resistant | Heavy use, wet environments |
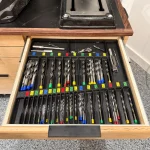
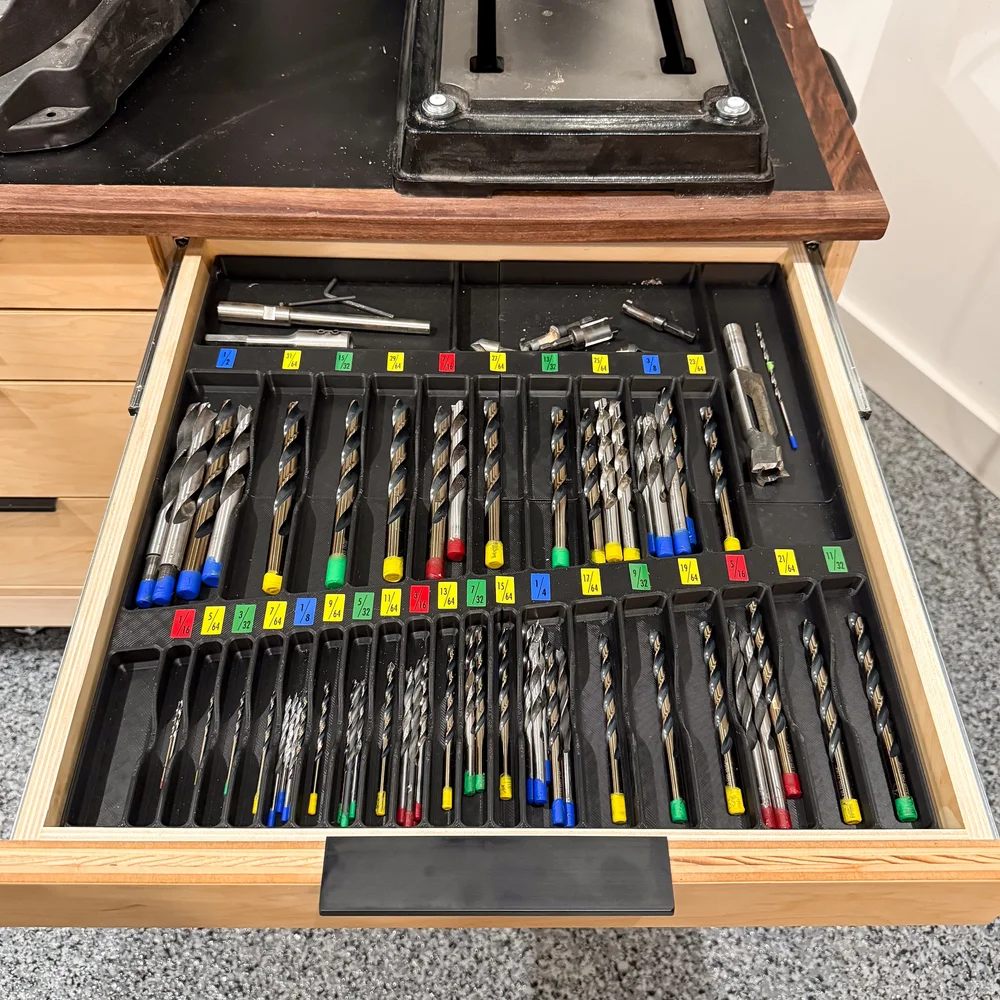
Custom 3d-printed Organizers
3D-printed organizers can be designed to fit your exact drill bit collection. They use precise slots and labels.
- Custom size and shape
- Easy to replace or add parts
- Can include labels or icons
- Made from durable plastic
Sorting Drill Bits Efficiently
Organizing drill bits helps you find the right one fast. It saves time and keeps your workspace neat.
Sorting by clear categories makes your toolbox easy to use. It also protects drill bits from damage.
By Size And Diameter
Sort drill bits by their size and diameter for quick selection. Group small, medium, and large bits separately.
Use a drill bit case or tray with size markings to keep them in order. This stops bits from mixing up.
- Arrange bits from smallest to largest
- Keep metric and imperial sizes separate
- Use foam inserts or dividers for each size
By Type And Purpose
Drill bits come in different types for wood, metal, or masonry. Sort them by their material use to avoid mistakes.
Group bits like twist, spade, or brad point together. This helps you pick the right bit for your task quickly.
- Separate wood, metal, and concrete bits
- Keep specialty bits in their own section
- Label groups by their purpose
Labeling Techniques
Labeling helps you identify drill bits without checking each one. Use clear, simple labels for sizes and types.
Use stickers, tags, or permanent markers to mark storage spots. Consistent labels keep your system organized over time.
- Use size numbers or letters on labels
- Color-code labels by drill bit type
- Place labels on cases, trays, or holders
Space-saving Placement Strategies
Organizing drill bits properly helps save space and find tools fast. Using smart placement methods keeps your toolbox neat.
This guide covers three ways to save space: vertical vs horizontal storage, using lid space, and stacking and nesting.
Vertical Vs Horizontal Storage
Vertical storage means placing drill bits upright, like in a block or holder. Horizontal storage lays bits flat in rows inside the toolbox.
- Vertical storage saves floor space and shows sizes easily.
- Horizontal storage fits more bits in a single layer.
- Vertical holders keep bits dry and reduce damage risk.
- Horizontal trays allow quick access to many bits at once.
Using Lid Space
The inside of a toolbox lid is often empty space. Use it for storing drill bits in holders or magnetic strips.
| Method | Advantages |
| Magnetic Strip | Holds bits firmly and saves space |
| Custom Holders | Organizes bits by size and type |
| Elastic Bands | Flexible and easy to adjust |
Stacking And Nesting
Stack small boxes or use nesting trays to pack drill bits tightly. This method uses vertical space inside the toolbox.
Tips for stacking and nesting:
- Use clear boxes to see bits inside.
- Group bits by size before stacking.
- Place heavier boxes at the bottom for stability.
- Use foam inserts to keep bits from moving.
Maintenance Tips For Drill Bits
Keeping drill bits in good shape makes your work easier and faster. Proper maintenance helps bits last longer and perform well.
This guide covers cleaning, rust prevention, and inspection of drill bits. Follow these simple tips to care for your tools.
Cleaning And Drying
After use, clean drill bits to remove dust and debris. Use a soft brush or cloth to wipe them clean.
- Use warm soapy water for tough dirt
- Dry bits completely with a cloth or air dry
- Do not leave bits wet to avoid damage
Rust Prevention
Rust weakens drill bits and lowers their quality. Protect bits by storing them properly and applying light oil.
| Rust Prevention Tip | How to Do It |
| Keep bits dry | Store in a dry place with silica gel |
| Apply oil | Use machine oil or WD-40 lightly on bits |
| Use rust inhibitors | Place rust inhibitor strips in toolbox |
Regular Inspection
Check drill bits often for signs of wear or damage. Replace or sharpen bits as needed to keep them effective.
- Look for dull or chipped edges
- Check the shank for bends or cracks
- Test bits on scrap material before big jobs
Diy Organizer Ideas
Keeping drill bits neat in a toolbox makes work easier. A good organizer saves time and protects your tools.
Try simple DIY ideas using things around your home or create custom solutions. Magnetic options also work well.
Repurposing Household Items
You can use many household items to organize drill bits. Look for items that hold small parts safely.
- Empty pill boxes keep bits separated by size
- Ice cube trays hold bits upright and visible
- Old jars or tins store bits with lids for protection
- Plastic egg cartons keep bits in individual slots
- Small tackle boxes from fishing gear work well too
Building Custom Inserts
Make custom inserts to fit your toolbox perfectly. Use wood, foam, or plastic to create compartments.
| Material | Benefits | Tools Needed |
| Wood | Durable and sturdy | Saw, drill, sandpaper |
| Foam | Lightweight and soft | Knife, marker, ruler |
| Plastic | Water-resistant | Scissors, glue |
Using Magnetic Paint Or Tape
Magnetic paint or tape can hold drill bits in place. Paint a section inside your toolbox or add strips where needed.
- Apply magnetic paint in thin layers and let dry fully
- Stick magnetic tape strips to toolbox walls or lids
- Use small magnets to hold metal drill bits securely
- Label each area for quick drill bit selection
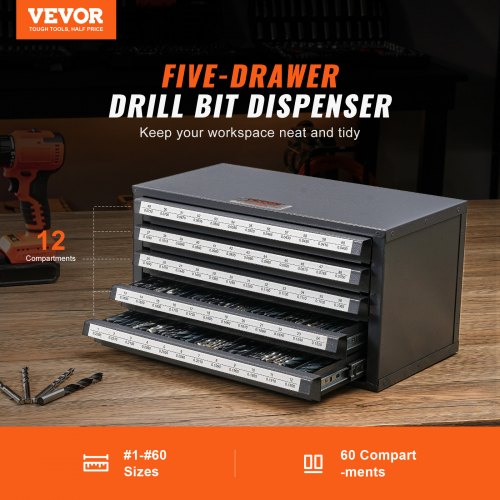
Credit: www.vevor.ca
Frequently Asked Questions
How Do I Organize Drill Bits By Size?
Sort drill bits from smallest to largest for quick access. Use labeled compartments or foam inserts to keep sizes separate and easy to find.
What Is The Best Storage For Drill Bits?
Use a sturdy toolbox with adjustable compartments or a dedicated drill bit case. This prevents damage and keeps bits organized and accessible.
How Can I Prevent Drill Bits From Rusting?
Store drill bits in a dry place and apply a light coat of oil. Use silica gel packs to absorb moisture inside the toolbox.
Should Drill Bits Be Stored With Other Tools?
It’s best to store drill bits separately to avoid damage. Use a dedicated organizer inside your toolbox for better protection and easy retrieval.
Conclusion
Organizing drill bits saves time and keeps your toolbox neat. Easy access helps you work faster and stay focused. Separate bits by size and type for quick finding. Use small containers or holders to avoid mix-ups. Regularly check and clean your bits for longer use.
Keep your workspace tidy and tools ready anytime. Simple steps lead to better work and less stress. Start organizing today and enjoy the difference it makes.