Are you ready to take your woodworking projects to the next level? Whether you’re a seasoned woodworker or just starting out, precision is key.
And when it comes to achieving precision, knowing how to measure angles accurately can make all the difference. Imagine effortlessly fitting pieces together with perfect alignment, creating seamless joints, and crafting stunning designs that stand out. In this guide, you’ll discover simple and effective techniques to measure angles like a pro.
Say goodbye to frustration and hello to flawless results. Ready to enhance your skills and transform your projects? Let’s dive in and unlock the secrets to mastering angle measurements in woodworking.

Credit: www.wikihow.com
Tools For Measuring Angles
Measuring angles accurately is important in woodworking. Using the right tool helps you cut and fit pieces perfectly. Different tools suit different tasks and skill levels.
Here are some common tools used to measure angles in woodworking projects. Each tool has its strengths and ideal uses.
Protractors And Angle Finders
Protractors are simple tools that measure angles in degrees. Angle finders are similar but often include features to measure inside and outside angles. Both help you mark or check angles on wood pieces.
- Use a protractor to measure or draw angles from 0° to 180°.
- Angle finders can fold to measure different angles easily.
- They are great for checking angles on existing pieces.
Combination Squares
Combination squares are versatile tools. They measure angles, check flatness, and mark lines. They often include a ruler and a head that adjusts to 90° and 45° angles.
| Feature | Use |
|---|---|
| Ruler | Measure lengths and mark straight lines |
| Adjustable head | Set and check 45° and 90° angles |
| Bubble level | Check if surfaces are level or plumb |
Bevel Gauges
Bevel gauges, or sliding bevels, measure and transfer angles. You can set them to any angle and lock the position. They are good for copying angles from one piece to another.
- Loosen the lock to adjust the blade.
- Set the blade to the angle you want to measure.
- Tighten the lock to hold the angle in place.
- Use the gauge to mark the angle on your wood.
Digital Angle Measuring Tools
Digital angle tools give quick and precise readings. They often have LCD screens and can measure angles in different units. These tools help reduce reading errors and save time.
Advantages of digital angle tools:
- Easy to read digital display
- Can measure angles quickly
- Some models store angle readings
- Useful for complex or tight spaces

Credit: www.wikihow.com
Preparing Your Workspace
Measuring angles accurately is essential for woodworking projects. A well-prepared workspace helps you work safely and precisely.
Start by organizing your tools and clearing the area. This setup makes angle measurement easier and more reliable.
Ensuring A Flat Surface
Use a flat, stable table or workbench for your project. Uneven surfaces cause errors in angle measurement.
Check your surface with a level tool. Place the level in different spots to confirm flatness.
Marking Reference Points
Mark clear reference points on your wood pieces before measuring angles. These marks guide your cuts and help keep accuracy.
- Use a pencil with a sharp tip for precise marks.
- Draw small dots or lines at key points.
- Label each mark to avoid confusion.
- Make sure marks are visible but not too thick.
Using Clamps For Stability
Clamps hold your wood firmly in place. This prevents movement while you measure and cut angles.
| Clamp Type | Best Use |
| C- Clamp | Holding small pieces tightly |
| Bar Clamp | Securing larger boards |
| Spring Clamp | Quick hold for light tasks |
| Corner Clamp | Keeping corners at right angles |
Basic Techniques For Angle Measurement
Measuring angles is important for many woodworking projects. Accurate angles help your pieces fit well.
This guide shows simple ways to measure right, acute, and obtuse angles. You can use common tools.
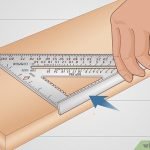
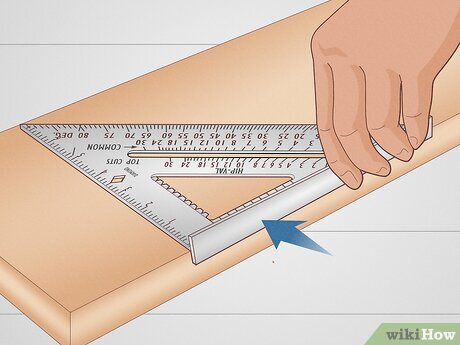
Measuring Right Angles
Right angles are 90 degrees. You often need them for corners and frames in woodworking.
Use a carpenter’s square or combination square to check or mark right angles. Place the square inside the corner to see if it fits perfectly.
- Place the square along both edges.
- Adjust the wood if there is any gap.
- Mark the line with a pencil along the square’s edge.
Finding And Marking Acute Angles
Acute angles are smaller than 90 degrees. They are common in angled cuts and decorative shapes.
Use a protractor or an adjustable bevel gauge to find and mark acute angles. Set the tool to the desired angle, then transfer it to the wood.
- Place the protractor’s center point on the corner or edge.
- Read the angle less than 90 degrees.
- Draw a line along the protractor’s edge to mark the angle.
- Use the bevel gauge to copy the angle to other pieces.
Measuring Obtuse Angles
Obtuse angles are larger than 90 degrees but less than 180 degrees. They appear in wide joints or decorative cuts.
Use a protractor or bevel gauge for obtuse angles too. Read angles above 90 degrees carefully to get the right measurement.
- Place the protractor’s center on the angle vertex.
- Find the number between 90 and 180 degrees.
- Mark the angle line on your wood piece.
- Use a bevel gauge to set the angle for cutting.

Credit: www.familyhandyman.com
Advanced Angle Measuring Tips
Measuring angles accurately is key in woodworking. It helps create tight joints and smooth finishes. Advanced tips improve precision and save time.
Use these techniques to measure and transfer angles more reliably for your projects. Proper tools and methods make a big difference.
Transferring Angles Between Pieces
Copying an angle from one piece of wood to another ensures perfect fit. Use angle finders or bevel gauges to capture the angle.
Lock the angle on your tool, then place it on the new piece. Trace the angle line before cutting to avoid mistakes.
- Use a sliding bevel to hold the angle firmly
- Double-check the angle by measuring twice
- Mark clearly on the wood for precise cuts
Using Templates And Jigs
Templates and jigs help you repeat the same angle many times. They save time and reduce errors in complex cuts.
Make a template from scrap wood by cutting the exact angle. Use it to guide your saw or router on other pieces.
- Build a jig that holds the wood at the needed angle
- Check the template angle with a protractor before use
- Use clamps to keep the jig steady during cutting
Calibrating Digital Tools
Digital angle tools need regular calibration to keep measurements accurate. Follow the manufacturer’s instructions carefully.
Check calibration by comparing the digital readout with a known angle, like a 90-degree square. Adjust if readings differ.
- Turn on the tool and place it on a flat surface
- Zero the tool according to the manual
- Test on a known angle to verify accuracy
- Recalibrate if measurements are off
Common Mistakes To Avoid
Measuring angles is a key task in woodworking. Mistakes here can spoil your project. Avoiding common errors saves time and materials.
Focus on accuracy and check your tools often. Read each measurement carefully to get the best results.
Misreading Measurement Tools
Many woodworkers make errors by reading tools wrong. Angles can be tricky to measure if you rush or guess.
- Check the scale closely before marking.
- Use a magnifier if numbers are small.
- Hold the tool steady to avoid wrong readings.
- Read the angle from the tool’s correct side.
- Double-check measurements before cutting.
Ignoring Tool Calibration
Calibration is needed to keep tools accurate. Skipping this step leads to wrong angles and poor fits.
| Tool Type | Calibration Tip |
| Protractor | Check zero mark alignment |
| Bevel Gauge | Tighten locking screw firmly |
| Digital Angle Finder | Reset to zero before use |
| Combination Square | Ensure ruler slides smoothly |
Skipping Test Cuts
Making a test cut helps confirm angle accuracy. Skipping test cuts can waste wood and cause errors.
Try these tips for test cuts:
- Use scrap wood similar to your project material.
- Cut the angle and check fit with other pieces.
- Adjust your tool or mark if needed before final cuts.
- Repeat test cuts if you change the angle setting.
Tips For Accuracy
Measuring angles correctly is important for good woodworking results. Small mistakes can cause big problems.
Use simple tips to improve your angle measurements and make your project fit better.
Double Checking Measurements
Always measure angles twice before cutting. This helps catch errors early.
Compare your measurements with different tools if possible. This ensures accuracy.
- Measure the angle once and note it down
- Measure the same angle again to confirm
- Use a protractor and an angle finder for comparison
Using Sharp Pencils And Fine Markers
Use sharp pencils or fine markers to mark your angles. Thick marks can cause mistakes.
Clear and thin lines help you see exact cutting points. This improves precision.
- Keep your pencil sharp with a good sharpener
- Choose fine markers for dark, clear lines
- Test your marker on scrap wood first
Maintaining Tools Regularly
Check your measuring tools often. Damaged or dirty tools give wrong readings.
Clean and store your tools properly to keep them accurate for every project.
- Wipe tools clean after each use
- Store tools in a dry place to avoid rust
- Check calibration of angle finders and protractors
- Replace worn out or broken tools promptly
Frequently Asked Questions
How Do I Measure Angles Accurately For Woodworking?
Use a protractor or an angle finder to measure angles precisely. Align the tool with the wood edges and read the angle. Mark the measurement clearly before cutting to ensure accuracy.
What Tools Are Best For Measuring Angles In Woodworking?
The best tools include a protractor, digital angle finder, bevel gauge, and combination square. These tools offer precision and ease for various angle measurements in woodworking projects.
How Can I Measure An Unknown Angle On Wood?
Place a bevel gauge on the angle, then transfer it to a protractor or angle finder. Read the measurement carefully to determine the exact angle for your woodworking task.
Why Is Angle Measurement Important In Woodworking Projects?
Accurate angle measurement ensures proper fitting, stability, and aesthetics in wood projects. Incorrect angles can cause gaps, weak joints, and structural issues.
Conclusion
Measuring angles accurately helps your woodworking projects fit well. Use simple tools like protractors or angle finders to check cuts. Take your time and double-check measurements before cutting wood. Small mistakes can cause big problems later. Practice measuring different angles to build your confidence.
Careful angle measuring leads to stronger, cleaner finished pieces. Keep your tools in good condition for best results. Accurate angles make your work look professional and last longer. Trust your skills and enjoy creating with precision.