Are you ready to take your woodworking skills to the next level? Imagine crafting tenon joints with precision and confidence, ensuring that every piece fits just right.
Whether you’re a seasoned carpenter or a DIY enthusiast, mastering the art of marking wood for tenon joints can elevate the quality of your projects. In this guide, you’ll discover simple, effective techniques to mark your wood accurately, transforming your work into a masterpiece.
Dive in to learn the secrets that will make your woodworking projects stand out, capturing attention and admiration. Let’s get started on making your woodworking dreams a reality!

Credit: www.youtube.com
Tools Needed
Marking wood precisely is key for strong tenon joints. The right tools help you measure and cut clean lines. This guide covers the main tools needed to mark wood accurately.
Using proper marking tools, measuring instruments, and cutting tools makes your woodworking easier. Each tool plays a role in creating perfect tenons.
Essential Marking Tools
Marking tools help you draw clear lines on the wood. These lines guide your cuts for tenon joints. Good marking tools include pencils and marking knives.
- Marking pencil:Use a sharp pencil for thin, visible lines.
- Marking knife:A knife cuts fine lines into the wood surface.
- Marking gauge:This tool sets consistent line depth and distance.
Measuring Instruments
Accurate measurements ensure your tenon fits perfectly. Use rulers and squares to check sizes and angles.
| Tool | Purpose |
| Steel ruler | Measures lengths accurately |
| Combination square | Checks right angles and marks lines |
| Caliper | Measures thickness of wood and joints |
| Try square | Ensures edges and lines are square |
Cutting Tools
Cutting tools help you follow the marked lines precisely. A clean cut makes the tenon fit well.
- Dovetail saw:Offers fine teeth for smooth, straight cuts.
- Tenon saw:Designed specifically for cutting tenons.
- Chisels:Used to clean and adjust tenon edges.

Credit: www.bigsandwoodworking.com
Preparing The Wood
Marking wood for tenon joints starts with good preparation. Preparing the wood carefully helps you make accurate marks.
Good preparation includes choosing the right wood, checking its size, and making sure surfaces are smooth.
Selecting The Right Wood
Choose wood that is strong and stable for your project. Avoid wood with many knots or cracks. Hardwoods like oak, maple, or cherry work well for tenon joints.
- Pick wood that is dry and free from damage.
- Use straight-grained wood to avoid weak joints.
- Select wood thickness that fits your project needs.
Checking Wood Dimensions
Measure the wood carefully before marking tenons. Make sure the length, width, and thickness match your design.
| Dimension | Recommended Tolerance |
| Length | ± 1/16 inch |
| Width | ± 1/32 inch |
| Thickness | ± 1/32 inch |
Smoothing Surfaces
Use sandpaper or a plane to smooth the wood surface. A smooth surface helps you mark lines clearly.
Tips for smoothing surfaces:
- Start with medium grit sandpaper (around 120 grit).
- Finish with fine grit sandpaper (220 grit) for a clean surface.
- Remove dust with a brush or cloth before marking.
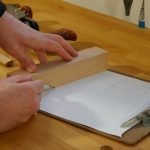
Marking The Tenon Length
Marking the tenon length is a key step in making strong joints. It helps cut the wood to the right size.
Clear marks guide your saw and chisel work. This keeps your joint tight and neat.
Setting The Shoulder Line
The shoulder line shows where the tenon ends and the shoulder begins. It is the first mark you make on the wood.
Use a square and pencil to draw a line across the wood. This line must be straight and clear.
- Place the square on the wood edge
- Draw the shoulder line across the face
- Double-check the line is square to the edge
Using A Marking Gauge
A marking gauge helps make precise lines for the tenon cheeks. It keeps your cuts even and clean.
Set the gauge to the tenon length. Then run it along the wood edge to score a line.
- Adjust the marking gauge to the tenon length
- Hold the gauge firmly against the wood edge
- Draw the gauge along the wood to mark the cheek
Ensuring Accurate Measurements
Use a ruler or tape measure to check the length twice. Measure from the shoulder line to the tenon tip.
Mark lightly at first. You can darken the lines once you are sure they are correct.
- Measure the length carefully
- Mark the wood lightly at first
- Re-check measurements before cutting
Marking The Tenon Cheeks
Marking the tenon cheeks accurately is important for a good fit in woodworking. This helps the tenon fit tightly into the mortise. Careful marking makes cutting easier and reduces mistakes.
Use sharp pencils and measuring tools to mark clearly. The marks guide your saw and chisel work when shaping the tenon cheeks.
Marking The Width
Start by marking the width of the tenon cheeks on the wood piece. This width matches the mortise width. Use a marking gauge or ruler to set the lines parallel to the wood grain.
- Set the marking gauge to the mortise width
- Run the gauge along the wood edge twice for a clear line
- Check both cheeks to have equal width marks
- Use a square to extend lines across the wood face
Transferring Measurements
Transfer the measured width from the mortise to the tenon stock carefully. Accurate transfer prevents gaps or tight joints. Use a marking knife for sharp lines that do not fade.
| Tool | Purpose |
|---|---|
| Marking Gauge | Set and mark width from mortise |
| Marking Knife | Cut precise lines for clear cutting guides |
| Combination Square | Extend lines across the wood face |
| Pencil | Make visible but less precise marks |
Double-checking The Layout
Always double-check your tenon cheek marks before cutting. Confirm measurements on both cheeks and the shoulder lines. Mistakes here can ruin the joint fit.
- Measure width marks again with a ruler
- Check marks against mortise dimensions
- Look for symmetry between both cheeks
- Ensure shoulder lines match the tenon length
- Make any corrections before starting to cut
Cutting The Tenon
Cutting the tenon is a key step in making strong wood joints. You must cut carefully to fit the tenon into the mortise snugly. This guide helps you cut the tenon accurately and cleanly.
Good sawing and cleaning techniques make the joint tight and long-lasting. Use the right tools and methods for best results.
Sawing Techniques
Use a fine-toothed backsaw for cutting tenons. Keep the saw blade vertical and start with light strokes. Cut just outside the marked line to allow room for trimming.
- Clamp the wood firmly to prevent movement.
- Cut slowly to avoid splintering the edges.
- Follow the marking lines carefully to keep the shape.
- Use a saw guide if needed for straight cuts.
Maintaining Straight Cuts
Straight cuts ensure the tenon fits well and the joint holds tight. Check your saw angle often and adjust as you go. A square and straight cut is easier to clean and assemble.
| Tip | Why It Matters |
|---|---|
| Keep saw blade vertical | Prevents angled cuts that weaken joints |
| Check cut with square tool | Ensures tenon faces are even |
| Use steady, slow strokes | Reduces splintering and keeps line clean |
Cleaning The Edges
After sawing, clean the tenon edges with a chisel or file. Smooth edges improve fit and glue adhesion. Remove any rough spots or splinters carefully.
- Hold the tenon securely while cleaning.
- Pare small amounts of wood at a time.
- Check the fit often with the mortise.
- Stop when the tenon slides in snugly without force.
Fitting The Tenon
Fitting the tenon is a key step in making strong wood joints. It ensures the pieces fit tightly without gaps.
Careful fitting helps the joint hold well and look neat. This guide explains how to test and adjust the fit.
Testing The Joint Fit
Start by gently inserting the tenon into the mortise. It should slide in with slight resistance.
Check for any gaps or looseness around the joint. A loose fit weakens the joint and affects strength.
- Insert the tenon without forcing it.
- Look for gaps between the tenon and mortise.
- Feel for smooth but snug contact.
Adjusting For Tightness
If the tenon is too tight, remove small amounts of wood. Use a file or sandpaper for precise control.
Remove wood evenly from all sides. This keeps the tenon square and balanced for a good fit.
- Mark areas that rub or resist.
- File or sand those spots gently.
- Test fit often to avoid over-removal.
Final Touches
After the fit feels right, clean the tenon and mortise of dust. This helps glue stick better.
Make sure edges are smooth but sharp enough to fit tightly. Avoid rounded edges that cause looseness.
- Wipe dust from joint surfaces.
- Check that edges are straight and sharp.
- Do a last dry fit before gluing.
Common Mistakes To Avoid
Marking wood for tenon joints needs care and attention. Many woodworkers make avoidable errors. These mistakes can ruin the fit and strength of the joint.
Knowing what to avoid helps you cut precise tenons. Below are common errors to watch out for and tips to prevent them.
Misaligned Markings
Marking lines that do not match up cause weak joints. Misalignment leads to gaps or uneven surfaces. This affects the wood’s stability and appearance.
Always check that your marking lines line up on all sides before cutting. Use a square tool to keep lines straight and consistent.
Inaccurate Measurements
Measuring wrong sizes is a frequent problem. Even small errors can make the tenon too loose or too tight. This stops the joint from fitting well.
- Measure twice, mark once to reduce errors.
- Use sharp pencils for clear, thin lines.
- Double-check measurements against the mortise size.
- Keep measuring tools clean and calibrated.
- Work in good lighting to see marks clearly.
Improper Tool Use
Wrong tools or dull blades cause poor marks and cuts. Using the wrong marking knife or pencil can blur lines. This leads to mistakes during cutting.
| Tool | Common Mistake | How to Avoid |
| Marking Knife | Dull blade, unclear lines | Sharpen blade regularly |
| Try Square | Not flush against wood | Hold firmly and check alignment |
| Pencil | Thick, hard to see marks | Use a sharp, soft pencil for thin lines |
| Measuring Tape | Twisted or bent tape | Keep tape straight and flat |

Credit: www.bigsandwoodworking.com
Frequently Asked Questions
How Do You Mark Wood For Tenon Joints Accurately?
Use a marking gauge to scribe lines parallel to the wood edge. Mark the cheek and shoulder lines clearly before cutting.
What Tools Are Best For Marking Tenon Joints?
A marking gauge, pencil, and try square are essential. These tools ensure precise and clean marking for accurate tenon joints.
How To Avoid Mistakes When Marking Tenon Joints?
Double-check measurements and mark lines clearly. Use sharp tools and measure twice to prevent errors in tenon joint marking.
Why Is Marking Important For Tenon Joints?
Proper marking guides accurate cutting and fitting. It ensures tight joints, structural strength, and a professional woodworking finish.
Conclusion
Marking wood for tenon joints needs care and clear steps. Use sharp tools and measure twice to avoid mistakes. Clean lines help fit the tenon snugly in the mortise. Take your time and check your marks often. This simple process makes strong and neat joints.
Practice will improve your skill and confidence. Soon, marking tenons will feel natural and easy. Keep these tips in mind for better woodworking results.