Imagine you’re working on a plumbing project, and everything is going smoothly until you notice the rough, uneven edges on your pipes. These jagged edges can cause leaks and hinder the efficiency of your work.
But there’s a simple tool that can save you from this hassle—a pipe reamer. With a pipe reamer, you can achieve smooth, clean edges effortlessly. Do you want to ensure your plumbing tasks are done with precision and professionalism? Keep reading to discover how using a pipe reamer can transform your projects, making your work both easier and more reliable.
This essential tool might just become your new best friend in the world of plumbing and beyond.

Credit: www.reedmfgco.com
Choosing The Right Pipe Reamer
Using a pipe reamer helps you get smooth, clean edges on pipes. Choosing the right reamer makes the job easier and safer.
Consider the type, material, and size of the reamer before you start working.
Types Of Pipe Reamers
There are several types of pipe reamers. Each type fits different needs and pipe materials.
- Hand reamers: Simple tools for small jobs and light use.
- Rotary reamers: Use with a drill for faster, smoother cuts.
- Adjustable reamers: Can fit different pipe sizes with changeable blades.
- Fixed-size reamers: Made for one specific pipe size for better precision.
Material Compatibility
Choose a pipe reamer that matches the pipe material. This helps avoid damage to pipes or tools.
Some reamers work better with soft materials, while others handle hard metals well.
- Plastic pipes: Use sharp, lightweight reamers for clean cuts.
- Copper pipes: Choose reamers with fine blades to prevent scratches.
- Steel pipes: Use heavy-duty reamers made from strong materials.
- Cast iron: Requires strong, durable reamers with tough blades.
Size Selection
Pick a pipe reamer that fits the pipe size exactly. Too small or too big can cause uneven edges.
Many reamers come in sets or adjustable sizes to match different pipes.
- Measure the pipe’s inner diameter before choosing a reamer.
- Use adjustable reamers for various pipe sizes.
- Fixed-size reamers work best for repeated use on one size.
Preparing The Pipe For Reaming
Using a pipe reamer helps remove rough edges from pipes. This step is important to create smooth and clean pipe ends.
Before reaming, you must prepare the pipe correctly. This ensures safety and better results.
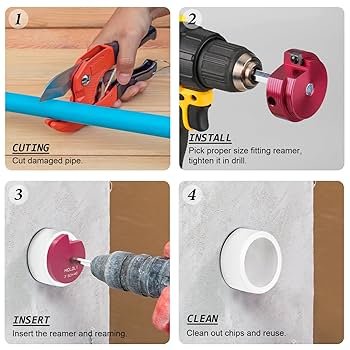
Cutting Techniques
Cut the pipe straight and clean to make reaming easier. Use a proper pipe cutter or saw for cutting.
Make sure the cut is smooth with no cracks or dents. This helps the reamer work better and prevents damage.
Securing The Pipe
Hold the pipe firmly before reaming. Use a vise or clamp to keep it steady and avoid slipping.
Check that the pipe is not loose. A steady pipe helps you apply even pressure while reaming.
Safety Precautions
Wear safety gloves to protect your hands from sharp edges. Safety glasses protect your eyes from metal shavings.
Work in a clean area with good light. Keep your tools in good condition to avoid accidents.
- Use gloves and eye protection
- Secure the pipe before starting
- Work in a clean, well-lit space
- Keep tools sharp and clean
Step-by-step Reaming Process
Using a pipe reamer helps create clean edges on pipes. It removes rough burrs and makes the pipe ready for fitting.
Follow these simple steps to use a pipe reamer safely and effectively. Clean edges improve pipe connections and prevent leaks.
Inserting The Reamer
Start by placing the reamer inside the pipe opening. Make sure the reamer’s blade faces the burrs to be removed.
Insert the tool gently until it fits snugly inside the pipe. Avoid forcing it in to prevent damage to the pipe or tool.
Applying Proper Pressure
Hold the reamer firmly and apply steady pressure. Press enough to cut the rough edges without pushing too hard.
Too much pressure can cause uneven edges or damage the pipe. Use a balanced force to get smooth results.
Rotating Techniques
Turn the reamer clockwise inside the pipe. Keep a slow and steady speed for even edge cleaning.
Rotate fully around the pipe edge several times. This ensures all burrs are removed and the edge is smooth.
- Use your wrist to control rotation smoothly
- Stop and check the edge often
- Repeat if rough spots remain

Credit: www.reedmfgco.com
Common Mistakes To Avoid
Using a pipe reamer can help create clean edges on pipes. Avoiding common mistakes will save time and effort. This guide explains key errors to watch out for.
Understanding these mistakes helps keep your tools and workpieces in good condition. Follow simple tips to improve your results.
Over-reaming Issues
Over-reaming happens when you remove too much material from the pipe edge. This weakens the pipe and causes leaks or poor fits. It also wastes time and tool life.
- Apply gentle pressure when reaming to avoid excess removal.
- Check the pipe diameter often during the process.
- Stop reaming once the edge is smooth and even.
- Use the correct reamer size for your pipe.
Uneven Edges
Uneven edges occur if the reamer is not aligned properly. This leads to poor pipe connections and stress points. Uneven cuts can cause leaks and damage over time.
| Cause | Effect | Solution |
|---|---|---|
| Reamer tilted during use | Uneven pipe edge | Hold reamer straight and steady |
| Inconsistent pressure | Rough or jagged edges | Apply even pressure all around |
| Using worn reamer | Irregular cutting | Replace or sharpen reamer |
Tool Damage
Tool damage reduces the effectiveness of the reamer. Damaged tools can scratch or gouge pipes. This increases repair costs and risks failure.
- Do not force the reamer if it is stuck.
- Keep the tool clean and lubricated.
- Store the reamer in a dry place to avoid rust.
- Inspect the tool regularly for wear or cracks.
- Sharpen or replace blades as needed.
Maintenance And Care For Pipe Reamers
Keeping your pipe reamer in good shape helps it work better and last longer. Regular care prevents damage and ensures clean, smooth pipe edges every time.
Follow simple maintenance steps after each use. Proper cleaning, sharpening, and storage keep your tool ready for the next job.
Cleaning After Use
Remove dirt and metal shavings from your pipe reamer after every use. Clean blades prevent rust and keep cutting edges sharp.
- Use a brush to clear debris from blades and handle.
- Wipe the tool with a dry cloth to remove moisture.
- Apply a light oil coat to metal parts to stop rust.
- Avoid harsh chemicals that can damage the tool.
Sharpening Blades
Sharp blades cut cleanly and reduce effort. Check the blade edges often and sharpen them as needed using a fine file or sharpening stone.
| Sharpening Tool | Best Use |
| Fine File | For small nicks and quick touch-ups |
| Sharpening Stone | For restoring blade edge and smooth finish |
| Grinding Wheel | For heavy blade repairs (use carefully) |
Storage Tips
Store pipe reamers in a dry, clean place. Proper storage prevents damage and rust formation.
- Keep tools in a toolbox or storage case.
- Avoid damp areas that cause rust.
- Cover blades with protective caps if available.
- Check tools regularly and clean before storing.
Advanced Tips For Professional Results
Using a pipe reamer correctly can give your pipes clean, smooth edges. This helps prevent damage and leaks in plumbing jobs.
Follow these advanced tips to improve your technique and get professional results every time you work with pipes.
Using Lubricants
Lubricants reduce friction and make reaming easier. They also help the tool last longer and create smoother edges on the pipe.
- Apply a small amount of lubricant to the pipe edge before reaming.
- Use oil-based lubricants for metal pipes.
- Water-based lubricants work well for plastic pipes.
- Clean the pipe edge after reaming to remove lubricant residue.
Handling Different Pipe Materials
Different pipe materials need different care when using a reamer. Adjust your technique to avoid damage and get clean edges.
| Pipe Material | Reaming Tips |
| Copper | Use light pressure and lubricate well to prevent scratching. |
| PVC | Ream slowly to avoid cracking; use water-based lubricant. |
| Steel | Apply oil-based lubricant and use firm, steady pressure. |
| Aluminum | Use gentle strokes and avoid over-reaming to prevent dents. |
Combining Tools For Efficiency
Using a pipe reamer with other tools can speed up your work and improve results. Plan your tool use for best efficiency.
- Cut the pipe with a pipe cutter before reaming.
- Use a deburring tool after reaming for extra smooth edges.
- Check the pipe edges with a file if needed.
- Wear gloves to protect your hands during all steps.

Credit: www.amazon.ca
Frequently Asked Questions
What Is The Primary Use Of A Pipe Reamer?
A pipe reamer is used to remove burrs and smooth pipe edges after cutting. This ensures clean, safe, and precise pipe connections. It prevents damage to fittings and improves flow by eliminating rough edges inside the pipe.
How Do You Properly Use A Pipe Reamer?
Insert the reamer into the pipe end and rotate it clockwise. Apply steady pressure to remove burrs evenly. Finish by inspecting the edge for smoothness to ensure a clean, safe connection.
Can A Pipe Reamer Improve Plumbing Installation Quality?
Yes, using a pipe reamer ensures clean pipe edges, reducing leaks and fitting damage. It enhances joint integrity and prolongs pipe life by preventing rough edges from causing wear.
What Types Of Pipes Can A Pipe Reamer Be Used On?
Pipe reamers work on various materials like copper, steel, PVC, and aluminum pipes. Choose the right size and blade type for your specific pipe material to achieve optimal results.
Conclusion
Using a pipe reamer helps create smooth, clean edges on pipes. It removes rough spots that can cause leaks or damage. This tool makes pipe fitting easier and safer. Clean edges also improve the flow of liquids or gases. Regular use of a pipe reamer saves time and effort.
It keeps your plumbing work neat and reliable. A small tool with big benefits. Simple, effective, and worth having in your toolkit.