Are you tired of uneven surfaces ruining your woodworking projects? Imagine the satisfaction of running your hand over a perfectly smooth piece of wood, where every inch feels just right.
If you want to achieve that flawless finish, mastering the use of a belt sander is your next step. This powerful tool can be your best friend or your worst enemy, depending on how you use it. But don’t worry, you’re about to learn how to operate a belt sander like a pro.
Get ready to transform your woodworking skills and discover the secrets to achieving smooth, even surfaces every time. Keep reading to unlock the potential of your projects and elevate your craftsmanship to new heights.
Choosing The Right Belt Sander
Using a belt sander helps create smooth and even surfaces. Picking the right belt sander makes your work easier.
Different belt sanders suit different tasks. Knowing the options helps you choose the best one for your project.
Types Of Belt Sanders
Belt sanders come in various types. Each type fits specific jobs and skill levels.
Here are common belt sander types you can find:
- Handheld Belt Sanders:Portable and easy to use for small areas.
- Stationary Belt Sanders:Fixed on a bench for precise sanding work.
- Orbital Belt Sanders:Combine belt and orbital motion for finer finishes.
Selecting The Correct Grit
The grit size on your sanding belt affects how smooth the surface will be. Lower numbers remove more material but leave rough marks.
Higher grit belts give a finer finish but remove less material. Choose grit based on your sanding goal.
- Coarse Grit (40-60):Remove paint or shape wood quickly.
- Medium Grit (80-120):Smooth wood and remove scratches.
- Fine Grit (150-220):Prepare wood for finishing.
Safety Features To Look For
Safety is key when using a belt sander. Look for features that protect you during work.
Good safety features reduce accidents and make sanding easier.
- Automatic Belt Tracking:Keeps the belt centered to avoid slips.
- Dust Collection Port:Removes dust to keep your workspace clean.
- Safety Switch:Prevents accidental starts.
- Ergonomic Handles:Provide better grip and control.

Credit: www.homebuilding.co.uk
Preparing The Work Area
Before using a belt sander, set up a safe and clean work area. This helps you work better and avoid accidents.
Organize your space to keep tools and materials within reach. Make sure the area is ready for sanding tasks.
Clearing And Securing The Surface
Remove all items from the surface you will sand. Dust, screws, and nails can damage the belt sander or your workpiece.
Secure the material firmly using clamps or a vise. This stops movement and helps you sand evenly and safely.
- Clear away debris and tools
- Check for nails or screws
- Use clamps to hold the workpiece
- Make sure the surface is stable
Proper Lighting And Ventilation
Good lighting helps you see the sanding progress clearly. Bright light reduces mistakes and uneven sanding.
Ventilation removes dust and keeps the air clean. Use a fan or open windows to improve airflow in your workspace.
- Use bright, direct light over the work area
- Keep windows open or use fans for airflow
- Consider using a dust extractor if available
Using Safety Gear
Wear safety gear to protect your eyes, ears, and lungs. Belt sanding creates dust and noise that can harm you.
Use gloves to protect your hands from rough surfaces. Choose gear that fits well and is comfortable to wear.
- Safety goggles or glasses
- Hearing protection like earplugs or earmuffs
- Dust mask or respirator
- Protective gloves
Setting Up The Belt Sander
Setting up the belt sander correctly helps you get smooth and even surfaces. This guide covers the basic setup steps.
Follow these steps carefully to prepare your belt sander for safe and effective use.
Installing The Sanding Belt
First, unplug the sander for safety. Remove the cover to access the belt area. Check the belt size before installing.
Place the sanding belt around the rollers. Make sure the arrows on the belt match the sander’s rotation direction. Close the cover firmly.
Adjusting Belt Tension And Tracking
Check the belt tension to keep it tight but not too tight. Loose belts slip and cause uneven sanding.
Use the tracking knob to center the belt on the rollers. Turn it slowly while running the sander to keep the belt aligned.
- Adjust tension until belt feels firm
- Turn tracking knob for center alignment
- Stop sander and readjust if belt slips or drifts
Checking Power Supply
Make sure the power cord is not damaged or frayed. Use a grounded outlet to avoid electrical hazards.
Test the sander by turning it on briefly. Confirm it runs smoothly before starting your work.
Techniques For Even Sanding
Using a belt sander properly helps create smooth, even surfaces. It takes practice and the right technique.
These tips will guide you to sand evenly and avoid damage to your workpiece.
Maintaining Consistent Pressure
Apply steady pressure to the belt sander for an even finish. Too much force can leave marks or remove too much wood.
Keep your hands relaxed and let the sander do the work. Push down just enough to keep contact with the surface.
- Hold the sander firmly but avoid pressing hard
- Keep pressure even across the sanding belt
- Move the sander to prevent deep spots
Using Smooth, Controlled Movements
Move the belt sander with slow, steady strokes. Quick or jerky moves cause uneven sanding and gouges.
Sand along the grain of the wood for a cleaner surface. Overlap each pass slightly for uniform coverage.
- Push the sander in the direction of the wood grain
- Use long, smooth passes
- Keep a consistent speed
Avoiding Common Mistakes
Watch out for uneven pressure and sanding too long in one spot. These cause dips or burn marks.
Don’t start the sander on the wood surface. Always start the tool first, then lower it onto the wood.
- Never keep the sander still while on the wood
- Check the belt for wear and replace if needed
- Keep your work area clean of dust
Handling Different Materials
Using a belt sander on different materials needs care and the right method. Each material reacts differently to sanding.
Knowing how to adjust your technique helps you get smooth, even surfaces without damage.
Sanding Wood Surfaces
Wood is the most common material for belt sanders. Use slow, steady movements to avoid gouges. Always sand with the grain to keep the surface smooth.
- Start with coarse grit to remove rough spots.
- Move to medium grit for smoothing.
- Finish with fine grit for a polished look.
- Keep the sander moving to avoid burns.
Working On Metal And Plastic
Metal and plastic require a gentler touch. Use finer grit belts to avoid deep scratches. Metal can heat up quickly, so take breaks to cool the surface.
| Material | Recommended Grit | Notes |
| Aluminum | 120-220 | Cool surface often |
| Steel | 80-150 | Use protective gear |
| Plastic | 180-320 | Sand lightly to prevent melting |
Dealing With Curved Or Irregular Shapes
Curved and odd shapes need patience. Hold the sander at different angles and use light pressure. Move the sander more slowly to keep control.
- Use a narrow belt for tight curves.
- Sand in small sections at a time.
- Check your progress often to avoid over-sanding.
- Consider hand sanding for very detailed areas.
Finishing Touches
Using a belt sander correctly helps you get smooth, even surfaces. Finishing touches are important to improve the final look.
This guide covers checking uniformity, switching to finer grits, and cleaning your sander.
Checking For Uniformity
After sanding, inspect the surface carefully. Look for any uneven spots or scratches.
- Run your hand over the surface to feel for bumps.
- Use good lighting to spot any marks.
- Mark problem areas with a pencil.
Switching To Finer Grits
Change the belt to a finer grit for a smoother finish. This step removes scratches from coarse belts.
| Grit Level | Purpose |
| 60-80 | Remove rough material |
| 100-120 | Smooth surface |
| 150-220 | Final polishing |
Cleaning And Maintaining The Sander
Keep your belt sander clean and in good shape. This extends its life and keeps it working well.
Follow these tips:
- Unplug before cleaning.
- Remove dust from vents and belts.
- Check the belt for wear and replace if needed.
- Lubricate moving parts as instructed in the manual.
- Store the sander in a dry place.
Troubleshooting Common Issues
Using a belt sander can be simple, but some issues may appear. Knowing how to fix these problems helps get smooth results.
This guide covers common problems and easy ways to solve them.
Belt Slipping Or Misalignment
If the sanding belt slips or moves off track, the sanding will be uneven and unsafe. This happens if the belt is too loose or worn out.
Check the belt tension and tracking regularly. Adjust the tracking knob until the belt stays centered on the rollers.
- Turn off the sander before adjusting
- Tighten or replace the belt if loose or damaged
- Use the tracking control to center the belt
- Clean rollers to remove dust and debris
Uneven Surface Results
An uneven surface means the sander is not working smoothly. This can happen if you apply too much pressure or hold the sander in one place too long.
Keep the sander moving at a steady pace. Let the belt do the work without pushing hard.
- Use light, even pressure while sanding
- Move the sander evenly across the surface
- Check the belt for wear and replace if needed
- Sand with the grain of the wood for best results
Overheating And Motor Problems
The sander can get hot if used for a long time or if dust blocks air vents. Overheating can damage the motor and reduce tool life.
Turn off the sander if it feels very hot. Clean the vents and allow it to cool before using again.
- Keep air vents clean and clear of dust
- Avoid running the sander continuously for long periods
- Use a dust collection system if possible
- Check the power cord and motor for damage
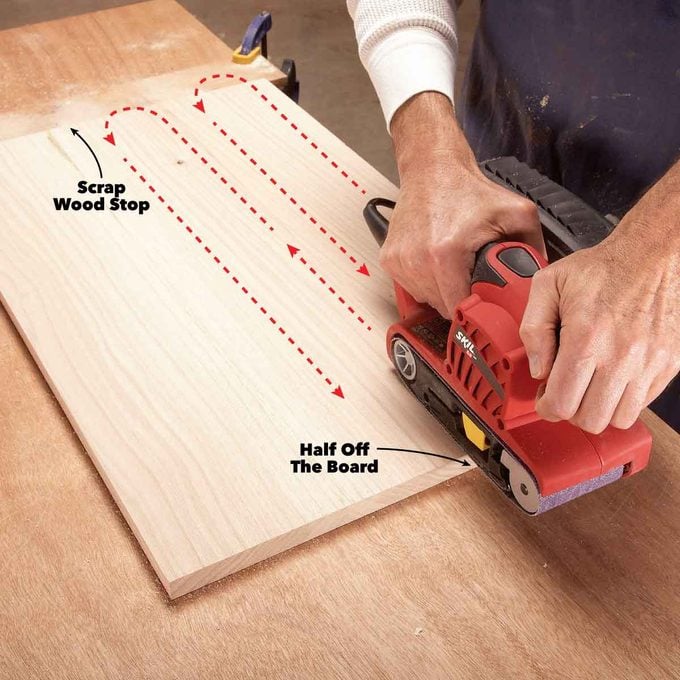
Credit: www.familyhandyman.com
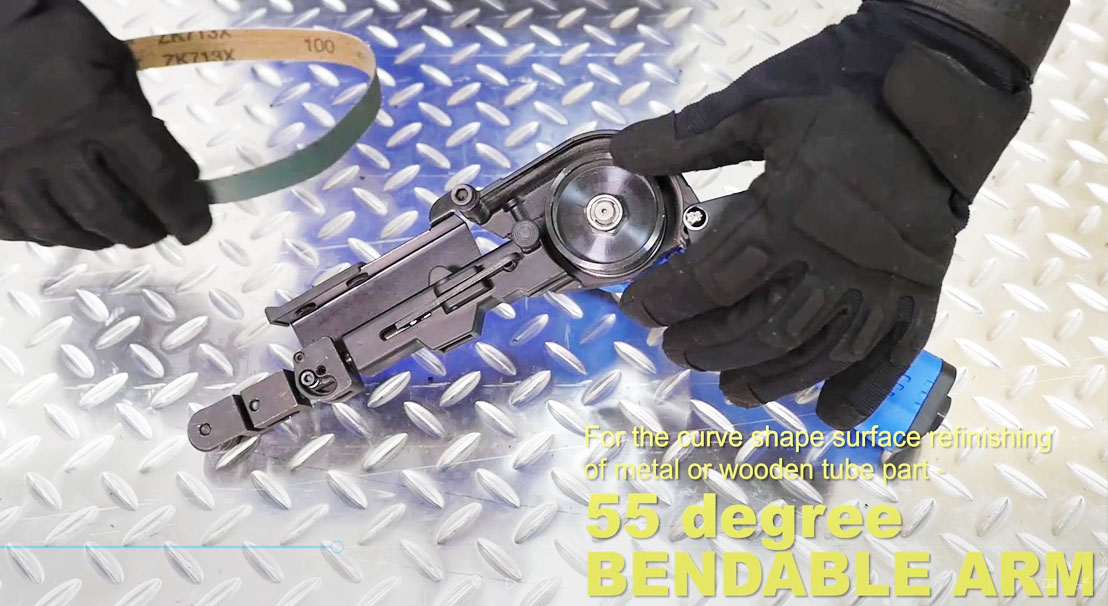
Credit: www.sumake.com
Frequently Asked Questions
How Do You Prepare A Belt Sander Before Use?
Before use, check the sanding belt for damage and proper tension. Secure the workpiece firmly. Adjust the speed setting if available. Wear safety gear like goggles and a dust mask.
What Is The Best Technique For Even Sanding?
Hold the sander flat and move it steadily along the surface. Avoid pressing too hard to prevent gouges. Keep the sander moving continuously for uniform results.
How Do You Change A Sanding Belt Safely?
Turn off and unplug the sander. Release the tension lever or knob. Remove the old belt carefully and install the new one aligned properly. Re-tighten the tension and test the belt’s movement.
How Can I Avoid Sanding Marks On Wood?
Use a fine-grit belt for finishing. Sand with the grain of the wood. Maintain consistent speed and pressure. Regularly check the belt for wear to prevent uneven sanding.
Conclusion
Operating a belt sander carefully creates smooth, even surfaces. Keep steady pressure and move the sander in one direction. Check your work often to avoid sanding too deep. Always wear safety gear for protection. With practice, your sanding will improve quickly.
Follow these steps to get the best results. Sanding doesn’t have to be hard or messy. A good finish makes your project look great. Take your time and be patient with each step. Your skills will grow, and your surfaces will shine.