Are your sanding tools scattered all over the place, making it difficult to find what you need when you need it? You’re not alone.
Many DIY enthusiasts and professionals face the challenge of keeping their tools organized. But what if you could transform your workspace with just a few simple storage hacks? Imagine opening a bin and instantly finding the exact sanding tool you need, ready for action.
This isn’t just a dream—it’s entirely possible with the right tips and tricks. We’ll dive into practical and easy-to-implement strategies for storing sanding tools in bins. Get ready to reclaim your workspace and boost your productivity!
Choosing The Right Bins
Storing sanding tools properly keeps them safe and easy to find. Choosing the right bins makes storage simple and organized.
Good bins protect tools from dust and damage. They also help save space in your workshop.
Material And Durability
Bins made from strong plastic resist cracks and wear. Metal bins last long but may rust if not coated.
- Plastic bins are lightweight and easy to clean.
- Metal bins offer sturdy protection for heavy tools.
- Clear bins help you see tools without opening them.
- Choose bins with tight lids to keep dust out.
Size And Shape Considerations
Pick bins that fit your sanding tools well. Too big bins waste space. Too small bins may damage tools.
| Tool Type | Recommended Bin Size | Shape |
|---|---|---|
| Hand Sanders | Medium | Rectangular |
| Orbital Sanders | Large | Rectangular |
| Sanding Blocks | Small | Square |
| Sanding Discs | Small | Flat |
Stackable Vs. Individual Bins
Stackable bins save space by piling up vertically. Individual bins allow quick access to each tool.
- Use stackable bins if you have limited floor space.
- Choose individual bins for tools you use often.
- Label each bin clearly for faster tool finding.
- Consider bins with handles for easier carrying.

Credit: www.reddit.com
Preparing Tools For Storage
Storing sanding tools properly helps them last longer and work better. It also keeps your workspace tidy and safe.
Before putting your sanding tools in bins, prepare them well. This makes it easier to find and use them next time.
Cleaning And Maintenance
Clean your sanding tools after each use. Remove dust and debris to keep them in good shape.
Check tools for damage or wear. Fix or replace any broken parts before storage.
- Use a soft brush to clear dust
- Wipe surfaces with a dry cloth
- Apply light oil to metal parts if needed
- Replace worn sanding sheets or pads
Grouping By Type And Size
Sort sanding tools by their type and size. This helps you find the right tool quickly.
Keep similar tools together in one bin. Use smaller containers inside bins for different sizes.
- Group sanding blocks, sheets, and discs separately
- Arrange tools by grit size from coarse to fine
- Store hand sanders apart from power sanders
Labeling For Easy Access
Label bins clearly to know what is inside without opening them. Use simple, readable labels.
Include the type and size of the sanding tools on the label. This saves time when searching for tools.
- Use waterproof markers or printed labels
- Place labels on the bin lid and front side
- Update labels when you add or remove tools
Space-saving Arrangement Techniques
Storing sanding tools in bins can be tricky without wasting space. Using smart arrangement methods helps keep tools organized and easy to find.
This guide covers simple techniques to save space and protect your sanding tools.
Vertical Vs. Horizontal Placement
Placing sanding tools vertically or horizontally changes how much space they take up. Vertical storage uses less floor space but needs taller bins. Horizontal placement fits better in shallow bins.
- Vertical placement saves width space and allows easy access.
- Horizontal placement stacks tools flat, preventing damage.
- Choose vertical for long tools and horizontal for small, flat items.
- Use foam or soft liners to avoid scratches in both cases.
Using Dividers And Inserts
Dividers and inserts keep tools separate and organized inside bins. They stop tools from moving and getting damaged.
| Type | Benefit |
| Foam inserts | Custom fit for each tool |
| Plastic dividers | Easy to clean and adjust |
| Wooden separators | Durable and strong |
| Adjustable grid inserts | Flexible layout options |
Maximizing Bin Lid Space
Use the inside of bin lids for extra storage. Small tools or accessories fit well here and stay visible.
- Attach small pouches or pockets to hold sandpaper sheets.
- Use magnetic strips to secure metal sanding blocks.
- Stick elastic bands across the lid to hold slim tools.
- Label lid compartments for quick tool identification.

Credit: www.reddit.com
Organizing By Frequency Of Use
Keeping sanding tools in bins can save time and space. Organize tools by how often you use them. This method helps you find what you need quickly.
Sorting tools based on frequency also protects less-used items from wear. It keeps your workspace tidy and efficient.
Accessible Storage For Daily Tools
Store tools you use every day in easy-to-reach bins. Label these bins clearly. Keep them at eye level or on top shelves for quick access.
- Sanding blocks you use most often
- Common grit sandpapers
- Handheld sanding sponges
- Small sanding attachments for power tools
Long-term Storage Solutions
Tools used less often should be stored safely for long periods. Use airtight bins to protect them from dust and moisture. Label bins with contents and date of storage.
| Tool Type | Storage Bin Type | Label Details |
| Rare grit sandpapers | Plastic airtight bin | Grit type, purchase date |
| Specialty sanding pads | Sealed container | Use frequency, material type |
| Bulk sanding belts | Large storage bin | Belt size, grit number |
Rotating Tools Seasonally
Some sanding tools are only needed during certain projects or seasons. Rotate these tools in and out of storage bins to keep your workspace clear. Mark bins by season or project type.
- Use color-coded bins for each season
- Keep a checklist of tools stored away
- Inspect tools before storing to clean or repair
- Move current season tools to accessible shelves
Safety And Protection Tips
Storing sanding tools properly helps keep them safe and in good shape. Good storage also protects people from accidents.
Use bins to organize your sanding tools. This keeps your workspace tidy and tools ready to use.
Preventing Tool Damage
Keep sanding tools separate to avoid scratches and dents. Place soft materials between tools if needed.
Use bins with dividers or small compartments. This stops tools from banging into each other and breaking.
- Clean tools before storing to remove dust and debris
- Store sharp edges away from other tools
- Do not overload bins to prevent pressure damage
Moisture And Dust Control
Keep sanding tools dry to stop rust and damage. Use bins that close tightly to block dust and moisture.
Add silica gel packs or moisture absorbers inside bins. These help keep the air dry and tools in good condition.
- Store bins in a cool, dry place
- Wipe tools dry before putting them away
- Check bins regularly for moisture or dust buildup
Secure Storage To Avoid Accidents
Store sanding tools in bins that are stable and hard to tip over. This prevents tools from falling and causing injuries.
Label bins clearly to avoid searching and dropping tools. Keep bins out of reach of children and pets.
- Use bins with lids to keep tools inside
- Place bins on low shelves for easy access
- Do not store heavy tools in high places

Credit: www.reddit.com
Creative Space-saving Hacks
Storing sanding tools can be tricky when space is limited. Using bins smartly helps keep tools tidy and easy to reach.
These creative ideas save space and protect your sanding tools from damage.
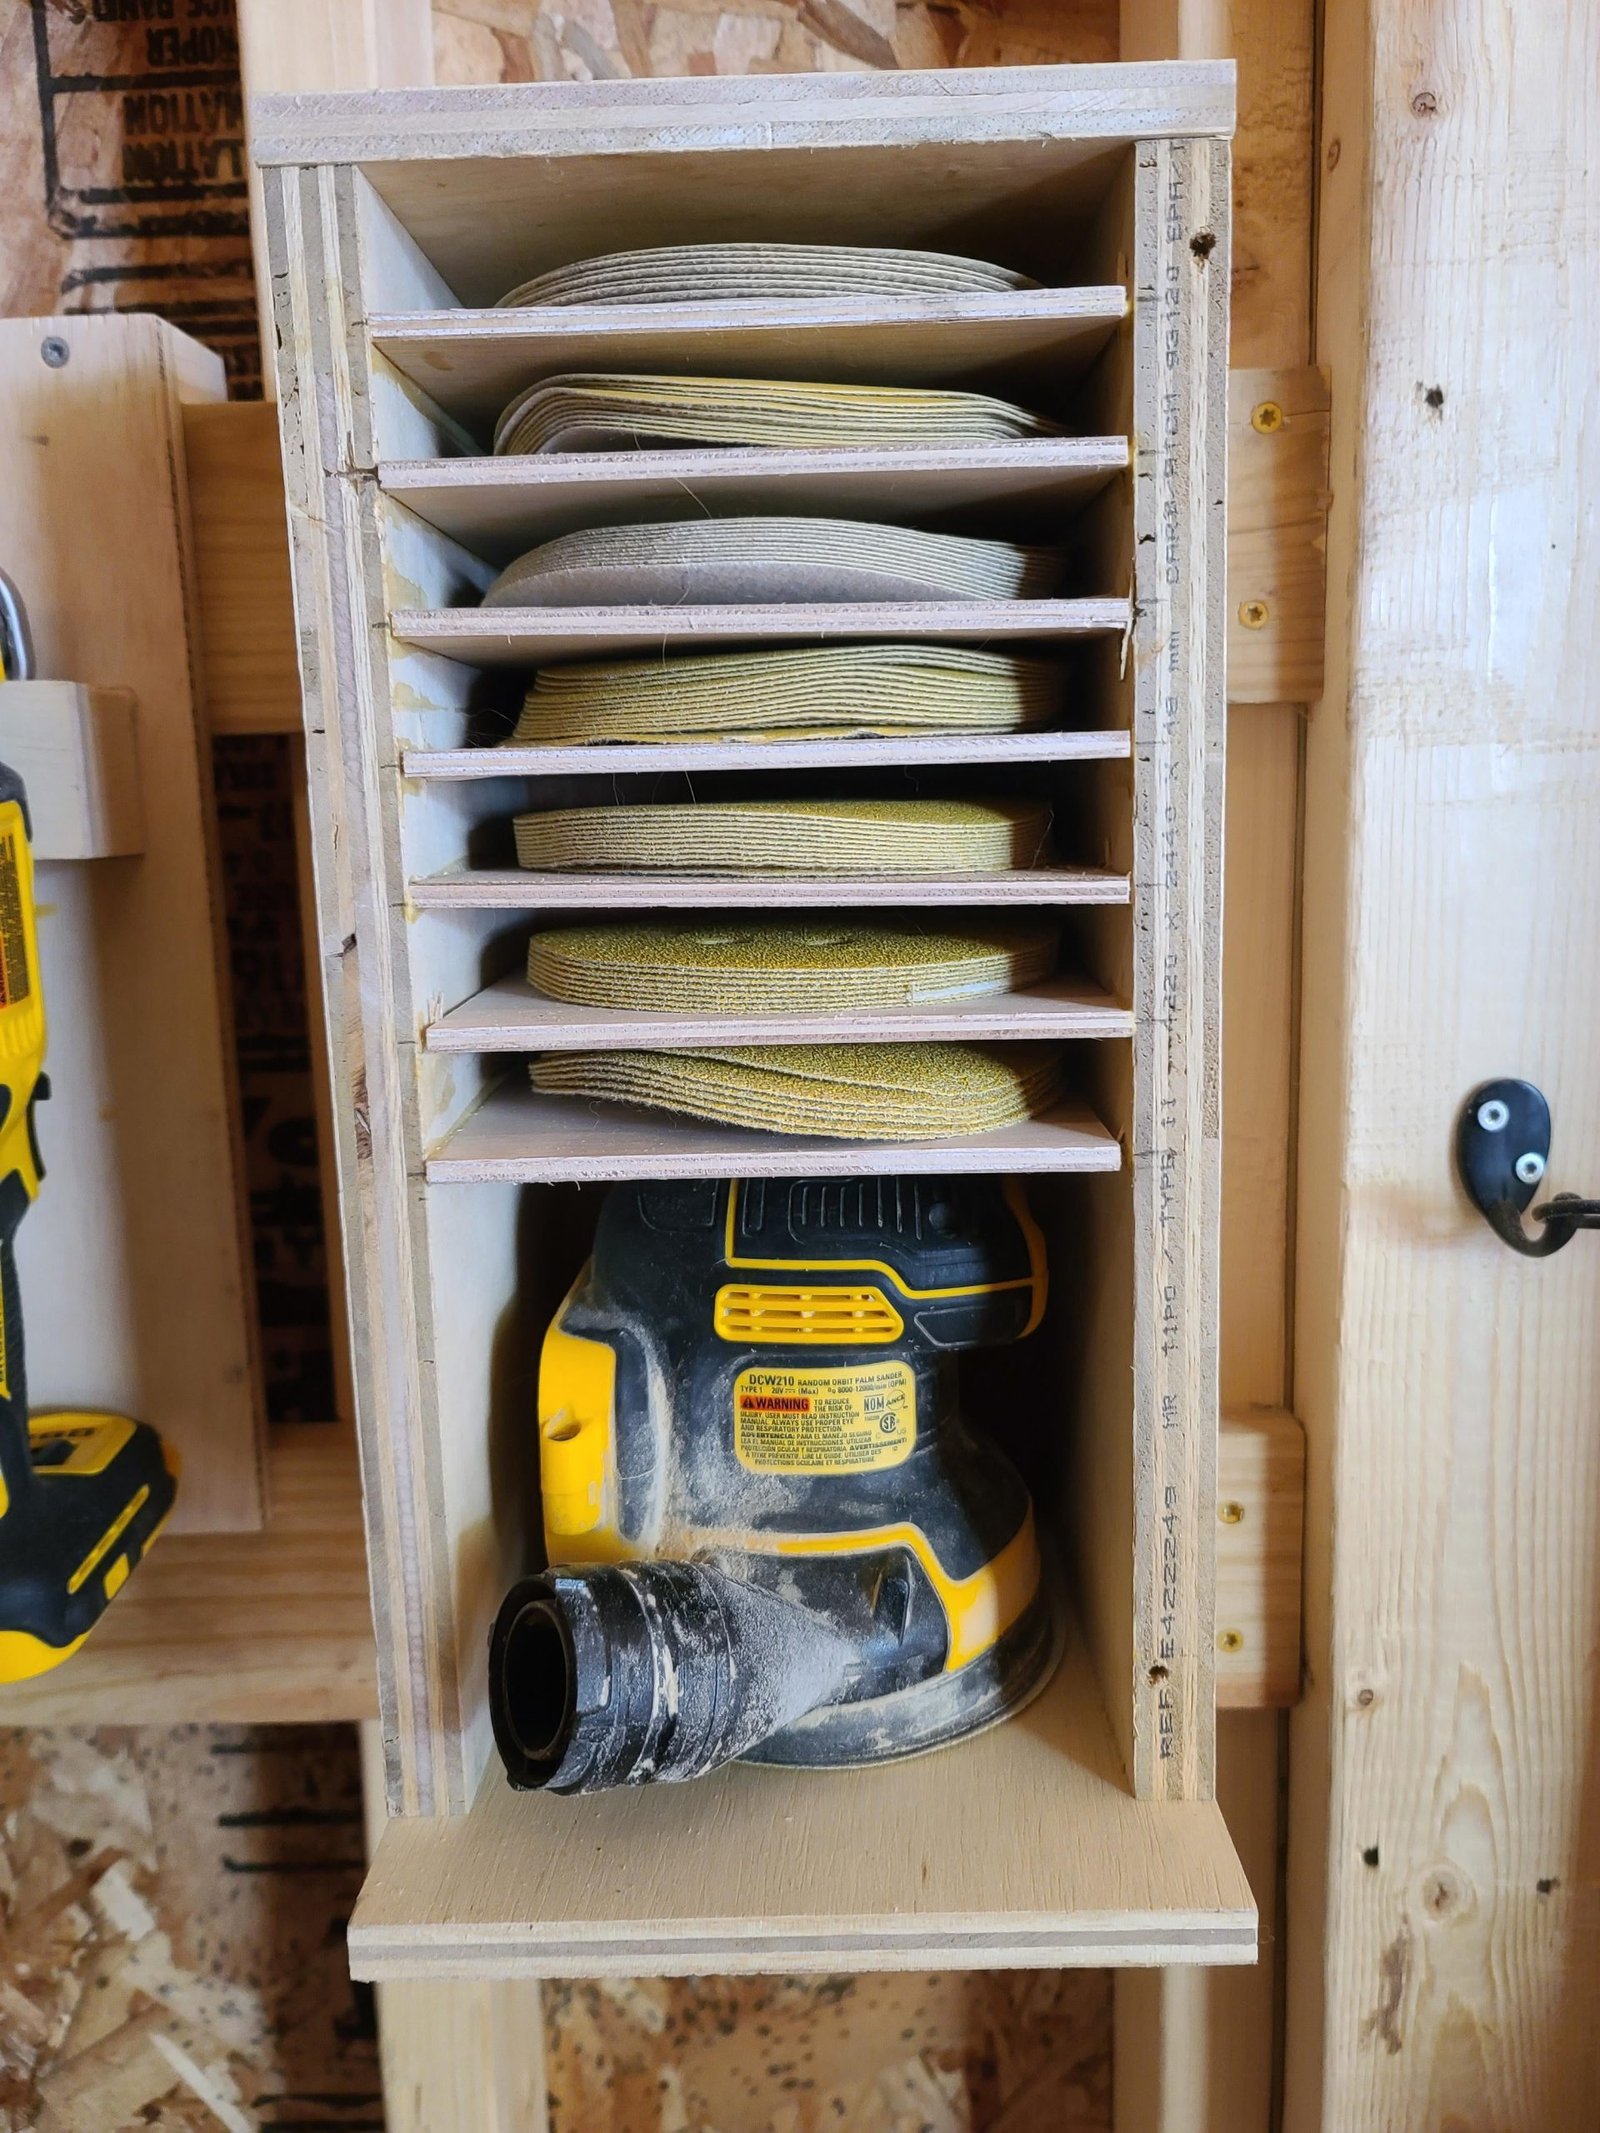
Utilizing Wall-mounted Bins
Wall-mounted bins free up floor space by using vertical walls. They keep sanding tools visible and organized.
Mount bins near your workspace for quick access. Use labels to find tools easily.
- Choose sturdy bins that hold the tool weight
- Arrange bins by tool size or type
- Install hooks or small shelves inside bins for extra storage
Repurposing Household Items
Old containers and jars can store small sanding tools and accessories. This saves money and reduces waste.
Use muffin tins, spice racks, or shoe organizers to sort different items. Label each spot for easy finding.
- Clean and dry containers before use
- Group similar tools together
- Stack containers to save space
Portable Bin Systems
Portable bins let you carry sanding tools to different jobs. Choose bins with compartments to separate items.
Look for bins with secure lids to protect tools from dust. Wheels or handles make transport easier.
- Select bins that fit your tool sizes
- Use foam inserts to keep tools steady
- Keep frequently used tools in the top compartments
Frequently Asked Questions
How Do I Organize Sanding Tools In Storage Bins?
Group sanding tools by type and size before storing. Use dividers or small containers inside bins to keep tools separated. Label each section clearly for easy access and quick identification. This method prevents damage and saves time when searching for specific tools.
What Is The Best Bin Type For Sanding Tools?
Plastic bins with airtight lids are ideal for sanding tools. They protect from dust, moisture, and physical damage. Transparent bins help you quickly see contents without opening. Choose sturdy bins that can hold the weight and allow easy stacking.
How To Prevent Sanding Tools From Getting Damaged In Bins?
Store sanding tools separately to avoid friction and wear. Use soft liners or foam padding inside bins to cushion tools. Keep bins in a dry, cool place to prevent rust or warping. Regularly inspect tools and clean bins to maintain tool condition.
Can I Store Sanding Tools With Other Workshop Items?
It’s best to store sanding tools separately to avoid cross-contamination. Mixing with other items may dull abrasive surfaces or cause damage. Dedicated bins or compartments ensure tools remain clean and effective for longer use.
Conclusion
Storing sanding tools in bins keeps your workspace neat and safe. It helps protect tools from damage and dust. Organizing tools by type or size saves time during projects. Clear labels on bins make finding tools quick and easy. Regularly cleaning and checking tools ensures they last longer.
Simple storage habits improve your work efficiency every day. Try these tips for better tool care and easy access. Small changes can make a big difference in your workshop. Keep tools ready and your work smooth.