Have you ever hung a picture on your wall, only to step back and realize it’s just a bit off? It’s a common frustration, but there’s a simple tool that can make all the difference: a level.
Using a level when hanging pictures ensures your art is perfectly aligned, transforming your space and eliminating the annoyance of crooked frames. Imagine walking into your room and feeling a sense of satisfaction because everything is just right. This guide will show you how to master the art of using a level for hanging pictures, so your home can look effortlessly polished.
Let’s dive in and discover how you can achieve picture-perfect walls every time.

Credit: www.create-enjoy.com
Choosing The Right Level
Using a level makes hanging pictures easier and more precise. Picking the right level helps you get straight lines every time.
Different types of levels suit different jobs. Also, size and features affect how useful a level is for your picture hanging needs.
Types Of Levels
There are several types of levels used for hanging pictures. Each type has a unique way of showing if something is straight.
- Bubble Level:Uses a liquid-filled tube with an air bubble to show level.
- Laser Level:Projects a laser line to guide placement on walls.
- Digital Level:Shows a digital readout of the angle for precise leveling.
- Torpedo Level:Small and easy to carry, ideal for tight spaces.
Size And Features To Consider
| Feature | Benefit |
| Length | Longer levels cover more area but can be hard to handle. |
| Weight | Lighter levels are easier to hold during use. |
| Vial Visibility | Clear vials help read the level accurately. |
| Magnetic Base | Keeps the level attached to metal surfaces for hands-free use. |
| Durability | Strong materials last longer and resist damage. |
Choosing a level with the right size and features makes hanging pictures faster and more accurate.
Preparing The Wall And Picture
Hanging pictures neatly requires good preparation. Using a level helps keep pictures straight.
Before hanging, you need to prepare the wall and the picture carefully. This makes the process easier.
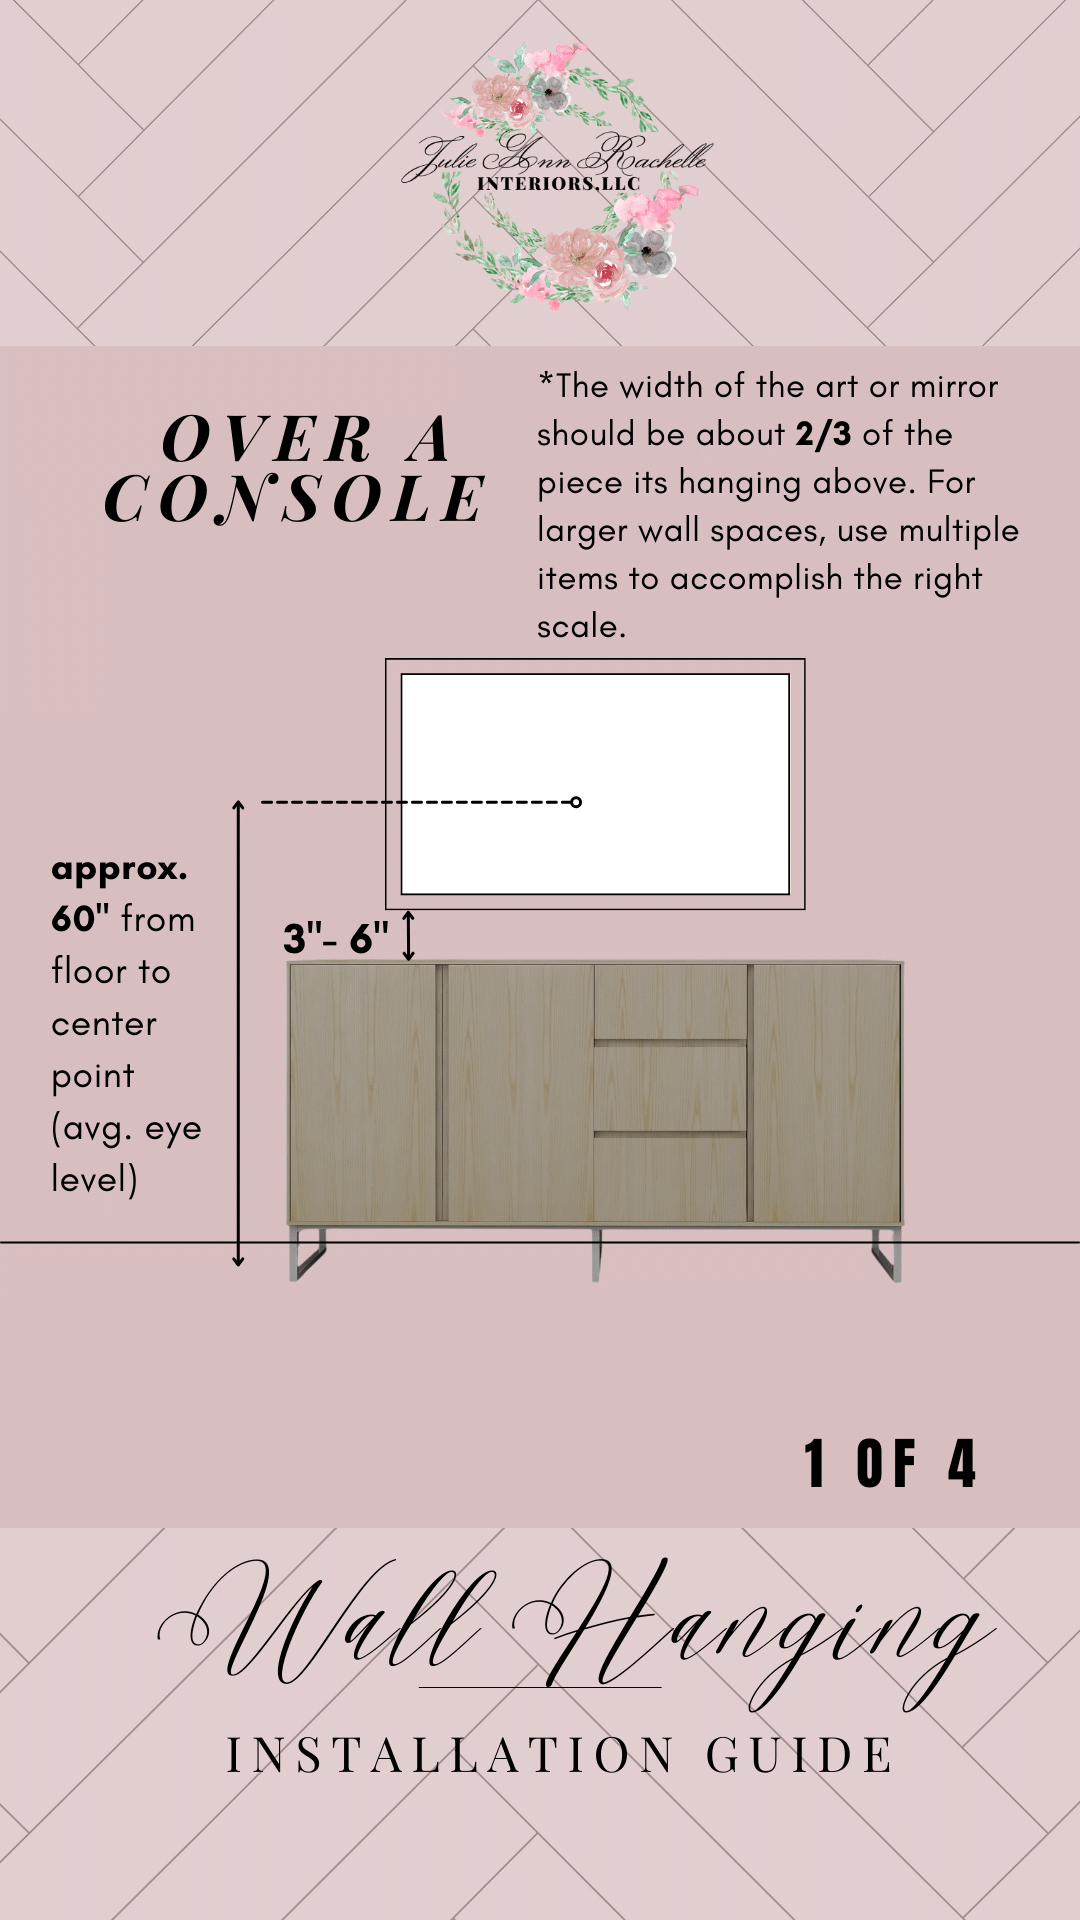
Selecting The Spot
Choose a wall space that fits the picture size and room style. Check for obstacles like switches.
Look for a spot at eye level for best viewing. Make sure the wall surface is clean and dry.
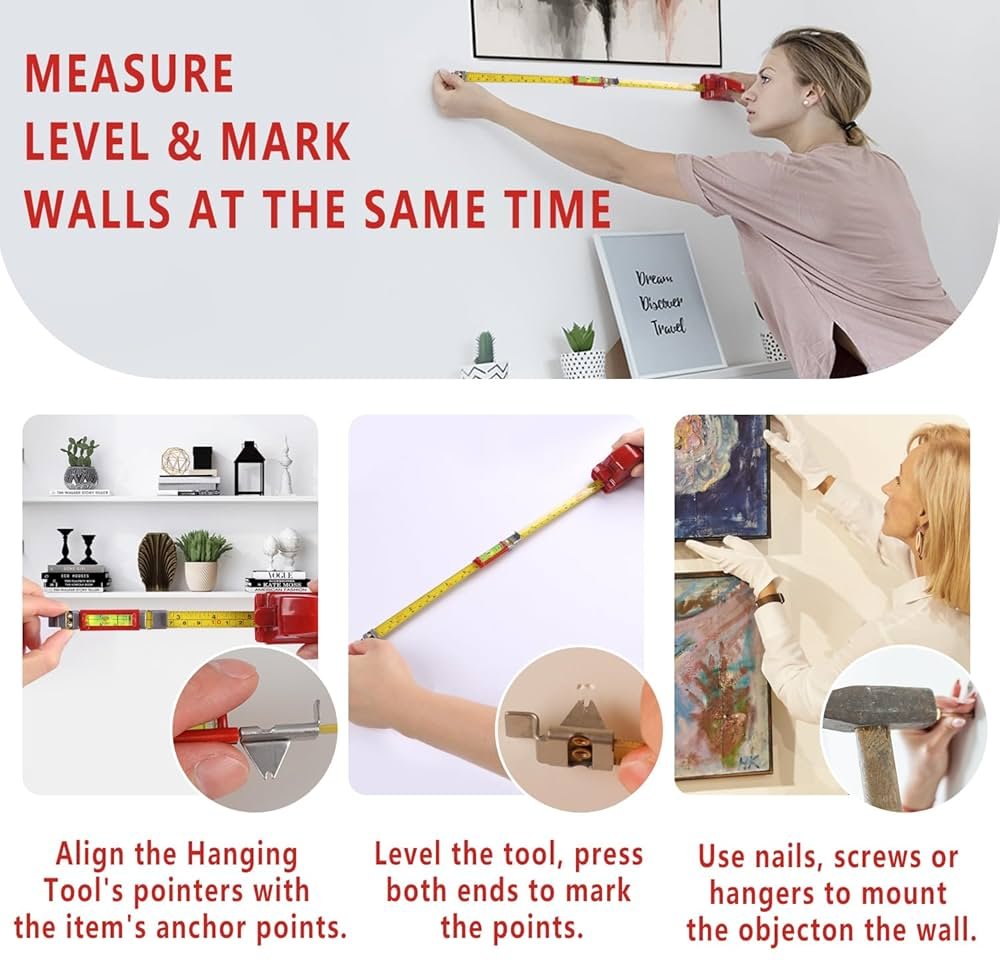
Marking Placement Points
Use a pencil and a level to mark where the picture will hang. Mark the top center point first.
Measure the distance from the hanger to the top of the picture. Mark this distance below the top center mark.
- Place the level horizontally on the wall
- Draw a light pencil line where the top edge will be
- Mark the exact spot for the nail or hook
Using The Level Effectively
A level helps you hang pictures straight on your wall. It shows if the picture is even or tilted.
Using the level correctly makes your work easier. It saves time and avoids mistakes.
Positioning The Level
Place the level on top of the picture frame. Make sure it touches the frame evenly.
If the picture is small, you can hold the level in your hand. For bigger frames, rest the level on the wall.
- Use a flat, clean surface on the frame for the level
- Hold the level steady without tilting it
- Keep the level horizontal to get an accurate reading
Reading The Bubble
Look inside the level’s bubble vial. The bubble moves inside a liquid-filled tube.
The picture is level when the bubble sits between the two black lines in the vial.
- If the bubble is to the left, the picture is tilted left
- If the bubble is to the right, the picture is tilted right
- Adjust the picture until the bubble centers between the lines
Adjusting The Picture
Move the picture frame slowly while watching the bubble in the level.
Lift one side or shift the frame until the bubble stays centered. Check the bubble again after each move.
- Use small adjustments for better accuracy
- Ask someone to hold the frame while you check the level
- Double-check the level on the frame top and side if needed

Credit: www.amazon.com
Hanging Multiple Pictures
Hanging many pictures on a wall looks great when they are even. Using a level helps keep pictures straight and tidy. It makes your wall art look neat and balanced.
This guide shows how to hang multiple pictures with a level. It covers aligning pictures and keeping space between them equal.
Aligning Pictures Horizontally
Use a level to make sure all pictures line up straight. Hold the level against the wall where the picture will hang. Adjust the nail or hook until the bubble is centered.
Check each picture’s top edge or center line with the level. This helps keep the pictures on the same height across the wall.
- Mark the top edge or center line lightly with a pencil
- Use the level to draw a straight horizontal line
- Hang pictures along the line for even alignment
Maintaining Consistent Spacing
Even spacing between pictures makes the display look clean. Measure the distance between frames before hanging.
Use a tape measure or ruler to keep the gaps the same size. Mark spots lightly on the wall for nails or hooks.
- Decide how much space you want between pictures
- Measure and mark equal spaces on the wall
- Use the level to keep marks even horizontally
- Hang pictures on the marked spots
Troubleshooting Common Issues
Using a level helps you hang pictures straight. Sometimes, walls or frames cause problems. This guide shows how to fix common issues.
Follow these tips to deal with uneven walls and misaligned frames. You will learn to adjust and correct your hanging process.
Dealing With Uneven Walls
Walls can have bumps or dips that make the level give wrong readings. You need to find the right spot to hang your picture.
- Move the level along the wall to spot flat areas.
- Use small spacers behind the frame to adjust for bumps.
- Mark the level’s position where it reads true level.
- Check the frame’s hanging hooks match the marks on the wall.
- Use a flexible level if the wall curves slightly.
Fixing Misaligned Frames
Frames may not hang straight if hooks or wires are uneven. Check the frame hardware and adjust as needed.
| Problem | Cause | Fix |
| Frame tilts left or right | Uneven hooks or wire length | Adjust hooks or tighten wire |
| Frame leans forward | Hanging wire too loose | Tighten wire or add support |
| Frame slips from nail | Wrong hook type or size | Use proper hooks or anchors |
| Level shows off by small angle | Frame not centered on wall hooks | Shift frame slightly left or right |
Credit: medium.com
Additional Tips For Perfect Alignment
Using a level helps hang pictures straight. Some extra tips make this job easier and more accurate.
Try these simple methods to ensure your pictures look neat and balanced on the wall.
Using Painter’s Tape
Painter’s tape can mark spots on the wall without damage. It helps keep your measurements clear and visible.
- Place tape where you want the picture’s top edge.
- Draw a light pencil line on the tape for the hanging point.
- Use the tape to hold the level in place if needed.
- Remove the tape easily after hanging the picture.
Double Checking With A Laser Level
A laser level projects a straight line across your wall. It helps confirm your picture is perfectly aligned.
| Tip | How It Helps |
| Set laser on a flat surface | Projects a steady line for reference |
| Align picture top with laser line | Ensures horizontal accuracy |
| Mark hanging spots on tape | Keeps marks visible and clean |
| Check multiple points | Confirms level across wide areas |
Frequently Asked Questions
How Do I Use A Level To Hang Pictures Straight?
Place the level on top of the picture frame. Adjust the frame until the bubble centers between the two lines. Mark the spot for the nail or hook.
What Type Of Level Is Best For Hanging Pictures?
A small, torpedo level is ideal for hanging pictures. It’s easy to handle and accurate for wall use. Magnetic levels also work well on metal surfaces.
Can I Hang Multiple Pictures Evenly With A Level?
Yes, use the level to align each frame’s top edge. Mark each spot carefully for consistent height. This ensures a balanced, professional look.
How Do I Keep The Level Steady While Marking?
Hold the level firmly against the wall or frame. Use one hand to stabilize it and the other to mark. Avoid moving the level during marking.
Conclusion
Using a level makes hanging pictures easy and neat. It helps keep frames straight on your wall. Avoid crooked or uneven displays by checking the level first. Small steps lead to a big difference in your room’s look. Trust the tool to guide you for perfect results.
Enjoy your nicely hung pictures every day. Simple tools bring great changes. Try it yourself and see how it works.
