Are you looking to create strong and precise rabbet joints in your woodworking projects? Marking wood accurately is crucial, and getting it right can make all the difference in the quality and durability of your final product.
Imagine the satisfaction of pieces fitting together seamlessly, as if crafted by a master artisan. In this guide, you’ll discover simple, effective techniques to mark wood for rabbet joints with confidence. Whether you’re a seasoned woodworker or just starting out, these tips will help you achieve professional results every time.
Keep reading to unlock the secrets of perfect rabbet joints and elevate your woodworking skills.

Credit: www.reddit.com
Tools Needed
Marking wood accurately is important for making rabbet joints. Using the right tools helps you make clean and precise marks.
This guide explains the tools needed to mark wood for rabbet joints. Each tool plays a specific role in the process.
Essential Marking Tools
Essential marking tools help you draw clear lines on the wood. They show where to cut or chisel for the rabbet joint.
- Pencil: Use a sharp pencil for fine, visible lines.
- Marking Knife: Cuts thin, precise marks that don’t smudge.
- Marking Gauge: Scribes lines parallel to the wood edge.
Measuring Instruments
Measuring tools help you get exact dimensions for the rabbet joint. Accurate measurements ensure the pieces fit well together.
- Tape Measure: Good for measuring long wood pieces.
- Combination Square: Measures and marks 90-degree angles.
- Ruler or Steel Rule: Provides straight edge and length measurement.
Cutting Accessories
Cutting accessories help you prepare the wood before marking. They make clean edges that guide your marks.
- Try Square: Checks the squareness of edges before marking.
- Chisel Set: Used after marking to clean out the rabbet area.
- Clamps: Hold the wood steady during marking and cutting.
Choosing Wood
Choosing the right wood is key for making strong rabbet joints. The wood must be easy to cut and hold glue well.
Wood type affects how the joint fits and lasts. Pick wood that matches your project needs.
Types Of Wood Suitable For Rabbets
Softwoods and hardwoods can both work for rabbets. Softwoods are easier to cut. Hardwoods are stronger.
- Pine: Soft and easy to work with
- Poplar: Smooth and paint-friendly
- Oak: Hard, strong, and durable
- Maple: Hard with fine grain
- Cherry: Hard with a smooth finish
Choose wood without cracks or knots. This keeps the joint tight and neat.
Wood Preparation Tips
Prepare your wood before marking for rabbets. This helps you get clean, accurate cuts.
- Sand the wood surface to remove rough spots
- Check wood moisture; dry wood cuts better
- Use a square to mark straight lines
- Clamp the wood to keep it steady
- Measure twice to avoid mistakes
Measuring The Rabbet
Marking wood for rabbet joints needs accurate measuring. You measure to ensure the joint fits tightly.
Understanding the rabbet size helps you mark the wood correctly. This makes cutting easier and precise.
Determining Rabbet Dimensions
Rabbet joints need two main measurements: depth and width. Depth is how far the cut goes into the wood.
Width is the length of the rabbet along the edge. Both dimensions depend on the wood thickness and joint type.
- Measure wood thickness with a caliper or ruler
- Decide rabbet depth usually half the wood thickness
- Set rabbet width based on the part joining the wood
Marking Depth And Width
Use a marking gauge or pencil to mark the rabbet depth. Mark from the wood edge to the cut line.
Mark the width along the wood edge. Use a square to make straight, clear lines for cutting.
- Set marking gauge to rabbet depth
- Draw a line around the wood edge
- Mark the width using a ruler and square
- Check marks before cutting to avoid mistakes
Marking Techniques
Marking wood accurately is key for strong rabbet joints. Good marking helps you cut and fit pieces precisely.
Different tools and methods help you mark wood clearly. Choose the right technique for your project.
Using A Marking Gauge
A marking gauge lets you scribe a line parallel to the wood edge. It keeps marks straight and even.
Set the gauge to the rabbet width. Hold it firmly and run the pin along the wood surface. This creates a clear line for cutting.
Employing A Combination Square
A combination square measures and marks right angles. It is helpful for marking rabbets at corners and edges.
- Place the stock of the square against the wood edge.
- Adjust the ruler to the rabbet depth or width.
- Draw a line using the pencil or knife along the ruler edge.
- Double-check measurements before cutting.
Pencil Vs. Knife Marking
| Marking Tool | Advantages | Disadvantages |
| Pencil | Easy to see, quick to use | Lines can be thick or smudged |
| Knife | Precise, creates thin lines | Harder to see, needs steady hand |
Pencils work well for general layout. Knives are better for exact cuts because their lines don’t blur.
Setting Up For Cuts
Marking wood for rabbet joints needs careful setup. Clear marks help make precise cuts.
Good setup saves time and makes your joints fit well. Focus on aligning and securing the wood.
Aligning Marks With Cutting Tools
Place your pencil or marking knife carefully along the edge. Make marks where the cut will start and stop.
Check your marks against the saw blade or router guide. The marks should line up exactly with the tool path.
- Use a square to draw straight lines at right angles.
- Double-check measurements before marking.
- Mark both the length and depth of the rabbet.
- Keep marks thin to avoid confusion when cutting.
Securing Wood For Accuracy
Hold the wood firmly to stop it from moving. Movement can cause uneven cuts and poor fitting joints.
Use clamps or a vise to keep the wood steady. Check that the wood is level and flat before cutting.
- Position clamps away from the cutting path.
- Apply pressure evenly to avoid warping the wood.
- Test stability by trying to move the wood before cutting.
- Use a solid workbench to support the wood well.
Common Mistakes
Marking wood for rabbet joints needs care and attention. Small errors can cause poor fits and weak joints.
Knowing common mistakes helps you avoid problems and improve your woodworking results.
Misaligned Marks
Misaligned marks happen when lines are not placed correctly on the wood. This leads to joints that don’t fit well.
It is important to use a square and measure carefully. Mark from the same reference edge every time.
- Always start marks from a consistent edge
- Use a sharp pencil or marking knife for clear lines
- Double-check measurements before cutting
Inconsistent Depth
Inconsistent depth means the rabbet cut is too shallow or too deep. This weakens the joint and looks uneven.
Use a marking gauge to set the exact depth. Check the gauge setting often to keep it steady.
- Set a marking gauge to the desired rabbet depth
- Mark the wood all around to guide the cut
- Measure the depth on test pieces before the real cut
Overcutting Issues
Overcutting happens when you cut beyond the marked line. This causes gaps and weakens the joint.
Cut slowly and stop exactly at the mark. Use stops or guides on your saw to avoid going too far.
- Follow the marked line carefully while cutting
- Use a stop block to limit the saw’s movement
- Check progress often to avoid cutting too deep or wide
Tips For Perfect Cuts
Marking wood correctly is key to making clean rabbet joints. Careful preparation helps you cut the wood exactly where needed. This guide shares tips to improve your cutting accuracy.
Follow these simple steps to measure, test, and maintain your tools. Doing so will make your woodworking safer and your joints stronger.
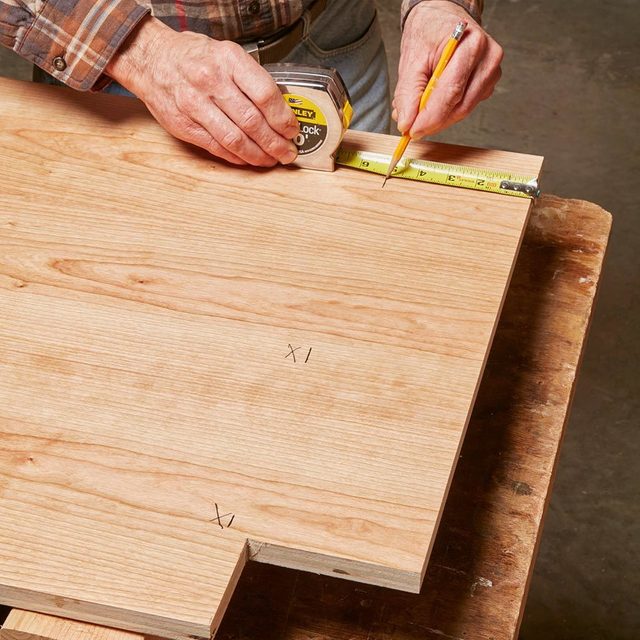
Double-checking Measurements
Always measure twice before marking the wood. Small errors can cause gaps in your rabbet joints. Use a reliable ruler or tape measure and check the marks carefully.
- Measure the length of the rabbet cut carefully.
- Mark the depth with a pencil or marking knife.
- Compare your marks with the project plans.
- Re-measure the wood piece to confirm accuracy.
- Adjust any marks if needed before cutting.
Using Test Pieces
Cutting a test piece helps you avoid mistakes on your main wood. It shows how your saw or router will perform on the real cut.
| Test Purpose | What to Check |
| Fit of the rabbet joint | Check if the two pieces fit tightly |
| Cut depth | Verify the rabbet depth matches your marks |
| Tool settings | Ensure blade or bit depth is correct |
| Wood reaction | Watch for tear-out or splintering |
Maintaining Sharp Tools
Sharp tools make cleaner cuts and reduce wood damage. Dull blades cause rough edges and can ruin your rabbet joints.
- Keep saw blades and router bits clean and sharp.
- Regularly inspect tools for damage or dullness.
- Use the right blade type for the wood species.
- Sharpen or replace blades as soon as you notice rough cuts.
- Store tools properly to avoid damage.

Credit: www.reddit.com
Credit: www.familyhandyman.com
Frequently Asked Questions
How Do I Mark Wood Accurately For Rabbet Joints?
Use a marking gauge to scribe precise lines along the wood edge. Ensure the gauge is set to the rabbet depth for accuracy.
What Tools Are Best For Marking Rabbet Joints?
A marking gauge, combination square, and pencil are essential. These tools help achieve clear, straight lines for consistent rabbet cuts.
How Deep Should I Mark Rabbet Joints On Wood?
Mark the depth equal to the rabbet’s required size. Typically, this matches the thickness of the mating wood piece.
Can I Use A Pencil Or Knife To Mark Rabbet Joints?
A pencil works for general marking, but a marking knife offers more precision and cleaner lines for rabbet joints.
Conclusion
Marking wood for rabbet joints is simple with the right steps. Use clear lines and measure twice for accuracy. A sharp pencil and square help create neat marks. Taking time to mark carefully saves effort during cutting. Practice these tips to improve your woodworking skills.
Precise marking leads to strong, clean joints every time. Keep tools sharp and work patiently for best results. Enjoy making your projects fit perfectly and look great.