Are you tired of uneven tiles that make your flooring project look less than perfect? Imagine transforming your tiling work with precision and ease.
A laser level can be your secret weapon. It’s not just a tool; it’s a game-changer that can turn your tiling tasks into a satisfying experience. In this guide, you’ll discover how to use a laser level to achieve professional-looking results without the stress of constant re-adjustments.
Whether you’re a DIY enthusiast or a seasoned pro, understanding how to harness the power of a laser level can save you time, effort, and frustration. Dive into this guide and unlock the secrets to flawless tiling that will impress anyone who steps foot in your space.

Credit: huepar.com
Benefits Of Laser Levels In Tiling
Using a laser level for tiling helps you get straight and even lines. It makes the whole process simpler and more accurate than older methods.
This guide explains why laser levels are useful for tiling work. You will learn how they improve accuracy, save time, and are easy to use.
Accuracy Compared To Traditional Methods
Laser levels project a clear and straight line on the surface. This line acts as a perfect guide for placing tiles. Traditional tools like chalk lines or spirit levels can be less precise.
- Laser lines are easy to see on walls and floors.
- They reduce human error in measuring and marking.
- Laser levels keep tiles aligned over large areas.
- They help maintain level and plumb lines without extra tools.
Time-saving Advantages
Laser levels speed up the tiling process by giving instant reference lines. You spend less time marking and checking measurements. This lets you finish the job faster.
| Task | With Laser Level | With Traditional Tools |
|---|---|---|
| Marking straight lines | Few seconds | Several minutes |
| Checking level | Instant | Repeated checks needed |
| Fixing alignment errors | Rare | Common |
Ease Of Use For Beginners And Experts
Laser levels are simple to set up and use. Beginners can quickly learn to position tiles straight. Experts benefit from the consistent and reliable guides.
- Most laser levels have easy controls and clear displays.
- They often come with adjustable stands or mounts.
- Both small and large projects can use laser guides.
- They reduce stress by making sure tiles line up correctly.

Credit: levelsure.com
Types Of Laser Levels Suitable For Tiling
Using a laser level helps you place tiles straight and even. Different laser levels suit different tiling jobs.
Here are the main types of laser levels you can use for tiling work.
Line Laser Levels
Line laser levels project a single straight line on a surface. They work well for small tiling areas or walls.
- Show a horizontal or vertical line
- Easy to set up and use
- Best for simple straight tile layouts
- Usually compact and affordable
Cross Line Laser Levels
Cross line laser levels show two lines that cross at a 90-degree angle. This helps align tiles both horizontally and vertically.
| Feature | Benefit for Tiling |
|---|---|
| Horizontal and vertical lines | Align tiles in two directions |
| Self-leveling function | Ensures accuracy on uneven surfaces |
| Compact size | Easy to move around the work area |
Rotary Laser Levels
Rotary laser levels spin a laser beam 360 degrees. They work well for large floor areas or outdoor tiling projects.
Rotary laser level advantages:
- Project a full circle line around the room
- Good for setting level points over large distances
- Often have a remote control for easy use
- More expensive but highly precise
Preparing Your Workspace
Using a laser level makes tiling easier and more accurate. Preparing your workspace well helps you get the best results.
Clean and organize the area before you start. Clear space helps you work safely and smoothly.
Cleaning And Clearing The Surface
Remove dirt, dust, and old adhesive from the tiling surface. A clean surface helps tiles stick better.
Clear away any objects or tools that might block your work area. This keeps your workspace safe and tidy.
- Sweep or vacuum the floor or wall
- Wipe surfaces with a damp cloth
- Remove old grout or glue with a scraper
- Keep tools and materials organized nearby
Marking Starting Points
Find the center or a straight edge to start your tiles. Mark points lightly with a pencil or chalk.
Marking helps you place the laser level and tiles in the right spot. It guides your work and keeps tiles even.
- Measure the wall or floor width and height
- Find the middle point using a tape measure
- Draw light lines to show where tiles will begin
- Check lines are straight using a ruler or square
Setting Up The Laser Level
Place the laser level on a flat surface or tripod near your starting marks. Make sure it is stable and secure.
Turn on the laser and adjust it until the beam matches your marks. Check the laser line is straight and level before you begin.
- Use a tripod or stable base for the laser level
- Turn on the laser and allow it to self-level
- Adjust height and angle to match your starting points
- Verify the laser line is visible and straight
- Lock the laser level in place to prevent movement
Step-by-step Tiling With A Laser Level
Using a laser level makes tiling more precise and faster. It helps keep tiles straight and even.
This guide shows how to use a laser level for tiling in simple steps.
Positioning The Laser Level
Place the laser level where it can project lines across the entire tiling area. Use a tripod or mount to keep it steady.
Make sure the laser level is at the right height and angle to cover the wall or floor surface.
- Clear the area of obstacles
- Set the laser level on a flat surface
- Turn on the laser and check the line’s reach
- Adjust height and angle as needed
Aligning Tiles With Laser Lines
Use the laser lines as guides to place tiles in a straight row. Start from the bottom or center for best results.
Match each tile edge with the laser line to ensure they stay aligned throughout the work.
- Lay the first tile along the laser line
- Place spacers to keep gaps even
- Follow the laser line for each new tile
- Check alignment often
Checking Level And Plumb
Use the laser level’s vertical and horizontal lines to check that tiles are level and plumb. This prevents uneven surfaces.
Look at the laser lines compared to tile edges regularly during installation.
- Check vertical lines for tile columns
- Check horizontal lines for rows
- Use a spirit level to double-check if needed
- Correct any misalignment immediately
Adjusting Tiles During Installation
If a tile is off, lift it gently and reposition it to match the laser lines. Use spacers to keep gaps consistent.
Adjust tiles before the adhesive sets. Small moves make a big difference in the final look.
- Check the tile alignment with the laser line
- Lift and shift tiles as needed
- Tap tiles lightly to level them
- Remove excess adhesive for clean joints
Common Challenges And Solutions
Using a laser level for tiling helps keep lines straight and even. Still, some problems can appear during the process. Knowing how to fix these issues saves time and improves results.
This guide covers three common challenges: uneven surfaces, bright light, and obstacles. Each section offers clear tips to handle these problems effectively.
Dealing With Uneven Surfaces
Uneven walls or floors can make laser lines look off. This can cause tiles to be misaligned. Adjusting the laser and preparing the surface can help.
- Check the surface with a spirit level before starting.
- Use shims or thin layers of mortar to even out bumps.
- Adjust the laser level to match the corrected surface height.
- Mark high and low spots to avoid tiling errors.
- Recheck laser lines often during the job.
Managing Laser Visibility In Bright Light
Bright light can make the laser beam hard to see. This slows down work and causes mistakes. Using the right tools and settings can improve visibility.
| Solution | Description |
| Use laser glasses | Special glasses make the laser beam clearer in daylight. |
| Choose a green laser | Green lasers are brighter and easier to see than red ones. |
| Lower ambient light | Close curtains or work in shaded areas if possible. |
| Increase laser brightness | Set the laser to its highest brightness mode. |
Handling Obstacles And Corners
Obstacles and corners block laser lines. This makes it hard to keep tiles straight around edges. Moving the laser and marking points helps manage this challenge.
Try these tips for tricky spots:
- Place the laser level in multiple positions to cover all areas.
- Use a pencil to mark laser points on walls and floors.
- Draw connecting lines by hand between laser points.
- Use a laser detector if the beam is faint or blocked.

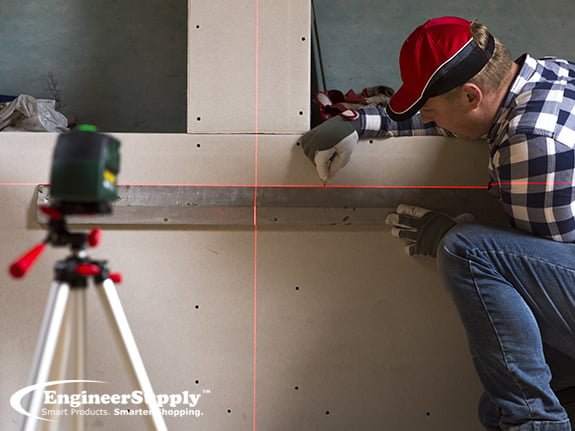
Credit: www.engineersupply.com
Maintenance And Care For Laser Levels
Taking good care of your laser level keeps it working well for a long time. Regular maintenance helps prevent damage and errors.
This guide covers cleaning, storing, and managing the battery of your laser level. These simple steps improve accuracy and lifespan.
Cleaning The Device
Keep the laser level free from dust and dirt. Clean the lens carefully to avoid scratches and blurry lines.
- Use a soft, dry cloth to wipe the outer surface
- Use a lens cleaning cloth or solution for the laser lens
- Avoid using harsh chemicals or water directly on the device
- Check for debris in the battery compartment and remove it
Storage Tips
Store your laser level in a dry, safe place. Protect it from extreme temperatures and moisture to avoid damage.
| Storage Condition | Recommendation |
| Temperature | Keep between 10°C and 40°C (50°F and 104°F) |
| Humidity | Store in a dry place with low humidity |
| Protection | Use a padded case or box |
| Position | Place on a flat, stable surface |
Battery Management
Proper battery care keeps the laser level ready for use. Check batteries often and replace or recharge as needed.
- Turn off the device when not in use to save power
- Remove batteries if the laser level will not be used for a long time
- Use the correct battery type recommended by the manufacturer
- Charge rechargeable batteries fully before storing
- Dispose of old batteries properly according to local rules
Additional Tips For Perfect Tiling
Using a laser level helps keep tiles straight and even. To get the best results, follow these extra tips. They focus on adhesives, spacers, and grouting.
These small steps improve the look and durability of your tiled surface. Pay close attention to each part of the tiling process.
Choosing The Right Tile Adhesive
Select an adhesive that fits your tile type and surface. Some adhesives work better for ceramic, others for stone or glass. Check product details carefully.
- Match adhesive with the tile material.
- Consider the location: wet areas need waterproof adhesive.
- Look at drying time to plan your work.
- Read instructions for mixing and applying.
Using Spacers For Consistent Gaps
Spacers keep tiles evenly spaced. This helps grout lines look neat and uniform. Place them between tiles as you lay them down.
| Spacer Size | Gap Width | Ideal Tile Type |
|---|---|---|
| 1/16 inch | 1.5 mm | Small ceramic tiles |
| 1/8 inch | 3 mm | Standard wall tiles |
| 3/16 inch | 5 mm | Large floor tiles |
| 1/4 inch | 6 mm | Natural stone tiles |
Remove spacers after the adhesive has set but before grouting.
Grouting With Precision
Grout fills gaps and seals the tiles. Use a rubber float to spread grout at a 45-degree angle. Press grout into gaps firmly.
- Mix grout to a smooth, thick paste.
- Work in small sections for better control.
- Clean excess grout quickly with a damp sponge.
- Let grout cure fully before cleaning tiles.
Frequently Asked Questions
What Is A Laser Level Used For In Tiling?
A laser level projects precise straight lines on surfaces. It ensures tiles align evenly and stay level during installation. This tool reduces errors and speeds up the tiling process, improving overall accuracy and finish quality.
How Do You Set Up A Laser Level For Tiles?
Place the laser level on a stable surface or tripod. Turn it on and adjust it until the laser line is perfectly horizontal or vertical. Mark the laser line on the wall or floor to guide tile placement.
Can A Laser Level Improve Tile Alignment Accuracy?
Yes, a laser level provides a clear, straight reference line. This helps keep tiles aligned perfectly straight, preventing crooked or uneven rows. It enhances precision, making tile installation easier and more professional.
Is A Laser Level Necessary For Diy Tiling Projects?
While not mandatory, a laser level greatly simplifies DIY tiling. It helps beginners maintain straight lines and level tiles, reducing mistakes. Using one can save time and produce better results.
Conclusion
Using a laser level helps keep your tiles straight and even. It saves time and reduces mistakes during tiling. Always check the laser’s position before starting your work. Small steps like this improve your tile’s final look. With practice, handling a laser level becomes easier and faster.
This tool brings precision to any tiling project, big or small. Remember, careful setup leads to great results every time. Keep your workspace clean and measure twice to avoid errors. A laser level makes tiling simpler and more accurate for everyone.