Imagine transforming your home with precision and ease, creating perfectly aligned and balanced rooms without the stress of guesswork. This is possible with the power of a laser level.
Whether you’re a seasoned DIY enthusiast or a homeowner tackling a project for the first time, mastering this tool can make your room layouts look professionally done. In this guide, you’ll discover how to use a laser level to achieve stunning results.
You’ll learn to effortlessly tackle tasks like hanging pictures, installing shelves, or planning a new room layout. By the end of this article, you’ll have the confidence and skills to enhance your home with perfect symmetry and alignment. Ready to unlock the secret to a flawless room layout? Let’s dive in.
Credit: www.theottohouse.com
Choosing The Right Laser Level
A laser level helps make your room layouts straight and accurate. Picking the right one saves time and avoids mistakes. This guide covers key points to help you choose well.
Understanding the types, features, and costs will help you find the best laser level for your projects.
Types Of Laser Levels
There are several kinds of laser levels. Each suits different tasks and spaces.
- Line Laser Levels:Projects horizontal and vertical lines. Good for aligning pictures and shelves.
- Dot Laser Levels:Shows points on walls or floors. Useful for plumbing and electrical work.
- Rotary Laser Levels:Spins 360 degrees for large areas. Ideal for floor leveling and site layouts.
- Combination Levels:Offers multiple laser modes. Fits varied tasks and needs.
Features To Consider
Look at key features that affect ease of use and accuracy.
| Feature | Why It Matters |
| Range | Longer range covers bigger rooms and outdoor sites. |
| Accuracy | Higher accuracy means better layout precision. |
| Self-Leveling | Auto-level saves time and reduces errors. |
| Mounting Options | Tripods and magnetic mounts add flexibility. |
| Battery Life | Long battery life supports longer work sessions. |
Budget And Quality
Price often links to build quality and features. Choose a model that fits your budget without cutting needed functions.
- Set a budget before shopping.
- Check reviews for reliability and accuracy.
- Buy from brands known for good support and warranty.
- Consider used or refurbished options for lower prices.
- Balance cost with features that match your project needs.
Setting Up Your Laser Level
Using a laser level helps you create accurate room layouts. Setting it up correctly is key for good results.
This guide explains how to prepare your room, mount the laser level, and calibrate the device.
Preparing The Room
Clear the room of furniture and obstacles. This makes it easier to place the laser level and see the lines clearly.
Check the floor and walls for dirt or dust. Clean surfaces help the laser line show up better.
Mounting And Positioning
Place the laser level on a stable surface or tripod. Make sure it is secure and will not move during use.
Position the laser so the beam covers the area you want to mark. Adjust height and angle as needed.
- Use a tripod for height adjustments
- Keep the device level for accuracy
- Aim the laser at the target wall or floor
Calibrating The Device
Turn on the laser level and check if the beam is straight and level. Calibration ensures accurate lines.
Use the device’s built-in bubble level or digital display to adjust it. Follow the manufacturer’s instructions for fine-tuning.
- Check for zero errors before use
- Adjust screws or knobs to level the laser
- Test the beam on a known level surface
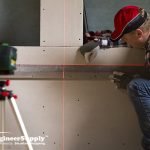
Using Laser Levels For Wall Layouts
Laser levels help make wall layouts accurate and easy. They project straight lines that guide your work.
Using a laser level saves time and improves precision for any wall project.
Marking Straight Lines
Set the laser level on a stable surface or mount it on a tripod. Turn it on to project a straight horizontal or vertical line on the wall.
Use the laser line as a guide to mark points or draw lines with a pencil. This helps keep walls straight and even.
- Place the laser level at the desired height.
- Ensure the laser line is clearly visible on the wall.
- Mark the wall along the laser line with a pencil.
- Double-check marks before drilling or cutting.
Aligning Fixtures And Outlets
Fixtures like shelves, cabinets, and outlets need to be level and aligned. Laser levels provide a precise reference line.
| Fixture Type | Use Laser For | Tip |
| Light Switches | Vertical alignment | Mark outlet height with laser line |
| Wall Cabinets | Horizontal leveling | Use laser line for top and bottom edges |
| Shelves | Consistent height | Check multiple points along wall |
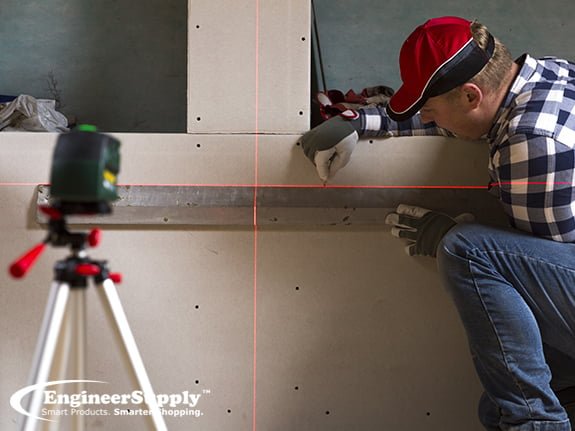
Checking Wall Plumb
A laser level can check if walls are perfectly vertical. This is important before installing drywall or tiles.
Place the laser level to project a vertical line. Measure the distance between the wall and the laser line at top and bottom.
- If distances match, the wall is plumb.
- If distances differ, the wall is leaning.
- Use this info to adjust framing or layout.
Credit: www.engineersupply.com
Floor And Ceiling Layouts
Using a laser level helps create straight and accurate lines on floors and ceilings. This tool saves time and reduces errors in room layouts.
Proper floor and ceiling alignment is important for installing tiles, lighting, and other fixtures. This guide explains key techniques for using a laser level in these tasks.
Projecting Level Lines On Floors
Place the laser level on a stable surface or tripod near the center of the room. Turn it on to project a horizontal line across the floor walls.
- Mark the laser line on the floor with chalk or tape.
- Use the line to align tiles or floorboards.
- Check the line at multiple points to ensure it stays level.
- Adjust the laser position if needed for full room coverage.
Ceiling Alignment Techniques
Set the laser level to project a line on the ceiling. This helps with installing ceiling tiles or mounting fixtures at the same height.
| Technique | Purpose | Tip |
| Line Projection | Mark level height | Use bright laser for visibility |
| Cross Line | Find center points | Place laser in room center |
| Rotating Laser | Cover full ceiling | Use tripod for stability |
Working With Uneven Surfaces
Uneven floors or ceilings can cause laser lines to look off. Adjust the laser level or use shims to keep it stable.
Follow these tips for uneven surfaces:
- Place the laser on a flat board if the surface is rough.
- Check the laser bubble level before use.
- Adjust laser settings for slope if available.
- Mark multiple points and connect them with a straight edge.
Maximizing Accuracy And Precision
Using a laser level helps create precise room layouts. It saves time and reduces errors in measurements.
To get the best results, you must understand how to avoid mistakes, keep the tool stable, and calibrate it often.
Avoiding Common Mistakes
Many errors happen from simple mistakes. Avoid moving the laser level after setting it. Check for obstacles that block the laser beam.
- Do not use the laser level on uneven surfaces.
- Keep the sensor clean and free from dust.
- Ensure the laser beam is visible in the room light.
- Use the correct laser mode for your task.
- Double-check measurements before marking.
Maintaining Stability
Stability is key for accuracy. Any shake or tilt changes the laser’s position and causes errors.
| Tip | Why It Helps |
| Use a tripod or flat surface | Keeps the laser steady and level |
| Check that legs or base are firm | Prevents wobbling during use |
| Lock the laser in place | Stops movement after adjustment |
| Avoid touching the laser while measuring | Prevents shifting or shaking |
Regular Calibration Tips
Calibration keeps the laser level accurate over time. Tools can drift or lose precision after use.
- Place the laser level on a flat, stable surface.
- Turn it on and aim the beam at a wall about 10 feet away.
- Mark the laser line on the wall.
- Rotate the laser 180 degrees and mark the new line.
- Check the difference between the two marks to find error.
- Adjust the laser according to the user manual if needed.
- Repeat calibration every few months or after rough handling.
Advanced Tips And Tricks
Using a laser level can greatly improve your room layouts. This guide shares tips to help you work smarter and avoid common mistakes.
These advanced ideas cover outdoor use, combining tools, and fixing issues that may arise during your projects.
Using Laser Levels Outdoors
Outdoor use requires care due to sunlight and uneven ground. Choose a laser level with bright beams and a good range for open spaces.
- Use a laser detector to spot the beam in bright light.
- Place the tripod on stable ground to prevent movement.
- Check the battery before heading outside to avoid shutdowns.
- Mark points with flags or stakes for easy reference.
Combining Laser Levels With Other Tools
Laser levels work well with traditional tools. Use a tape measure and carpenter’s square to verify measurements and angles.
| Tool | How to Use with Laser Level |
| Tape Measure | Double-check distances marked by the laser beam. |
| Carpenter’s Square | Confirm right angles for corners and walls. |
| Chalk Line | Create straight reference lines guided by the laser. |
| Plumb Bob | Ensure vertical alignment alongside laser points. |
Troubleshooting Common Issues
Some problems can slow your progress. Here are signs and fixes to keep your laser level working well.
Fix:Replace batteries or charge the unit.
Issue:Laser level does not self-level.
Fix:Check if the device is on a flat surface and reset.
Issue:Measurement seems off.
Fix:Calibrate the laser level following the user manual.
Issue:Beam not visible outdoors.
Fix:Use a laser detector or work in shaded areas.

Credit: www.engineersupply.com
Frequently Asked Questions
What Is A Laser Level Used For In Room Layouts?
A laser level projects straight lines to ensure accurate alignment. It helps position walls, fixtures, and furniture precisely in room layouts, saving time and reducing errors during setup.
How Do I Set Up A Laser Level For Accurate Measurements?
Place the laser level on a stable surface or tripod. Turn it on and adjust until the laser line is perfectly horizontal or vertical. Use the built-in bubble to confirm level accuracy.
Can A Laser Level Improve Diy Room Layout Projects?
Yes, a laser level simplifies DIY projects by providing precise reference lines. It helps avoid mistakes, ensures symmetry, and speeds up tasks like installing shelves, tiles, or painting.
What Safety Precautions Should I Follow When Using A Laser Level?
Avoid direct eye exposure to the laser beam. Use laser safety glasses if recommended. Keep the device away from children and never point the laser at reflective surfaces.
Conclusion
Using a laser level makes room layouts easier and more accurate. It saves time and reduces mistakes. Set up the level carefully and check your measurements twice. This tool helps you create straight lines and perfect angles. Practice a few times to feel confident.
A laser level works well for any room size or project. Keep it steady and follow the instructions closely. Your layouts will look neat and professional. Simple steps lead to great results. Give it a try and see the difference yourself.