Are your utility knives not cutting it anymore? Whether you’re trimming wallpaper or slicing through cardboard, a sharp utility knife is your best friend for any DIY project.
Dull blades can slow you down and even lead to mistakes, costing you time and effort. But don’t worry, giving your knives a new lease on life is easier than you think. In this guide, you’ll discover simple, effective techniques to get those blades razor-sharp in no time.
Imagine the satisfaction of clean, smooth cuts and the precision that makes your projects shine. Ready to transform your DIY experience? Keep reading to learn how to make every slice count.

Credit: www.youtube.com
Choosing The Right Sharpening Tools
Sharpening a utility knife needs the right tools. Picking the right tool helps keep your blade sharp and safe.
Different tools work better for different knives and skills. Learn about whetstones, sharpening rods, and electric sharpeners.
Whetstones And Their Grit Levels
Whetstones are flat stones used for sharpening knives. They come in different grit levels that affect the sharpness.
Low grit stones are coarse and remove metal fast. High grit stones are fine and polish the blade for a sharp edge.
- Coarse grit (200-600): Fixes dull or damaged blades
- Medium grit (800-1500): Sharpens and smooths edges
- Fine grit (3000-8000): Polishes for a razor-sharp finish
Using Sharpening Rods
Sharpening rods, also called honing rods, keep blades aligned. They do not remove much metal but help maintain sharpness.
Use rods regularly to keep your knife edge straight. They work best for small touch-ups and quick sharpening jobs.
- Steel rods: Durable and good for most knives
- Ceramic rods: Remove small amounts of metal for sharper edges
- Diamond rods: Best for very dull knives and hard metals
Electric Sharpeners: Pros And Cons
Electric sharpeners are fast and easy to use. They have built-in guides to keep the angle correct.
They can remove a lot of metal quickly, which shortens blade life if used often. Some models work better than others.
- Pros: Fast sharpening, easy for beginners, consistent angles
- Cons: Can remove too much metal, less control, may not fit all knives
Preparing Your Utility Knife
Before sharpening your utility knife, you must prepare it properly. This preparation helps you work safely and get better results.
Two main steps are cleaning the blade and following safety rules. These steps protect you and the knife during sharpening.
Cleaning The Blade
Cleaning the blade removes dirt, rust, and old residue. A clean blade sharpens more evenly and lasts longer.
- Use warm water and mild soap to wash the blade.
- Gently scrub with a soft brush or cloth.
- Dry the blade completely with a clean towel.
- Apply a light oil layer to stop rust from forming.
Safety Precautions
Sharpening a utility knife can be risky. Follow these safety tips to avoid injury.
| Safety Tip | Reason |
| Wear cut-resistant gloves | Protect your hands from sharp edges |
| Work on a stable surface | Prevent slips and accidents |
| Keep fingers away from the blade | Avoid cuts while sharpening |
| Use proper sharpening tools | Ensure safe and effective sharpening |
| Store knife safely after use | Prevent accidental cuts later |
Sharpening Techniques
Utility knives need sharp blades for safe and clean cuts. Sharpening helps keep the blade effective for DIY projects.
Using the right technique improves the blade’s sharpness and lasts longer. This guide shares easy sharpening tips.
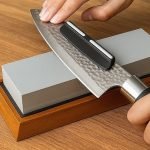
Angle And Pressure Tips
Hold the blade at the correct angle to sharpen it well. Usually, a 20-degree angle works for utility knives.
Apply steady, light pressure while sharpening. Too much pressure can damage the blade edge.
- Keep blade angle steady around 20 degrees
- Use light and even pressure
- Avoid pushing too hard on the sharpening stone
- Move the blade smoothly across the sharpener
Step-by-step Sharpening Process
Start by cleaning the blade to remove dirt and debris. This helps you see the edge clearly.
Use a sharpening stone or a diamond sharpener for best results. Follow these steps carefully.
- Place the blade at the correct angle on the sharpener
- Draw the blade across the sharpener from heel to tip
- Repeat this motion 5 to 10 times on one side
- Flip the blade and sharpen the other side equally
- Check the blade sharpness with a light touch
- Wipe the blade clean after sharpening
Maintaining Consistent Blade Angle
Keeping the same angle ensures the blade edge stays even. This makes cutting easier and safer.
Practice holding the blade steady before you start sharpening. Small angle changes reduce sharpness.
- Use a guide or angle tool if available
- Watch the blade edge closely during sharpening
- Move slowly and keep the blade steady
- Check the blade angle often with your eye or tool

Credit: www.youtube.com
Testing Sharpness
Checking the sharpness of your utility knife is important for safety and efficiency. A sharp knife cuts cleanly and reduces effort.
There are simple ways to test your blade without risking damage or injury. Use these methods often during DIY projects.
Simple Cutting Tests
Cutting tests show how well the blade slices through materials. Try cutting paper, cardboard, or thin fabric.
- Hold a sheet of paper firmly.
- Slice through it with the knife at a slight angle.
- Look for a clean, smooth cut without tearing.
- Try cutting a thin cardboard to check deeper sharpness.
Visual And Tactile Checks
Look closely at the blade edge for chips, nicks, or dull spots. Run your finger carefully along the blade to feel for roughness.
| Check | What to Look For | Action |
|---|---|---|
| Visual | Shiny, even edge with no damage | Blade is sharp |
| Visual | Dull, rounded, or chipped areas | Sharpen or replace blade |
| Tactile | Blade feels smooth and sharp | Ready to use |
| Tactile | Blade feels rough or blunt | Sharpen before use |
Maintaining Sharpness Over Time
Keeping your utility knife sharp makes your DIY projects easier. A sharp blade cuts cleanly and safely.
Regular care helps the blade stay sharp longer. This saves time and effort during your work.
Regular Honing Tips
Honing your utility knife aligns the blade’s edge. It removes small bends and keeps the knife sharp.
Use a honing rod or leather strop for best results. Hold the blade at a 20-degree angle while honing.
- Hone after every few uses to maintain sharpness
- Use gentle, even strokes along the blade edge
- Keep the honing tool clean and dry
Proper Storage Solutions
Store your utility knife safely to protect the blade. Avoid tossing it in a drawer with other tools.
Use a sheath or blade cover. This prevents damage and keeps the edge sharp longer.
- Keep the knife dry to avoid rust
- Store in a dedicated tool box or pouch
- Avoid dropping or banging the knife

Credit: www.familyhandyman.com
Common Mistakes To Avoid
Sharpening utility knives is important for DIY projects. It helps your tools cut better and last longer.
Some mistakes can damage your knife or make sharpening harder. Learn what to avoid to keep your knives sharp and safe.
Over-sharpening Risks
Sharpening too much removes too much metal from the blade. This can make the knife weak and shorten its life.
Over-sharpening can also change the blade shape. This makes the knife less effective for cutting tasks.
- Blade becomes thin and fragile
- Edge wears out quickly
- Knife loses balance and control
- More frequent sharpening needed
Incorrect Angling Issues
Holding the knife at the wrong angle causes a bad edge. The blade may look sharp but cuts poorly.
Wrong angles can create uneven edges. This makes the knife dull faster and can cause chips or nicks.
- Edge becomes uneven and rough
- Blade dulls faster than usual
- Risk of blade chipping or breaking
- More effort needed to cut materials
Frequently Asked Questions
How Often Should I Sharpen Utility Knives For Diy Projects?
Sharpen utility knives after every 5 to 10 uses. Frequent sharpening ensures clean cuts and prevents accidents. Regular maintenance keeps blades effective and safe for your DIY tasks.
What Tools Are Best For Sharpening Utility Knives?
A whetstone, diamond file, or sharpening rod works best. Choose a tool based on blade condition and your skill level. Proper tools ensure precise and efficient sharpening results.
Can I Sharpen Utility Knives Without Removing The Blade?
Yes, you can sharpen utility knives without blade removal. Use a sharpening stone or rod carefully along the edge. This method saves time but requires steady hands and caution.
How Do I Maintain A Sharp Edge On Utility Knives?
Clean blades regularly and store them safely. Avoid cutting hard materials that dull edges quickly. Regular honing and proper storage extend blade sharpness and durability.
Conclusion
Sharpening utility knives keeps them safe and easy to use. Regular sharpening saves time and effort during DIY projects. Use the right tools and follow simple steps for best results. A sharp knife cuts cleanly and reduces accidents. Practice sharpening often to keep your blades in top shape.
Small efforts bring better results and a smoother project. Keep your knives sharp and enjoy working with ease.