If you want your furniture to look smooth, polished, and professionally finished, mastering the orbital sander is a game changer. You might think sanding is just about rubbing the surface, but using an orbital sander the right way can save you time and give your furniture a flawless finish.
You’ll discover simple steps and insider tips to make your sanding process easier and more effective. Stick with me, and by the end, you’ll feel confident handling your orbital sander like a pro. Ready to transform your furniture projects? Let’s dive in!
Choosing The Right Orbital Sander
Using the right orbital sander makes furniture finishing easier and smoother. It helps remove old paint, smooth rough wood, and prepare surfaces for staining or painting.
There are many types of orbital sanders. Choosing the best one depends on your project and skill level. Safety features and sandpaper grit also matter for good results.
Types Of Orbital Sanders
Orbital sanders come in several types. Each type works best for different tasks. Knowing these helps you pick the right tool for furniture finishing.
- Finishing Sander:Small and light. Good for fine sanding on flat surfaces.
- Random Orbital Sander:Moves in a random pattern. Great for smooth finishes and avoids swirl marks.
- Detail Sander:Small tip to reach corners and tight spots.
Selecting Sandpaper Grit
Sandpaper grit affects how smooth your furniture will be. Lower grit numbers remove more material, while higher numbers create a fine finish.
| Grit | Use |
| 40-60 | Remove old paint or varnish |
| 80-120 | Smooth rough wood surfaces |
| 150-220 | Prepare for staining or painting |
| 320+ | Final polishing and finishing |
Safety Features To Consider
Safety is important when using an orbital sander. Look for features that protect you and make the tool easier to control.
- Dust Collection:A built-in dust bag or port helps keep your workspace clean and reduces dust inhalation.
- Ergonomic Grip:Comfortable handles reduce hand fatigue during long sanding jobs.
- Variable Speed Control:Allows you to adjust the speed for different materials and tasks.
- Safety Switch:Prevents accidental starts to avoid injuries.
Credit: www.familyhandyman.com
Preparing Furniture For Sanding
Preparing your furniture before sanding is important. It helps you get smooth and even results.
Good preparation saves time and protects the wood surface. Follow these steps carefully.
Cleaning The Surface
Remove dust and dirt from the furniture before sanding. A clean surface prevents scratches and clogging.
Use a soft cloth or a vacuum to clean the wood. Check for sticky spots and clean them well.
Removing Old Finish
Old paint, varnish, or stain must be removed before sanding. This helps the new finish stick better.
Use chemical strippers or sandpaper to remove the old finish. Follow safety rules if using chemicals.
- Apply stripper with a brush and wait as instructed
- Scrape off the softened finish with a plastic scraper
- Sand rough areas to smooth the surface
Securing The Furniture
Make sure the furniture is stable before sanding. Movement can cause uneven sanding or damage.
Place the furniture on a flat surface. Use clamps or blocks to hold it steady if needed.
- Work in a well-lit area
- Clear space around the furniture
- Check that legs or parts do not wobble
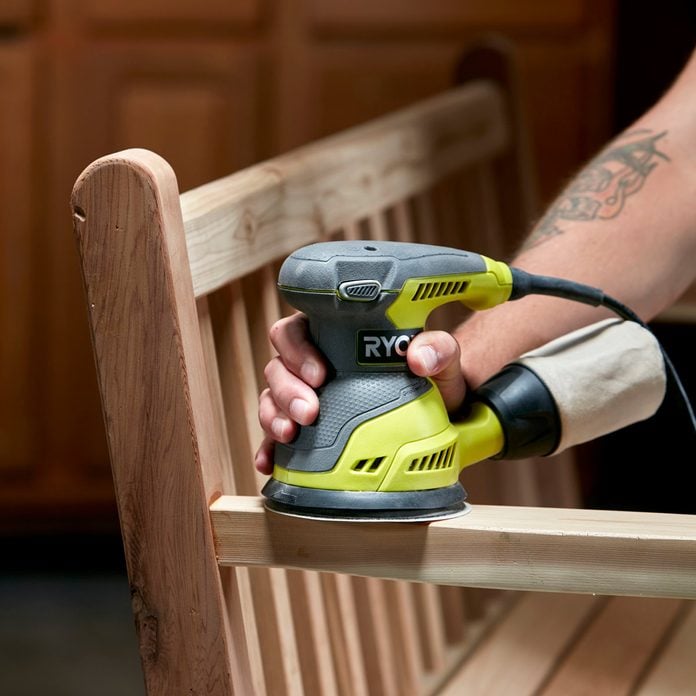
Sanding Techniques For Smooth Finish
Using an orbital sander properly helps create a smooth finish on furniture. The right techniques remove rough spots and prepare the surface well.
Focus on sanding motions, avoiding marks, and sanding between coats for the best results.
Proper Sanding Motion
Hold the sander flat and keep it moving in small circles or back-and-forth motions. Do not press too hard to avoid uneven sanding. Let the sander do the work.
- Start with medium grit sandpaper for rough areas.
- Move the sander steadily without stopping in one spot.
- Overlap each pass slightly for even sanding.
- Finish with fine grit to smooth the surface.
Avoiding Gouges And Swirls
Gouges are deep marks made by pressing too hard or staying too long in one place. Swirls happen when the sander moves unevenly or at odd angles.
- Keep the sander flat against the wood.
- Do not apply extra pressure.
- Use consistent, gentle movements.
- Check the sandpaper regularly and replace if worn.
Sanding Between Coats
Lightly sanding between finish coats removes dust and bumps. Use very fine sandpaper and a gentle touch to avoid removing too much finish.
| When to Sand | After each coat dries fully |
| Sandpaper Grit | 320 to 400 grit fine sandpaper |
| Pressure | Light and even pressure |
| Cleaning | Remove dust with a tack cloth after sanding |

Credit: mrsander.co.uk
Dealing With Different Wood Types
Using an orbital sander on furniture needs care for each wood type. Different woods react in unique ways. Knowing these differences helps you get smooth, even finishes.
This guide covers softwoods, hardwoods, veneers, and painted surfaces. Learn how to handle each for the best results.
Softwoods Vs Hardwoods
Softwoods like pine and cedar are easier to sand but can dent easily. Hardwoods such as oak and maple are tougher and need more sanding power.
Use finer grit sandpaper on softwoods to avoid deep scratches. For hardwoods, start with medium grit and finish with fine grit for smoothness.
- Softwoods: Use light pressure to avoid marks
- Hardwoods: Use steady pressure and multiple passes
- Always sand with the wood grain direction
Handling Veneers
Veneers are thin wood layers glued to surfaces. They can sand through quickly, so be gentle. Use the orbital sander on low speed settings.
Start with very fine grit sandpaper to avoid damaging the veneer. Test on a small area first to check how the veneer reacts.
- Use low speed to prevent heat buildup
- Sand lightly and check often
- Avoid heavy pressure to protect veneer layers
Sanding Painted Surfaces
Orbital sanders help remove old paint or smooth new coats. Use medium grit sandpaper to avoid deep scratches. Always wear a mask to avoid dust inhalation.
Sand lightly to avoid peeling paint. Use a finer grit for final smoothing. Clean the surface after sanding to remove dust before repainting.
- Start with 120 grit for paint removal
- Finish with 220 grit for smooth surface
- Wear protective gear to avoid dust
Maintaining Your Orbital Sander
Keeping your orbital sander in good shape helps it work better and last longer. Regular care prevents problems and keeps your furniture projects smooth.
This guide covers cleaning, storage, changing pads, and fixing common issues. Follow these tips to maintain your tool properly.
Cleaning And Storage
Clean your orbital sander after each use. Dust and debris can cause damage or reduce performance. Use a soft brush or compressed air to remove dust from vents and moving parts.
Store the sander in a dry, cool place. Avoid damp areas to prevent rust. Keep it in its case or on a shelf where it won’t get knocked over.
- Brush dust off the sanding pad and vents
- Use compressed air to clean tight spots
- Wipe the body with a dry cloth
- Store in a dry, safe place away from moisture
Replacing Pads And Sandpaper
Replace sanding pads when they wear out or tear. Using a damaged pad can hurt your furniture and the sander. Check the pad for cracks or loss of grip before each job.
Change sandpaper frequently to keep sanding smooth. Attach new sandpaper firmly to avoid slipping. Use the right grit for your furniture finishing.
- Remove old sanding pad by unscrewing or pulling off
- Attach new pad securely to the sander
- Peel off old sandpaper and stick new sandpaper on the pad
- Choose sandpaper grit based on your finish needs
Troubleshooting Common Issues
If your sander vibrates too much, check the pad and sandpaper for damage. Replace them if needed. Loose parts can also cause vibration.
When the sander stops working, check the power cord and switch. Make sure the tool is plugged in and the switch is on. Clean dust from vents to prevent overheating.
- Excess vibration: Inspect and replace pads or sandpaper
- Tool won’t start: Check power connection and switch
- Overheating: Clean dust from vents and avoid long continuous use
- Unusual noise: Tighten loose parts or replace worn components
Finishing Touches After Sanding
After sanding your furniture with an orbital sander, the final steps give it a smooth, polished look. These steps include cleaning dust, applying color, and sealing the wood.
Taking time on these finishing touches helps protect the wood and brings out its natural beauty.
Dust Removal Techniques
Removing dust is key before applying any finish. Dust can cause bumps and uneven color.
- Use a vacuum cleaner with a brush attachment to pick up loose dust.
- Wipe the surface with a tack cloth to catch fine particles.
- Use a damp cloth for sticky dust, then let the wood dry completely.
- Blow compressed air in corners and edges for thorough cleaning.
Applying Stain Or Paint
Choose the right stain or paint to match your furniture style. Test the color on a small area first.
- Apply stain evenly with a brush or cloth.
- Let the stain soak in for a few minutes, then wipe off excess.
- For paint, use thin coats and allow each layer to dry well.
- Sand lightly between coats for a smooth finish.
Sealing And Protecting Wood
Seal your wood to keep it safe from moisture, dirt, and wear.
| Sealant Type | Best Use | Dry Time |
| Polyurethane | High durability, indoor furniture | 4-6 hours |
| Lacquer | Fast drying, smooth finish | 30 minutes to 1 hour |
| Wax | Soft sheen, easy to apply | 1-2 hours |
| Shellac | Natural look, easy repair | 1 hour |
Apply sealant with a clean brush in thin coats. Let each coat dry before adding another. Sand lightly between coats for best results.

Credit: 100things2do.ca
Frequently Asked Questions
What Is An Orbital Sander Used For?
An orbital sander is used for smoothing surfaces. It is ideal for furniture finishing tasks. The tool operates in a circular motion. This ensures an even and smooth finish. It’s perfect for removing old paint, smoothing rough edges, and preparing surfaces for painting.
How Do I Choose The Right Sandpaper?
Select sandpaper based on grit size. Coarse grit (40-60) removes heavy materials. Medium grit (80-120) smooths surfaces. Fine grit (150-180) prepares surfaces for finishing. Extra fine grit (220-240) is ideal for final touches. Always check the sandpaper compatibility with your orbital sander.
Can An Orbital Sander Remove Paint?
Yes, an orbital sander can remove paint efficiently. Use coarse grit sandpaper for best results. This helps strip the paint effectively. Move the sander in steady, even motions. Be careful not to damage the surface underneath. Always wear protective gear while sanding.
How To Maintain An Orbital Sander?
Regularly clean the sander’s dust collection system. Check and replace worn-out sandpaper frequently. Inspect the power cord for any damage. Lubricate moving parts if necessary. Store the sander in a dry, safe place. Proper maintenance ensures longevity and optimal performance.
Conclusion
Using an orbital sander makes furniture finishing easier and faster. Start with coarse sandpaper, then move to finer grits. Keep the sander moving to avoid marks. Always wear safety gear for protection. Take your time and check your work often.
Practice on scrap wood to gain confidence. Your furniture will look smooth and ready for paint or stain. Simple steps lead to great results. Try these tips on your next project and see the difference.