If you want to make precise cuts and accurate measurements, mastering your combination square is key. This simple tool can help you mark perfect angles every time, saving you frustration and wasted materials.
Whether you’re a beginner or looking to sharpen your skills, this guide will show you exactly how to use a combination square to mark angles quickly and confidently. By the end, you’ll have the know-how to tackle your next project with ease and accuracy.
Keep reading to unlock the full potential of your combination square!
Basics Of A Combination Square
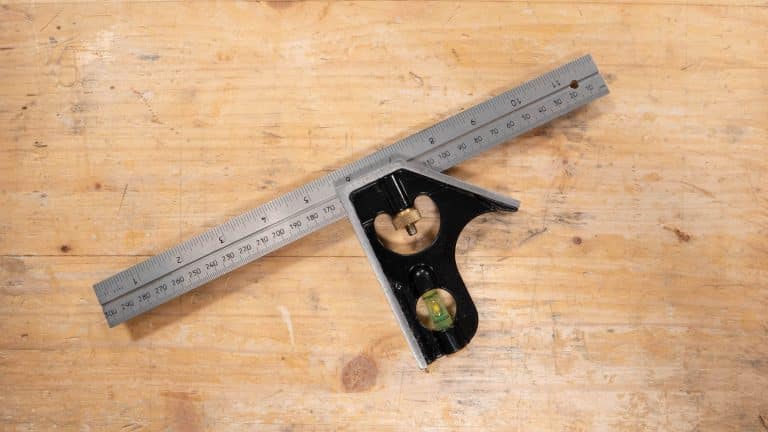
A combination square is a tool used in woodworking and metalworking. It helps you mark and measure angles accurately.
This tool is handy for checking right angles, measuring depths, and drawing straight lines. It is easy to use with a little practice.
Key Components
A combination square has several parts that work together. Each part has a specific role in measuring and marking.
- Blade:A metal ruler with clear markings. It slides through the head.
- Head:The main body that holds the blade in place. It can be adjusted.
- Bubble level:A small vial with liquid and an air bubble. It helps check if surfaces are level.
- Scriber:A pointed tool stored in the head. Used to mark materials.
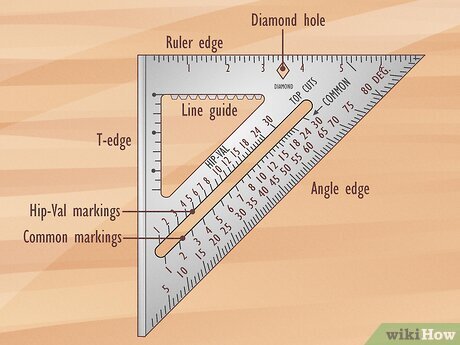
Types Of Combination Squares
There are different types of combination squares for various tasks. Each type suits specific needs.
- Standard Combination Square:Most common type. Used for general measuring and marking.
- Double Square:Has two heads for marking angles other than 90 degrees.
- Center Square:Designed to find the center of round objects.
- Protractor Head Square:Includes a protractor to measure and mark angles precisely.

Credit: www.wikihow.com
Setting Up For Angle Marking
Using a combination square helps mark angles accurately. Before starting, you must set it up correctly. This guide explains how to adjust the blade and secure the square.
Proper setup saves time and prevents mistakes. Follow these simple steps to prepare your tool for angle marking.
Adjusting The Blade
First, loosen the locking screw to move the blade freely. Slide the blade to the needed angle or measurement. Make sure it lines up with your marking requirements.
- Loosen the locking screw gently.
- Slide the blade to the desired angle or mark.
- Check the alignment against your reference.
- Tighten the screw to fix the blade in place.
Securing The Square
After adjusting the blade, secure the entire square to avoid movement during marking. This keeps your angle precise and repeatable.
| Part | Action |
|---|---|
| Locking Screw | Tighten firmly to hold blade |
| Stock (Handle) | Place flat against the workpiece |
| Blade | Ensure it does not shift during marking |
Marking Common Angles
A combination square is a useful tool for marking angles on wood or metal. It helps you draw accurate lines for cutting or joining materials.
Two common angles you will mark often are 45 degrees and 90 degrees. Knowing how to use your combination square for these angles saves time and effort.
Marking 45-degree Angles
The 45-degree angle is used for making miter joints and other angled cuts. Your combination square has a built-in 45-degree edge for this purpose.
Place the stock of the square against the edge of the workpiece. Then slide the blade until it touches the surface where you want to mark.
- Hold the stock firmly against the edge
- Align the blade to the surface
- Draw a line along the blade edge
Marking 90-degree Angles
Marking a 90-degree angle is important for square cuts and layouts. The combination square also has a stock edge that forms a perfect right angle with the blade.
Place the stock flush against the edge of the material. Make sure the blade rests flat on the surface to be marked.
- Keep the stock tight against the edge
- Let the blade lay flat on the surface
- Draw your straight marking line

Credit: www.familyhandyman.com
Advanced Angle Techniques
Using a combination square beyond basic right angles opens many possibilities. You can mark exact angles for complex projects with precision.
This guide covers advanced methods for marking custom angles and using the protractor head for accuracy.
Marking Custom Angles
To mark custom angles, adjust the combination square’s blade to the desired degree. Lock it firmly in place to avoid movement.
- Loosen the blade lock and slide the blade out.
- Use a protractor or angle finder to set the blade to the angle you need.
- Tighten the lock securely before marking.
- Place the stock of the square against the edge of your workpiece.
- Draw the angle line along the blade’s edge.
Using The Protractor Head
The protractor head allows precise angle measurement and marking. It can measure angles between 0° and 180° with fine adjustment.
| Part | Function | Tip |
| Protractor dial | Shows angle in degrees | Read at eye level for accuracy |
| Locking knob | Fixes angle setting | Ensure it is tight before marking |
| Blade | Draws the angle line | Check blade edge is sharp and straight |
Tips For Accuracy
Using a combination square correctly helps you mark angles with precision. Small mistakes can lead to poor cuts and bad fits.
This guide shares simple tips to improve your accuracy when marking angles with a combination square.
Checking Calibration
Make sure your combination square is properly calibrated before use. A misaligned tool gives wrong measurements.
Check the square against a known 90-degree angle or a factory-set reference. Adjust if needed to keep it accurate.
- Place the square on a flat, true edge
- Look for gaps between the ruler and the edge
- Adjust the head of the square if it moves
- Repeat checks regularly to maintain accuracy
Maintaining Steady Pressure
Hold the combination square firmly but gently when marking. Too much force can shift the tool and ruin the line.
Keep steady pressure on the handle and ruler. This stops the square from moving and keeps your marks straight.
- Grip the handle securely with one hand
- Use your other hand to hold the ruler tight
- Apply even pressure along the ruler while marking
- Avoid quick or jerky movements during marking
Credit: commonwoodworking.com
Common Mistakes To Avoid
Using a combination square helps you mark angles with care. Small errors can cause big problems in your project.
Knowing common mistakes can save you time and materials. Avoid these errors to get accurate results.
Misreading Measurements
Reading the scale wrong is a common error. The marks can be small and close together, causing confusion.
Always check which side of the ruler you are using. Use good light to see the numbers clearly.
- Look closely at the scale for the right units
- Double-check your reading before marking
- Do not guess between two marks
- Keep your eyes level with the scale
Improper Tool Handling
Holding the combination square wrong can cause wrong angle marks. The tool must sit flat and tight against the workpiece.
Using too much force can move the ruler or damage the tool. Keep a steady hand and adjust the tool carefully.
- Hold the handle firmly but not too tight
- Keep the ruler flush with the edge
- Check the tool is locked before marking
- Use a sharp pencil for clear lines
Maintenance And Care
Taking care of your combination square keeps it accurate and lasts longer. Regular maintenance prevents rust and damage.
Simple cleaning and proper storage help your tool stay in good shape for every project.
Cleaning The Square
Clean your combination square after each use. Remove dust, dirt, and any wood particles.
Use a soft cloth or brush to wipe all parts. Avoid harsh chemicals that may damage the metal or markings.
- Wipe the blade and head with a dry cloth
- Use a soft brush for hard-to-reach spots
- Apply light oil to metal parts to stop rust
- Dry the tool well before storing
Storage Recommendations
Store your combination square in a dry place. Keep it away from moisture to prevent rust.
Use a toolbox or a drawer with padding to protect it from knocks. Avoid storing it with heavy tools on top.
- Keep the tool in a case or pouch if possible
- Store in a low-humidity environment
- Place the square flat to avoid bending
- Check the tool regularly for signs of wear
Frequently Asked Questions
What Is A Combination Square Used For?
A combination square is used for marking and measuring angles accurately. It is essential for woodworking and metalworking. The tool consists of a ruler and a movable head, allowing precise measurements. It’s versatile, suitable for 90-degree and 45-degree angles, and ideal for checking the squareness of objects.
How Do You Mark Angles With A Combination Square?
To mark angles, align the ruler with the workpiece edge. Adjust the square head to the desired angle, usually 45 or 90 degrees. Hold the tool firmly, ensuring it doesn’t slip. Draw a line along the ruler’s edge. This ensures accurate angle marking, essential for precise cuts.
Can A Combination Square Measure 45-degree Angles?
Yes, a combination square can measure 45-degree angles. Its movable head includes a 45-degree edge, perfect for marking miters. Adjust the head to align with the ruler at a 45-degree angle. This feature ensures precise measurements and cuts, crucial for projects requiring angled joints.
Why Is A Combination Square Essential For Woodworking?
A combination square ensures precision in woodworking tasks. It helps in marking accurate angles, checking squareness, and measuring depths. This tool is versatile, making it indispensable for creating accurate joints and cuts. Its reliability enhances the quality of woodworking projects, ensuring professional results.
Conclusion
Using a combination square makes marking angles easier and more precise. Practice helps you gain confidence and accuracy. This tool suits many projects, from woodworking to metalwork. Keep your combination square clean and store it safely. Small steps lead to better results every time.
Try different angles and see how it works for you. A reliable tool and steady hand make a good team. Start simple, and soon you will mark angles like a pro.