If you want smooth, flawless surfaces without spending hours sanding by hand, mastering the orbital sander is a game-changer. But are you using your orbital sander the right way to get the best results fast?
In this guide, you’ll discover simple tips and tricks to work smarter, not harder. Whether you’re a beginner or want to improve your technique, this article will help you save time, avoid common mistakes, and achieve professional-quality finishes. Keep reading to unlock the secrets of using your orbital sander efficiently and transform your projects with ease.
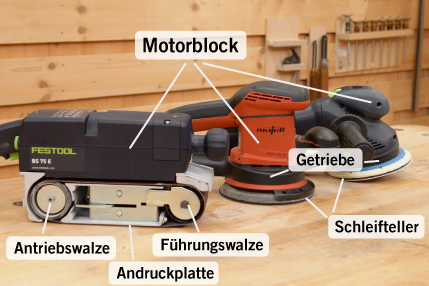
Credit: www.dictum.com
Choosing The Right Orbital Sander
Choosing the right orbital sander helps you finish your project faster. It also gives a smooth, even surface.
Knowing the types, features, and sandpaper grit will guide your choice. Each detail affects your sanding results.
Types Of Orbital Sanders
Orbital sanders come in different types for various tasks. Each type works best on certain surfaces and materials.
- Finishing Sander:Small, lightweight, good for fine sanding and corners.
- Random Orbital Sander:Moves in random orbits, reduces swirl marks, good for most jobs.
- Detail Sander:Has a pointed tip to reach tight spots and edges.
- Sheet Sander:Uses square sandpaper sheets, works well on flat surfaces.
Key Features To Consider
| Feature | Why It Matters |
| Pad Size | Larger pads cover more area, smaller pads reach tight spaces. |
| Power | Higher power means faster sanding but can be harder to control. |
| Dust Collection | Keeps your work area clean and improves visibility. |
| Ergonomics | Comfortable grip reduces hand fatigue during long work. |
| Speed Settings | Variable speed lets you adjust for different materials. |
Selecting The Correct Grit
Sandpaper grit affects how much material the sander removes. Choose grit based on the task.
- Coarse Grit (40-60):Removes old paint or rough wood quickly.
- Medium Grit (80-120):Smooths surfaces and removes small scratches.
- Fine Grit (150-220):Prepares surface for finishing and polishing.
- Very Fine Grit (240+):Used for final sanding and between coats.
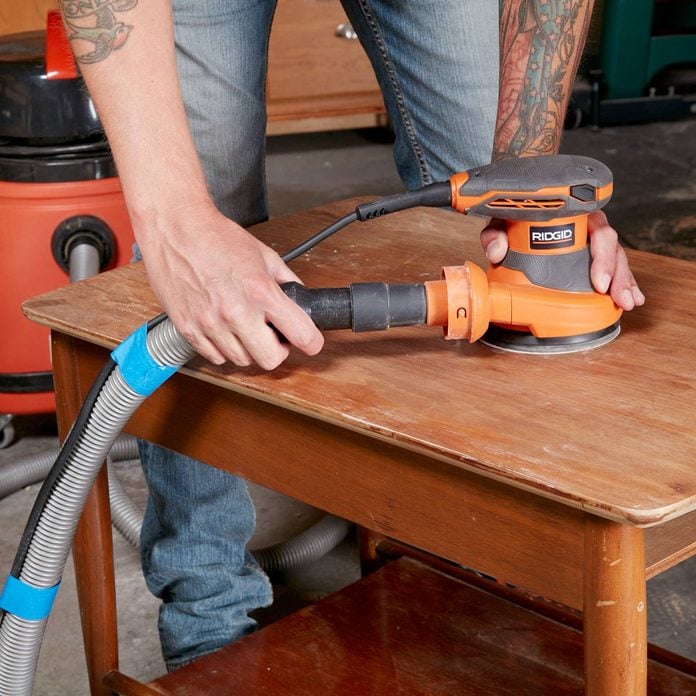
Credit: www.familyhandyman.com
Preparing Your Workspace
Setting up your workspace well helps you use an orbital sander safely and well. A tidy area stops accidents and makes your work easier.
Focus on clearing the space, wearing the right gear, and managing dust. These steps keep your project smooth and safe.
Clearing And Securing The Area
Clear your workspace of tools and items you do not need. This gives you room to move and avoid tripping.
Secure loose cords and cover sharp edges nearby. Make sure the workpiece is firmly fixed before sanding.
- Remove clutter and loose objects
- Secure electrical cords out of the way
- Clamp or hold down your workpiece firmly
- Keep pets and children away
Protective Gear Essentials
Wear safety gear to protect your body from dust and flying debris. This gear reduces injury risk during sanding.
Use a mask to avoid breathing dust. Wear safety goggles to shield your eyes and gloves for hand protection.
- Dust mask or respirator
- Safety goggles or glasses
- Work gloves to protect hands
- Ear protection if noise is loud
Dust Management Tips
Dust from sanding can harm your health and make a mess. Control dust to keep the workspace clean and safe.
Use a vacuum or dust collection system with your sander. Clean the area often and work in a well-ventilated place.
- Attach a dust bag or vacuum to the sander
- Work near an open window or fan
- Wipe surfaces regularly to remove dust
- Dispose of dust safely after sanding
Setting Up The Orbital Sander
Setting up your orbital sander correctly helps you work safely and efficiently. A good setup saves time and gives smooth results.
This guide covers how to attach sandpaper, adjust speed, and check power sources for the sander.
Attaching Sandpaper Properly
Attach sandpaper tightly to avoid slipping during sanding. Loose paper can scratch surfaces or cause damage.
Use the correct size and type of sandpaper for your sander. Check if your sander uses hook-and-loop or adhesive backing.
- Remove old sandpaper before attaching new sheets
- Align the paper with the pad edges
- Press firmly to secure the sandpaper
- Check that all corners stick well
Adjusting Speed Settings
Set the sander speed based on the material you are sanding. Different speeds help control the finish and prevent damage.
Lower speeds work well on soft woods or delicate surfaces. Higher speeds remove material faster on hard surfaces.
- Start with a low speed to test the surface
- Increase speed if sanding is too slow
- Use consistent speed to avoid uneven sanding
- Turn off speed before unplugging the sander
Checking Power Source And Cords
Check the power source and cords before using the orbital sander. Faulty cords or plugs can cause shocks or damage.
Use an outlet that matches the sander’s voltage requirements. Keep cords away from water and sharp edges.
- Inspect cords for cuts or frays
- Use grounded outlets for safety
- Keep cords clear of the sanding area
- Unplug when changing sandpaper or adjusting settings
Sanding Techniques For Best Results
Using an orbital sander correctly can make your sanding work easier and smoother. Good technique helps you get even surfaces without damage.
This guide explains key sanding tips to improve your results with an orbital sander.
Maintaining Even Pressure
Keep steady, even pressure on the sander while working. Pressing too hard can cause uneven sanding and marks.
Light pressure lets the sander do the work and avoids gouges. Let the machine’s weight help you.
- Hold the sander firmly but gently
- Do not push down hard on the tool
- Move at a steady pace to keep pressure even
Using Smooth, Circular Motions
Move the sander in smooth circles to cover the surface evenly. This helps avoid lines and uneven spots.
Keep your motions steady and continuous. Stop and start can leave marks on your work.
- Keep your hand moving in small circles
- Overlap each pass slightly for full coverage
- Do not stay too long in one spot
Avoiding Gouges And Swirls
Gouges happen from too much pressure or staying in one spot. Swirls come from uneven motion or dirty sandpaper.
Check your sandpaper often and keep the sander moving smoothly. This reduces marks on the wood.
- Use clean, undamaged sandpaper
- Do not press down too hard
- Keep the sander moving at a steady pace
- Inspect the surface often for marks
Handling Different Materials
An orbital sander works on many surfaces. Each material needs a different approach. Using the right technique keeps the surface smooth.
This guide shows how to use an orbital sander on wood, metal, plastic, and painted areas. Follow simple tips for best results.
Sanding Wood Surfaces
Start with coarse grit sandpaper for rough wood. Move to finer grits to smooth the surface. Always sand in the direction of the wood grain.
Keep the sander moving to avoid making dips. Use light pressure to protect the wood from damage.
- Use 60-80 grit for heavy sanding
- Switch to 120-150 grit for finishing
- Sanding with the grain prevents scratches
- Keep the sander moving steadily
Working On Metal And Plastic
Metal and plastic need finer grits and gentler sanding. Use a sanding pad suited for hard surfaces. Avoid heat buildup by sanding in short bursts.
Clean the surface before sanding. Remove dust often to keep sanding smooth and avoid scratches.
- Start with 150-180 grit for metal and plastic
- Use 220 grit or higher for smooth finish
- Sand in circular motions with light pressure
- Take breaks to cool down the surface
Dealing With Painted Areas
Use a fine grit sandpaper to avoid removing too much paint. Sand gently to smooth edges and prepare for new coats. Avoid sanding too deep.
Wear a mask to protect from paint dust. Clean the area well after sanding to help new paint stick.
- Use 180-220 grit sandpaper
- Sand lightly and evenly
- Wear a dust mask for safety
- Clean surface before repainting
Maintaining Your Orbital Sander
Keeping your orbital sander in good shape helps it work better. Proper care extends its life and performance.
Regular maintenance is simple and takes little time. Follow these tips to keep your sander ready.
Cleaning After Use
Clean your sander after each use to remove dust and debris. This prevents buildup that can harm the tool.
Use a brush or compressed air to clean hard-to-reach parts. Wipe the surface with a dry cloth.
- Unplug the sander before cleaning
- Remove sanding pads first
- Blow out dust from vents and moving parts
- Check for stuck debris and remove carefully
- Store in a dry, dust-free place
Replacing Sanding Pads
Change sanding pads when they wear out or clog. Old pads reduce sanding quality and can damage surfaces.
Choose pads that fit your sander and are right for your project. Attach them firmly before use.
- Turn off and unplug the sander
- Remove the old sanding pad carefully
- Clean the pad holder from dust
- Attach the new sanding pad securely
- Check for any loose parts before starting
Troubleshooting Common Issues
If your sander does not work well, check for common problems. Fixing these issues can save time and money.
Look for signs like strange noises, poor sanding, or the sander not turning on.
- Check power cord and plug for damage
- Clean or replace clogged sanding pads
- Remove dust buildup in vents
- Make sure the sanding pad is attached correctly
- Inspect the motor brushes for wear
Safety Precautions
Using an orbital sander requires care to keep yourself safe. Follow safety rules to avoid injuries and work better.
Learn how to avoid accidents, store your sander properly, and check it often. These tips help you use the tool safely.
Avoiding Accidents
Always wear safety gear like goggles and a dust mask. Keep your hands away from the sanding pad. Work in a clean area to stop slips or trips.
- Wear eye protection and a dust mask
- Keep fingers clear of the sanding surface
- Use the sander on stable surfaces only
- Unplug the sander before changing sandpaper
- Do not wear loose clothing or jewelry
Proper Storage
Store your orbital sander in a dry place to avoid rust. Keep it in a case or on a shelf where it won’t fall or get damaged.
| Storage Tip | Reason |
|---|---|
| Keep away from moisture | Prevents rust and electrical problems |
| Use a protective case | Protects from dust and impacts |
| Store on a stable shelf | Prevents falling and damage |
Regular Tool Inspections
Check your orbital sander before each use. Look for worn pads, loose parts, or damaged cords. Fix problems before you start working.
- Inspect sanding pads for wear
- Check power cord for cuts or frays
- Tighten any loose screws or parts
- Test the sander before use
- Clean dust from vents and moving parts
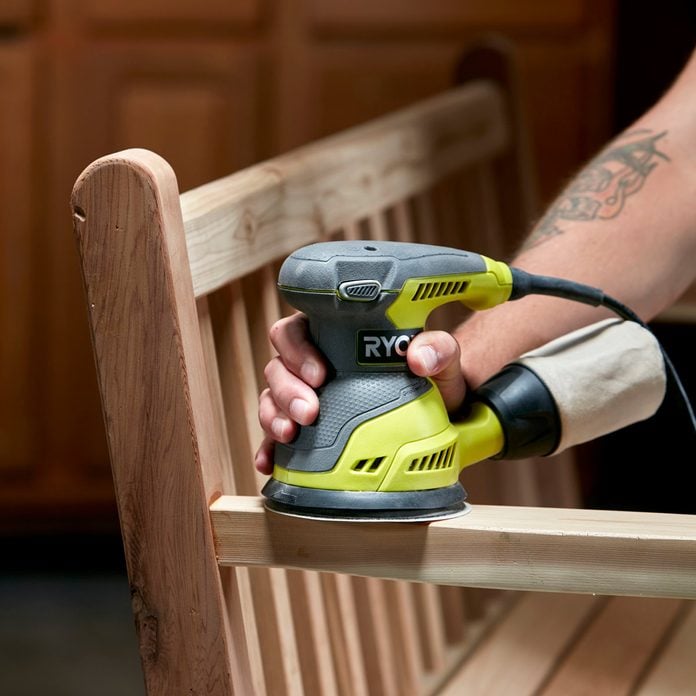
Credit: www.familyhandyman.com
Frequently Asked Questions
How Does An Orbital Sander Work?
An orbital sander uses a round pad that moves in small orbits. This ensures a smooth finish without leaving swirl marks. The random motion helps in efficient material removal and provides a finer surface. It’s perfect for sanding wood, metal, and plastic surfaces effectively.
What Surfaces Can An Orbital Sander Handle?
An orbital sander is versatile and can handle wood, metal, and plastic surfaces. It’s ideal for smoothing edges, removing old paint, or preparing surfaces for painting. Ensure you use the right grit sandpaper for each material to achieve the best results.
Is Dust Control Important When Using An Orbital Sander?
Yes, dust control is crucial when using an orbital sander. Dust can affect visibility and air quality, and it may damage the sander. Most sanders have built-in dust collection bags. Always use them to maintain a clean workspace and improve sanding efficiency.
How To Choose The Right Sandpaper Grit?
Choosing the right sandpaper grit depends on your project needs. For rough surfaces, use coarse grits like 40-60. For smoothing or finishing, use finer grits like 120-240. Always start with a coarser grit and progress to finer grits for the best results.
Conclusion
Using an orbital sander saves time and effort on sanding tasks. Follow safety rules and use the right sandpaper for best results. Keep the sander moving to avoid marks on your work. Clean the tool often to keep it working well.
Practice helps you get smooth and even surfaces. Enjoy your projects with a well-finished look. Keep these tips in mind for easy and efficient sanding.