If you want your wood projects to look smooth and professional, mastering the use of an orbital sander is key. Whether you’re refinishing furniture or putting the final touches on a DIY piece, knowing how to handle this tool can make all the difference.
In this guide, you’ll discover simple steps and expert tips to help you achieve a flawless finish every time. Ready to transform your woodwork and impress with your skills? Keep reading to learn how to use an orbital sander like a pro.
Choosing The Right Orbital Sander
Using an orbital sander helps you finish wood smoothly and evenly. Picking the right sander makes your work easier and better.
This guide explains how to choose the right orbital sander by looking at types, grit selection, and power.
Types Of Orbital Sanders
Orbital sanders come in different types. The main types are random orbit and finishing sanders. Random orbit sanders move in circles and orbits to reduce swirl marks. Finishing sanders move in a simple orbital pattern and are lighter.
- Random Orbit Sander:Best for fast sanding and smooth finish.
- Finishing Sander:Good for delicate surfaces and fine sanding.
- Detail Sander:Used for tight spaces and corners.
Selecting The Correct Grit
Grit size affects how smooth the wood will be. Coarse grits remove material fast but leave rough marks. Fine grits smooth the surface but remove less material.
| Grit Size | Use |
| 40-60 | Remove old finish or shape wood |
| 80-120 | Smooth rough surfaces |
| 150-220 | Final sanding before finishing |
Power And Speed Considerations
Power and speed affect how well the sander works. More power helps with large projects. Variable speed lets you adjust for different tasks.
- Higher power is good for heavy sanding jobs.
- Variable speed helps control the finish quality.
- Lighter sanders are easier to handle for small jobs.

Credit: www.youtube.com
Preparing Your Workspace
Using an orbital sander needs a clean and safe workspace. Preparing your area helps you work better.
Getting ready before sanding also protects your wood and yourself from harm.
Safety Gear Essentials
Wearing the right safety gear keeps you safe from dust and accidents. Always use protective items.
- Safety glasses protect your eyes from dust and debris.
- A dust mask stops you from breathing wood particles.
- Hearing protection reduces noise from the sander.
- Gloves protect your hands from rough surfaces.
Setting Up A Clean Area
Clear your workspace of tools and clutter. This prevents accidents and damage to your wood.
Good lighting helps you see the wood grain and sanding progress clearly.
- Remove extra tools and materials from the sanding table.
- Sweep or vacuum dust and dirt from the area.
- Use a workbench or sturdy table with good lighting.
- Keep a trash bin nearby for waste.
Securing The Wood Piece
Fix the wood piece firmly to stop it from moving while sanding. This gives better control.
Use clamps or a vise to hold the wood steady. Never hold the piece by hand.
- Place the wood on a flat surface or workbench.
- Use clamps to hold the wood on all sides.
- Check that the wood does not shift before starting.
- Make sure clamps do not block sanding areas.
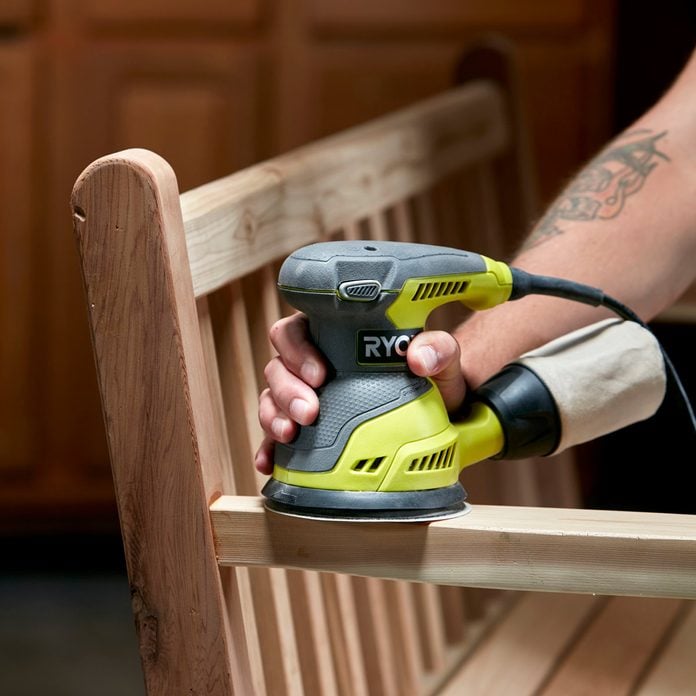
Sanding Techniques For Smooth Finish
An orbital sander helps create a smooth surface on wood. Using the right sanding techniques gives the best results.
Learn how to hold the sander, move it, and avoid mistakes. These tips improve your wood finishing work.
Proper Sander Grip And Movement
Hold the orbital sander firmly but not too tight. Keep your hand steady to control the tool well.
Move the sander in slow, even circles. Avoid pressing too hard; let the sander do the work.
- Keep a light grip for better control
- Use smooth, circular motions
- Do not push down hard on the sander
- Keep the sander flat against the wood surface
Avoiding Over-sanding
Do not sand one spot for too long. Over-sanding can damage the wood and create uneven spots.
Check your progress often. Stop sanding once the surface feels smooth and even.
- Move the sander constantly to avoid marks
- Stop sanding if the wood looks thinner in spots
- Use finer sandpaper for the final sanding steps
- Inspect the surface by touch and sight regularly
Working With The Grain
Always sand in the direction of the wood grain. This prevents scratches and keeps the surface smooth.
Sanding across the grain can leave visible lines. Follow the grain to make your finish look natural.
- Identify the wood grain direction before sanding
- Move the sander along the grain lines
- Use gentle pressure to avoid deep scratches
- Finish with fine grit sandpaper along the grain

Credit: mrsander.co.uk
Troubleshooting Common Issues
Using an orbital sander can make wood finishing easier. Yet, some problems may appear during sanding. Knowing how to fix these issues helps get a smooth, even surface.
This guide covers common problems and how to solve them. Focus on avoiding swirl marks, fixing uneven surfaces, and keeping sandpaper effective.
Preventing Swirl Marks
Swirl marks are circular scratches caused by wrong sanding technique. They can spoil the wood’s look. To prevent them, follow simple rules.
- Use fine grit sandpaper for the final sanding passes.
- Keep the sander moving steadily without staying too long in one spot.
- Apply light pressure; pressing too hard can cause marks.
- Sand with the grain of the wood whenever possible.
- Replace worn sandpaper to maintain smooth sanding.
Dealing With Uneven Surfaces
Uneven surfaces appear if sanding is not consistent or if the sander pads wear out. Fixing this issue requires careful attention.
| Cause | Solution |
| Uneven pressure on sander | Hold sander flat and apply even pressure |
| Worn or damaged sanding pad | Replace sanding pad regularly |
| Skipping grit steps | Sand progressively from coarse to fine grit |
| Sander stays too long on one spot | Keep sander moving constantly |
Maintaining Sandpaper Effectiveness
Sandpaper loses its ability to cut well after use. Maintaining its effectiveness saves time and improves results.
Follow these tips to keep sandpaper working longer:
- Clean sandpaper often by tapping or brushing off dust.
- Use a sandpaper cleaning stick to remove clogged particles.
- Store sandpaper flat and dry to avoid damage.
- Switch to fresh sandpaper when you notice reduced sanding power.
Finishing Touches After Sanding
After sanding wood with an orbital sander, the finishing touches are important. These steps help prepare the wood for a smooth and lasting finish.
Cleaning, inspecting, and preparing the wood surface ensures the best results for your project.
Cleaning Dust From Wood
Dust left on wood can cause rough finishes and poor adhesion of stains or paint. Remove all dust before moving on.
Use a vacuum or a soft brush to clear dust from the surface. Wipe the wood with a damp cloth to pick up fine particles.
- Vacuum or brush off loose dust
- Use a damp cloth to remove fine dust
- Let the wood dry completely before the next step
Inspecting For Imperfections
Look closely at the wood for scratches, dents, or rough spots. These flaws can show through the finish.
If you find any imperfections, lightly sand those areas again with fine-grit sandpaper. Clean the dust after sanding.
- Check for scratches, dents, or rough spots
- Sand problem areas gently with fine-grit paper
- Clean dust from repaired spots
Preparing For Stain Or Paint
Before applying stain or paint, the wood surface must be clean and smooth. This helps the finish stick well and look even.
Use a tack cloth to remove any last dust particles. Make sure the wood is dry and free from oils or residues.
- Use a tack cloth to pick up tiny dust
- Ensure wood is dry and clean
- Avoid touching the surface with bare hands
Credit: www.familyhandyman.com
Frequently Asked Questions
How Do You Use An Orbital Sander Safely?
To use an orbital sander safely, wear protective gear, including goggles and a mask. Secure your wood piece firmly. Start with a coarse grit, moving to finer grits for a smooth finish. Always move the sander in a consistent pattern, and never press too hard.
What Type Of Sandpaper Is Best For Orbital Sanders?
For orbital sanders, start with 80-grit sandpaper for rough surfaces. Move to 120-grit for medium smoothing. Finish with 220-grit for a fine, polished look. Higher grits result in smoother finishes. Choose sandpaper based on your wood’s condition and desired finish.
Can An Orbital Sander Remove Paint From Wood?
Yes, an orbital sander can remove paint from wood. Use a coarse grit sandpaper, like 60-grit, to strip paint effectively. Apply even pressure and move the sander in a consistent pattern. Gradually switch to finer grits for a smooth wood surface once the paint is removed.
How Often Should I Change Sandpaper?
Change sandpaper when it becomes clogged or loses effectiveness. Frequent changes ensure optimal sanding performance. For most projects, expect to change sandpaper every 15-30 minutes. Always inspect the sandpaper for wear and replace as needed for best results.
Conclusion
Using an orbital sander makes wood finishing easier and faster. Start with coarse sandpaper to smooth rough spots. Then switch to finer grit for a clean, polished surface. Keep the sander moving to avoid marks or uneven areas. Always wear safety gear like goggles and a mask.
Practice on scrap wood to build confidence. With these simple steps, your wood projects will look smooth and professional. Ready to try? Just take your time and enjoy the process.