Do you want your hand saw to cut like new again? Dull saw teeth can make your work harder, slower, and less precise.
But sharpening them isn’t as tricky as you might think. In this guide, you’ll discover simple, step-by-step tips to bring your saw teeth back to life. By the end, you’ll save time, effort, and get cleaner cuts every time you use your saw.
Ready to make your saw sharper and your projects smoother? Let’s get started!

Credit: www.woodwrightschool.com
Tools Needed
Sharpening hand saw teeth needs the right tools. Using correct tools makes your work easier.
This guide covers essential tools to sharpen saw teeth properly and safely.
Choosing The Right File
The file is the main tool for sharpening saw teeth. Pick a file that fits your saw type.
Most hand saws need a triangular file. Choose the right size for your saw’s teeth.
- Use a small triangular file for fine saw teeth
- Use a larger triangular file for coarse saw teeth
- Look for a smooth, sharp file for clean cuts
Additional Sharpening Supplies
Besides the file, some supplies help keep your work steady and safe. These tools improve sharpening quality.
Common supplies include clamps to hold the saw and a saw set to adjust tooth angle.
- Clamps or a vise to hold the saw firmly
- A saw set tool to bend teeth for better cutting
- A flat file for jointing teeth before sharpening
- Protective gloves to keep your hands safe
- A cleaning brush to remove sawdust and debris
Credit: www.dictum.com
Preparing The Saw
Sharpening a hand saw starts with proper preparation. A clean and stable saw helps you sharpen teeth evenly.
This guide covers cleaning the blade and securing the saw for sharpening.
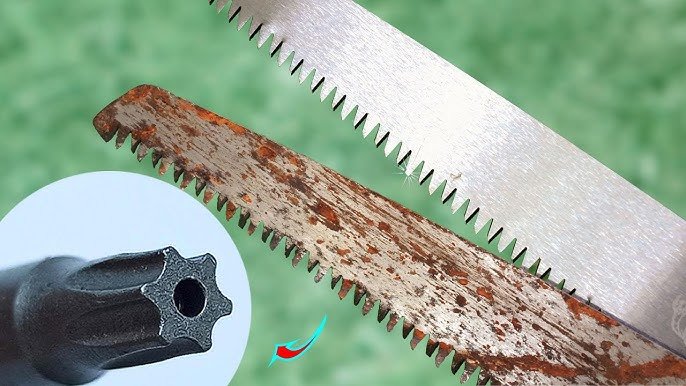
Cleaning The Blade
Remove dirt and rust from the saw blade before sharpening. This helps you see the teeth clearly and prevents damage to the file.
- Use a wire brush to scrub away rust and debris.
- Apply a cloth with light oil to clean sticky residue.
- Wipe the blade dry to avoid rust forming again.
- Check for damaged teeth and note their position.
Securing The Saw For Sharpening
Hold the saw firmly in place to sharpen teeth safely and accurately. Use a clamp or vise to avoid movement.
| Tool | Purpose |
|---|---|
| Bench Vise | Keeps saw steady for filing |
| Clamps | Secure saw to workbench edges |
| Wooden Blocks | Protect saw blade from damage |
Place wooden blocks between the saw and clamp jaws. This prevents dents and keeps the blade flat.
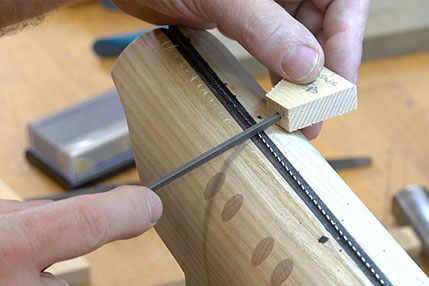
Setting The Teeth
Setting the teeth of a hand saw is an important step in sharpening. Properly set teeth make cutting easier and cleaner. This process involves bending the teeth slightly outward to create a wider cut path.
Different saws need different amounts of set depending on the type of wood and the saw’s purpose. Checking and adjusting the set helps keep the saw cutting smoothly and prevents it from binding in the cut.
Checking And Adjusting The Set
To check the set, look at the saw teeth from above. The teeth should alternate bending left and right evenly. If some teeth are bent too much or too little, the saw may cut unevenly.
- Use a ruler or straight edge to compare tooth alignment.
- Look for any teeth that stand out or lean too far.
- Gently tap teeth back into place if needed using pliers or a small hammer.
- Keep the set consistent along the whole blade for best results.
Using A Saw Set Tool
A saw set tool helps bend the teeth evenly and accurately. It holds each tooth and bends it to the right angle. This tool saves time and improves precision.
| Tool Part | Purpose | How to Use |
| Jaw | Holds tooth securely | Place tooth between jaws before bending |
| Adjustable stop | Controls bend angle | Set to desired bend width for each tooth |
| Handle | Applies force | Squeeze to bend tooth outward |
Credit: www.youtube.com
Sharpening Technique
Sharpening hand saw teeth keeps your saw cutting well. A sharp saw works faster and with less effort.
Use the right technique to sharpen teeth evenly and correctly. This helps your saw last longer.
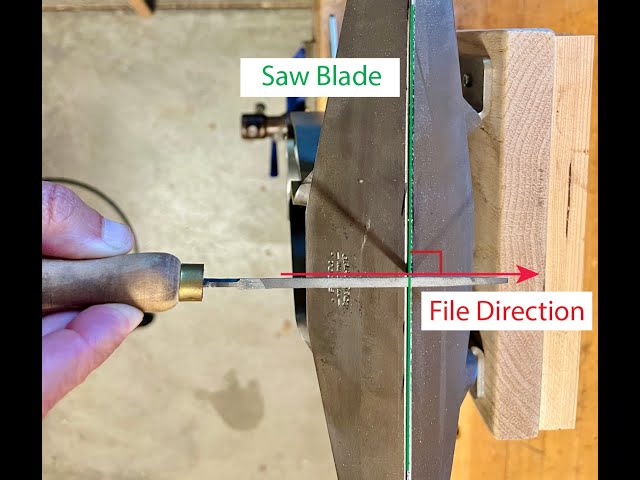
Filing Angle And Stroke
Hold the file at the right angle to keep the teeth sharp. Usually, this angle is about 60 degrees to the saw blade.
Use smooth, even strokes with the file. Push the file across each tooth in one direction only.
- Keep the file angle steady for every tooth
- Use the same number of strokes on each tooth
- Do not use a back-and-forth motion
Filing Each Tooth Evenly
File each tooth the same amount to keep the saw balanced. Uneven teeth cause rough cuts and make sawing harder.
Check the teeth regularly while filing. Stop if a tooth looks sharp and matches the others.
- Count the strokes per tooth
- File one tooth, then move to the next
- Repeat until all teeth are sharp
Checking Tooth Sharpness
Keeping your hand saw teeth sharp helps you cut wood easily and cleanly. Checking the sharpness is the first step before sharpening.
There are simple ways to check if your saw teeth need sharpening. You can look closely or test cut some wood.
Visual Inspection
Look at the teeth under good light. Sharp teeth have clear, pointed edges. Dull teeth look rounded or chipped.
Check for any damage or missing teeth. Even a few bad teeth can make cutting harder.
- Use a bright light and magnifier if needed
- Look for shiny, smooth edges on each tooth
- Notice if teeth are bent or broken
- Compare teeth to a sharp saw if possible
Test Cutting
Try cutting a piece of wood with your saw. Sharp teeth cut smoothly and quickly. Dull teeth feel slow and rough.
Listen to the sound while cutting. Sharp teeth make a clean, steady noise. Dull teeth may sound dull or uneven.
- Use a softwood board for testing
- Cut with steady pressure and speed
- Watch how easily the saw moves through wood
- Check the cut edge for roughness or splinters
Maintaining Your Saw
Keeping your hand saw sharp helps it cut better and last longer. Regular care makes your work easier and safer.
This guide shows how to keep your saw teeth sharp and how to store your saw properly.
Regular Sharpening Schedule
Sharpen your saw teeth often. A dull saw slows your work and can be dangerous.
Check your saw teeth before each use. If they look dull or damaged, sharpen them.
- Sharpen every few hours of use for heavy work
- Sharpen after every few projects for light use
- Use a fine file to keep teeth sharp
- Keep teeth evenly sharp for smooth cutting
Proper Storage Tips
Store your saw in a dry place to stop rust. Moisture can damage the metal and teeth.
Keep the saw in a case or hang it safely to avoid bending the teeth.
- Wipe the saw clean before storing
- Use oil to protect the blade from rust
- Hang the saw on a pegboard or tool rack
- Keep it away from heavy tools that can cause damage
Frequently Asked Questions
How Do You Sharpen A Hand Saw Manually?
To sharpen a hand saw manually, first secure it in a vise. Use a triangular file to sharpen each tooth, maintaining the original angle. File each tooth with consistent strokes to ensure even sharpness. After filing, test the saw on scrap wood to ensure it cuts smoothly.
What Tools Are Needed To Sharpen Saw Teeth?
To sharpen saw teeth, you’ll need a vise, a triangular file, a saw set tool, and safety gear. The vise secures the saw, while the file sharpens the teeth. The saw set adjusts tooth angles, and safety gear protects you during the process.
How Often Should You Sharpen A Hand Saw?
You should sharpen a hand saw when it starts cutting inefficiently or feels dull. Frequency depends on use, but typically every few months for regular use. Maintaining sharp teeth ensures cleaner cuts and prolongs the saw’s life, making it a crucial maintenance task.
Can Beginners Sharpen Hand Saws Effectively?
Yes, beginners can sharpen hand saws with practice and patience. Start by understanding tooth angles and using the right tools. Practice on an old saw to gain confidence. As you improve, maintaining consistent angles and strokes becomes easier, leading to effective sharpening.
Conclusion
Sharpening hand saw teeth keeps your tool working well. It makes cutting easier and more precise. Regular sharpening saves time and effort on projects. Use the right file and follow the teeth shape carefully. Take your time and work with steady strokes.
Clean and oil the saw after sharpening. This simple care helps the saw last longer. Keep your saw sharp to enjoy smooth, clean cuts every time. A sharp saw makes woodworking more fun and less tiring. Try these steps and see the difference yourself.