Are you ready to make your trim work look sharp and professional? Using a miter saw for precise trim cuts can transform your projects from good to amazing.
But if you’re not confident with the tool, those perfect angles might feel out of reach. This guide will show you exactly how to use your miter saw step-by-step, so you can cut with accuracy and confidence every time. Keep reading, and you’ll soon master the skills that make your trim fit like a glove—no guesswork, no wasted material, just clean, precise cuts that impress.

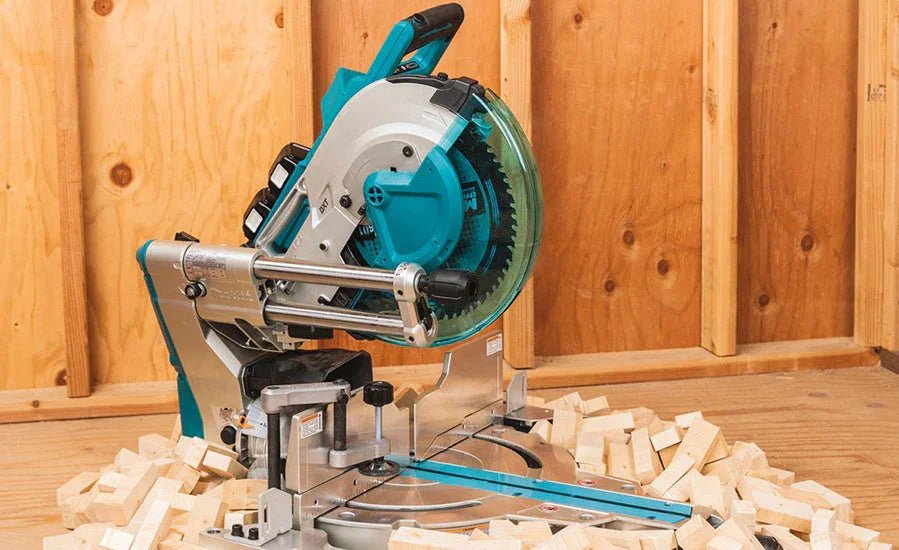
Credit: www.amazon.ca
Choosing The Right Miter Saw
Choosing the right miter saw is key for making precise trim cuts. The right saw improves accuracy and saves time.
This guide explains different saw types, blade tips, and safety features to consider before buying.
Types Of Miter Saws
Miter saws come in different styles for various cutting needs. Knowing each type helps you pick the best one.
- Standard Miter Saw:Cuts at fixed angles. Good for simple trim work.
- Compound Miter Saw:Can tilt for bevel cuts. Useful for angled trim and molding.
- Sliding Compound Miter Saw:Has sliding rails to cut wider boards. Offers more flexibility.
- Dual Bevel Miter Saw:Tilts both left and right. Saves time on complex cuts.
Blade Selection Tips
Choosing the right blade affects cut quality. Use blades designed for trim to get clean edges.
| Blade Type | Teeth Count | Best Use |
| Crosscut Blade | 60 to 80 | Fine trim and molding cuts |
| Combination Blade | 40 to 50 | General purpose cutting |
| Fine Finish Blade | 80 to 100 | Very smooth cuts on delicate trim |
Safety Features To Look For
Safety features protect you during use. Choose a saw with these important options.
- Blade Guard:Covers the blade when not cutting.
- Electric Brake:Stops the blade quickly after release.
- Locking Mechanism:Keeps the saw locked during transport.
- Anti-Kickback Pawls:Prevent wood from kicking back.
- Dust Collection Port:Keeps the work area clean and safe.
Setting Up Your Workspace
Setting up your workspace properly helps you make precise trim cuts with a miter saw. A good setup improves safety and accuracy.
Focus on arranging your tools, lighting, and materials so you can work comfortably and efficiently.
Optimal Workbench Setup
Use a sturdy workbench that can hold the miter saw and your materials. The height should let you work without bending too much.
Clear the bench of clutter to avoid distractions. Make sure there is enough space on both sides of the saw for long pieces of trim.
- Choose a flat, stable surface
- Set bench height near waist level
- Leave 12 to 18 inches of space on each side of the saw
- Keep tools and scraps away from the cutting area
Lighting And Visibility
Good lighting helps you see the cut lines clearly. Use bright, focused lights near the saw to reduce shadows.
Natural light is great, but if you work indoors, add extra lamps. Avoid glare that can make it hard to see.
- Use LED or daylight bulbs for bright light
- Position lights to shine directly on the cut line
- Check for shadows before starting your cut
- Wear safety glasses with clear lenses to improve visibility
Securing Materials Properly
Hold your trim pieces firmly to prevent movement during cutting. Use clamps or a vise to keep materials steady.
Make sure the trim is supported along its length to avoid bending or tipping. This keeps cuts clean and exact.
- Clamp trim to the workbench or saw base
- Use supports for long or heavy pieces
- Check that clamps do not block the saw blade
- Test stability by gently pushing the material before cutting
Preparing The Miter Saw
Using a miter saw for precise trim cuts starts with proper preparation. Setting up your saw correctly helps you get clean and accurate cuts every time.
Before cutting, check the saw settings and make sure the blade is sharp and clean. This will keep your work smooth and safe.
Adjusting The Angle And Bevel
Adjust the angle on the miter saw to cut corners and edges. Most saws have a dial or lever to set this angle easily.
The bevel adjustment lets you tilt the blade for angled cuts. This is important for making trim fit tightly in corners.
- Unlock the angle adjustment handle
- Turn the saw to the desired angle
- Lock the handle firmly to hold the angle
- For bevel, release the bevel lock
- Tilt the blade to the needed bevel degree
- Secure the bevel lock in place
Calibrating The Saw For Accuracy
Calibration makes sure your saw cuts exactly where you want. Check the blade alignment and the angle scale often.
Use a square or angle finder tool to test the blade position. Adjust the saw if the blade does not line up with the marks.
- Turn off and unplug the saw
- Place a square against the blade
- Check if the blade is perfectly vertical
- Adjust the bevel or miter angle if needed
- Tighten all locks after adjustments
- Test cut a scrap piece to confirm accuracy
Blade Maintenance And Cleaning
A clean, sharp blade cuts better and lasts longer. Remove debris and resin that can build up on the blade.
Use a brush or cloth with a blade cleaner to clean the teeth. Check for any damage and replace the blade if it is dull or chipped.
- Unplug the saw before cleaning
- Remove the blade guard carefully
- Wipe blade teeth with a soft brush
- Use blade cleaner for sticky residue
- Dry the blade completely before use
- Inspect blade for chips or dullness
- Replace blade if damaged or worn out

Credit: www.amazon.ca
Techniques For Precise Trim Cuts
Using a miter saw for trim work requires careful attention. Precise cuts ensure the trim fits well and looks professional.
This guide explains key techniques for accurate trim cutting. Follow these tips to improve your woodworking projects.
Measuring And Marking Trim
Measure the space carefully before cutting trim. Use a tape measure for exact lengths.
Mark the cut line clearly with a pencil. Check measurements twice to avoid mistakes.
- Measure twice, cut once
- Mark the trim on the edge, not the face
- Use a square to keep lines straight
Making Straight Cuts
Set the miter saw blade at 0 degrees for straight cuts. Keep the trim firmly against the fence.
Cut slowly to avoid splintering the wood. Use a sharp blade for cleaner edges.
- Align the blade with the pencil mark
- Hold the trim tight to prevent movement
- Cut at a steady speed
Executing Compound Cuts
Compound cuts combine miter and bevel angles. These cuts fit trim around corners and angled walls.
Adjust the miter and bevel settings on the saw. Test cuts on scrap wood help avoid errors.
- Set miter angle for horizontal tilt
- Set bevel angle for vertical tilt
- Check angles with a protractor if needed
- Practice on scrap before cutting trim
Handling Crown Molding
Crown molding requires special care. It sits at an angle between the wall and ceiling.
Place the molding upside down on the saw. Match the molding’s spring angle to saw settings.
- Identify the spring angle of the molding
- Use the saw’s crown molding setting
- Hold the molding tight and steady
- Make test cuts on scrap pieces
Common Mistakes To Avoid
Using a miter saw for trim work needs care and attention. Small mistakes can cause big problems with your cuts.
Learn about common errors to keep your trim cuts clean and precise every time.
Misalignment Issues
Misalignment happens when the saw blade and the trim are not properly lined up. This causes uneven or angled cuts.
Check the saw’s angle and position before cutting. Use the saw’s guide marks to help line up the cut.
- Always measure twice before cutting.
- Make small test cuts on scrap wood first.
- Keep the trim tight against the saw fence.
Improper Clamping
Not clamping the trim properly lets it move during the cut. This leads to rough or inaccurate edges.
Use clamps or hold the wood firmly to keep it still. Secure the trim before turning on the saw.
- Use a clamp that fits your workpiece size.
- Check the clamp pressure; too loose or too tight can cause damage.
- Position clamps so they don’t block the saw blade.
Ignoring Safety Protocols
Skipping safety steps increases the risk of injury. A miter saw is powerful and can be dangerous.
Always wear safety glasses and ear protection. Follow all safety instructions for your saw.
- Keep hands away from the blade path.
- Wait for the blade to stop before removing cut pieces.
- Use the saw’s safety guard and never disable it.
Finishing Touches After Cutting
After cutting trim pieces with a miter saw, the job is not done. Finishing touches help make the trim look clean and professional.
Taking time to smooth edges and fit pieces well will improve your final results. Small fixes can make a big difference.
Sanding And Smoothing Edges
Cut edges often have rough spots or splinters. Use sandpaper to smooth these areas for a clean finish.
Sand gently along the cut lines to avoid changing the angle. Use fine-grit sandpaper for the best results.
- Start with medium-grit sandpaper (120 grit)
- Finish with fine-grit sandpaper (220 grit)
- Sand both edges and faces of the cut
- Check edges for smoothness by touch
Fitting And Installation Tips
Test fit your trim pieces before final installation. This helps check angles and gaps between pieces.
Use clamps or painters tape to hold pieces in place while you check the fit. Make small adjustments if needed.
- Place trim on the wall and check alignment
- Look for gaps or uneven joints
- Make minor angle or length adjustments
- Secure pieces with finishing nails or adhesive
Touch-up Techniques
Fill small gaps or nail holes with wood filler or caulk. Let it dry before sanding smooth.
Use paint or stain to match the trim color. This hides any imperfections and blends repairs.
- Apply wood filler to cracks and holes
- Sand the filler once dry for a flat surface
- Use paint or stain to match existing trim
- Apply multiple coats if needed for coverage
Maintenance For Long-term Use
Keeping your miter saw in good shape helps it work well for many years. Regular care prevents problems and keeps cuts precise.
Simple maintenance tasks can save you time and money on repairs. Follow these tips to extend your saw’s life.
Regular Cleaning Routines
Dust and debris can build up on your miter saw. Clean it after every use to avoid damage and keep it running smoothly.
Use a brush or compressed air to remove sawdust from the blade and motor area. Wipe down surfaces with a dry cloth.
- Unplug the saw before cleaning
- Remove leftover wood chips from the table
- Clear dust from the blade guard and motor vents
- Check for sticky resin and clean with a soft cloth
Blade Replacement Indicators
A dull blade makes rough cuts and can strain the motor. Replace the blade when you notice signs of wear.
Look for chipped or missing teeth, slow cutting speed, or burning marks on wood. These are clear signals to change the blade.
- Chipped or broken teeth on the blade
- Wood edges are rough or splintered
- Blade takes longer to cut than usual
- Burn marks appear on the wood
Storage Best Practices
Store your miter saw in a dry, clean place to prevent rust and damage. Cover it to keep dust off when not in use.
Keep the saw away from heavy traffic areas to avoid bumps. Organize the workspace to protect the tool and its parts.
- Use a protective cover over the saw
- Store in a dry area to avoid rust
- Keep the power cord coiled and untangled
- Avoid stacking heavy items on the saw

Credit: www.findbuytool.com
Frequently Asked Questions
How Do You Make Precise Trim Cuts With A Miter Saw?
To achieve precise trim cuts, use a sharp blade and secure your material. Align the blade with your cut line. Make sure to hold the material firmly against the fence. Always measure twice to ensure accuracy before cutting. This ensures clean and precise trim cuts every time.
What Angle Should I Use For Trim Cuts?
The standard angle for trim cuts is typically 45 degrees. However, depending on your project, you might need to adjust this. Always measure and mark your material carefully. Use the miter saw’s angle guide for accuracy. Adjust accordingly for non-standard angles to achieve the desired fit.
Can A Miter Saw Handle All Trim Materials?
A miter saw can handle most trim materials like wood, plastic, and composite. Ensure the blade is suitable for the material. For harder materials, consider using a blade with more teeth. Always check the manufacturer’s guidelines for compatibility. This ensures safety and precision.
What’s The Best Blade For Trim Cuts?
For trim cuts, use a fine-tooth blade with 80 teeth or more. This type of blade provides smooth and clean cuts. It minimizes splintering and ensures precision. Always choose a blade compatible with your miter saw. Regularly check and maintain the blade for optimal performance.
Conclusion
Using a miter saw helps you make clean, precise trim cuts every time. Practice safe handling and measure twice before cutting. This tool saves time and improves your woodworking projects. Keep your saw sharp and clean for best results. With patience and care, your trim work will look professional.
Enjoy creating neat edges and perfect angles with confidence.