If you want your crown molding to look perfect, mastering the miter saw is a must. You might feel unsure about those tricky angles and cuts, but with the right guide, you can tackle them confidently.
This guide will show you exactly how to use your miter saw to create clean, precise cuts every time. By the end, you’ll have the skills to make your crown molding look professional and polished. Ready to transform your space with sharp, flawless edges?
Let’s get started.
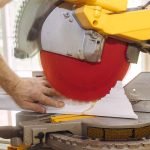
Credit: sawdustgirl.com
Choosing The Right Miter Saw
Using a miter saw for crown molding requires the right tool. Choosing the best miter saw helps you make clean, precise cuts. This guide explains key features to look for.
Selecting a saw with the right blade and safety features is important. It will make your work easier and safer.
Types Of Miter Saws
Miter saws come in different types. Each type suits certain tasks. Understanding these helps you pick the right one for crown molding.
- Basic Miter Saw:Cuts at fixed angles. Good for simple molding.
- Compound Miter Saw:Tilts to cut bevels and angles. Ideal for crown molding.
- Sliding Compound Miter Saw:Has a sliding arm for wider cuts. Best for large crown molding pieces.
Blade Selection For Crown Molding
Blade choice affects the smoothness of your cuts. Crown molding needs a fine, sharp blade. Look for these features:
| Blade Type | Teeth Count | Purpose |
| Carbide-Tipped | 60-80 | Clean, precise cuts |
| Finishing Blade | 80-100 | Very smooth edges |
| General Purpose | 40-50 | Rough cuts, not ideal for molding |
Safety Features To Consider
Safety is key when using a miter saw. Choose a saw with these features to protect yourself:
- Blade guard to cover the blade when not cutting
- Electric brake to stop the blade quickly
- Secure clamps to hold the molding in place
- Non-slip base to keep the saw steady
Credit: sawdustgirl.com
Preparing Crown Molding For Cutting
Preparing crown molding before cutting is important for a clean fit. Proper steps help avoid mistakes and wasted material.
This guide covers measuring and marking, setting molding orientation, and clamping techniques. Follow these to get precise cuts.
Measuring And Marking
Measure the length needed carefully. Use a tape measure to get exact dimensions for each piece of molding.
Mark the cutting lines clearly with a pencil. Use a square or protractor to mark angles accurately.
- Measure twice to avoid errors
- Mark the cut line on the back side
- Note inside or outside corners on the mark
Setting The Molding Orientation
Place the molding on the saw in the same way it will sit on the wall. This helps cut the correct angle.
Hold the molding with the bottom edge flat against the saw base. The top edge should lean against the fence.
- Keep the molding in its installed position
- Align the molding’s wall edge with the fence
- Check the angle matches your corner
Clamping Techniques
Secure the molding firmly to prevent movement while cutting. Use clamps designed for wood and molding.
Place clamps where they do not block the saw blade. Tighten clamps just enough to hold the molding steady.
- Use a quick-release clamp for easy adjustment
- Clamp close to the cut line but not on it
- Check the molding does not shift before cutting
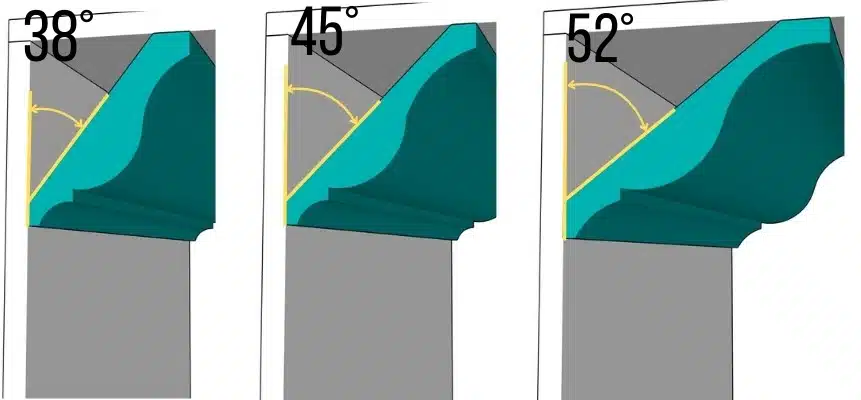
Setting Miter And Bevel Angles
Setting the correct miter and bevel angles is key to cutting crown molding cleanly. These angles help the molding fit tightly at corners.
Understanding how to adjust your saw for these angles saves time and reduces mistakes in your project.
Common Angles For Crown Molding
Crown molding typically sits at a 45-degree angle on each side. This angle affects how you set the saw for inside and outside corners.
| Wall Angle | Miter Angle | Bevel Angle |
| 90° (Standard Corner) | 31.6° | 33.9° |
| 135° (Wide Corner) | 10.5° | 16.5° |
| 45° (Sharp Corner) | 43.3° | 44° |
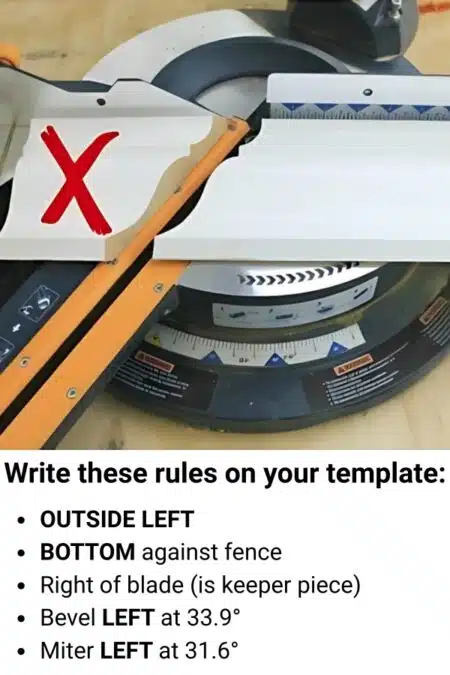
Adjusting The Saw For Inside And Outside Corners
Inside corners require the molding to tilt inward, while outside corners tilt outward. You must flip the molding and adjust the angles accordingly.
- For inside corners, tilt the saw blade to the left or right as needed.
- For outside corners, tilt the blade in the opposite direction.
- Always test cut on scrap molding before cutting your final pieces.
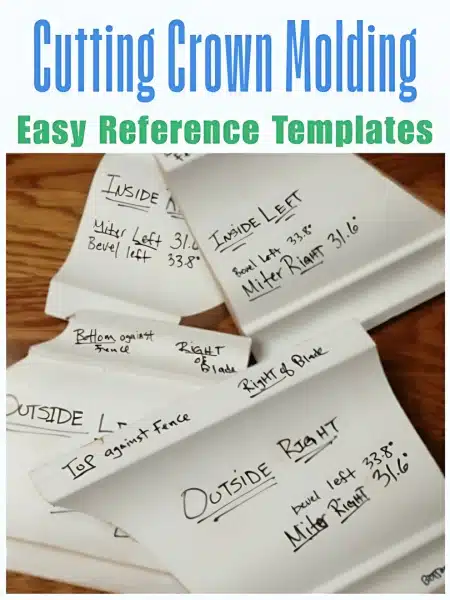
Using Angle Calculators And Templates
Angle calculators help convert wall angles into miter and bevel settings. Templates guide you in marking precise cuts on molding.
Here is a simple guide for using an angle calculator:
- Measure the wall corner angle with a protractor.
- Enter this angle into the calculator or app.
- Note the recommended miter and bevel angles.
- Set your saw to these angles before cutting.
Cutting Techniques For Clean Joints
Using a miter saw for crown molding requires precise cutting to create clean joints. Accurate cuts ensure the molding fits tightly at corners.
Understanding cutting techniques helps avoid gaps and uneven edges. This guide covers key tips for clean, professional results.
Making Test Cuts
Always make test cuts on scrap wood before cutting your molding. Test cuts show if your angles are correct.
Adjust the saw settings as needed based on the test pieces. This step saves material and time by reducing mistakes.
- Cut a scrap piece at the desired angle
- Check if the edges match with another piece
- Make small adjustments and test again
- Confirm the fit before cutting the actual molding
Handling Compound Cuts
Crown molding often needs compound cuts, which combine miter and bevel angles. Set your saw to the correct miter and bevel angles before cutting.
Use the saw’s angle guide or a digital angle finder to get precise settings. Cutting slowly helps maintain control and accuracy.
- Set the miter angle on the saw base
- Adjust the bevel angle by tilting the saw head
- Hold the molding firmly against the fence
- Make slow, steady cuts to avoid splintering
Tips For Accurate And Smooth Cuts
Use a sharp blade designed for fine cuts to get smooth edges. Dull blades can tear the wood and cause rough joints.
Clamp the molding securely and keep your hands steady. Mark cut lines clearly to follow the saw blade precisely.
- Use a blade with many teeth for fine cuts
- Clamp the molding to prevent movement
- Mark cut lines on the molding’s face
- Cut slowly to reduce splintering
- Sand edges lightly if needed for a clean finish
Assembling And Installing Crown Molding
Installing crown molding adds a refined touch to any room. Careful assembly ensures a clean and professional look.
This guide covers fitting, securing, and finishing crown molding using a miter saw.
Fitting The Pieces Together
Measure and cut each piece precisely. Use the miter saw to create angled cuts that match the corners.
Dry fit the pieces before nailing to check alignment and make any adjustments.
Nailing And Securing
Secure the molding to the wall and ceiling with finishing nails. Use a nail gun or hammer carefully.
- Hold the molding in place at the correct angle.
- Drive nails into the studs or ceiling joists for a strong hold.
- Space nails about 12 inches apart for stability.
- Use a nail set to sink the nails slightly below the surface.
- Check that the molding is flush and straight before finishing.
Filling Gaps And Finishing Touches
Fill nail holes and gaps between pieces with wood filler or caulk for a smooth look.
| Material | Use |
|---|---|
| Wood filler | Fill nail holes and small cracks |
| Painter’s caulk | Seal gaps between molding and wall or ceiling |
| Sandpaper (120-grit) | Smooth filler after drying |
After filling and sanding, paint or stain the molding to match your decor.
Troubleshooting Common Issues
Using a miter saw for crown molding can be tricky. Some common problems may slow you down. Fixing these issues helps you get clean, precise cuts.
This guide covers how to handle errors with your miter saw. You will also learn to fix uneven joints and stop wood from splintering.
Dealing With Miter Saw Errors
Errors with your miter saw can cause wrong angles and bad cuts. Check the saw’s settings before each cut. Make sure the blade is sharp and tight.
Use a reliable angle guide or protractor to set angles. Double-check the saw’s fence is square to the blade. Small mistakes can lead to big problems.
- Check blade alignment regularly
- Use the right angle settings for crown molding
- Keep the saw clean and free of dust
- Tighten loose parts before cutting
Fixing Uneven Joints
Uneven joints happen when cuts do not match perfectly. Measure the molding carefully before cutting. Cut slowly and hold the molding steady.
Sand the edges lightly if the joint is slightly off. Use wood filler to fill gaps. Proper measuring and steady cutting reduce uneven joints.
- Measure twice, cut once
- Hold molding firmly against the fence
- Use a clamp to keep molding steady
- Sand or fill small gaps for smooth joints
Preventing Wood Splintering
Wood splintering ruins the look of crown molding. Use painter’s tape along the cut line to reduce splinters. Cut slowly and avoid forcing the saw.
Make sure your blade is sharp and clean. A dull blade causes more splinters. Support the wood fully to stop it from moving during the cut.
- Apply painter’s tape on cut line
- Use a sharp, clean blade
- Cut slowly and steadily
- Support wood firmly to avoid movement
Maintenance And Care For Your Miter Saw
Keeping your miter saw in good shape helps it work well and last longer. Regular care stops damage and keeps cutting smooth.
Follow simple steps to clean, replace parts, and store your saw safely. This keeps it ready for any project.
Cleaning And Lubrication
Clean your miter saw after each use to remove dust and debris. Dust can cause parts to stick and wear out faster.
Use a soft brush or compressed air to clear out sawdust from the blade guard and motor vents. Wipe metal parts with a dry cloth.
- Lubricate the pivot points and sliding rails lightly with machine oil.
- Avoid oil on the blade or areas that touch wood.
- Check the owner’s manual for recommended lubricants.
Blade Replacement Tips
Change the blade when it becomes dull or damaged. A sharp blade cuts cleaner and is safer to use.
Turn off and unplug the saw before replacing the blade. Use the blade lock to keep it from moving while you work.
- Use the right blade type for cutting crown molding.
- Tighten the blade securely but avoid over-tightening.
- Wear gloves to protect your hands during replacement.
Storage Best Practices
Store your miter saw in a clean, dry place to stop rust and damage. Cover it to keep dust away.
Keep the saw on a stable surface or in a proper case. Avoid stacking heavy items on top of it.
- Unplug the saw and coil the power cord neatly.
- Remove the blade or lower the blade guard before storage.
- Check the saw regularly for any signs of wear or damage.
Credit: sawdustgirl.com
Frequently Asked Questions
What Is A Miter Saw Used For?
A miter saw is primarily used for making precise crosscuts and angled cuts in wood. It is essential for tasks like cutting crown molding, baseboards, and framing. Its ability to pivot allows for angled cuts, making it ideal for intricate molding installations.
How Do You Cut Crown Molding With A Miter Saw?
Cutting crown molding with a miter saw requires setting the saw at the correct angle. Position the molding upside down against the saw fence. Adjust the miter and bevel angles according to your specific molding type. Test on scrap pieces to ensure accuracy before final cuts.
What Angle Do You Cut Crown Molding?
The typical angle for cutting crown molding is 45 degrees. However, it can vary based on the wall angle and molding size. Always measure and test before making final cuts. Refer to angle charts or guides specific to your crown molding for precise instructions.
Can Beginners Use A Miter Saw?
Yes, beginners can use a miter saw with proper guidance and safety precautions. Start by understanding the tool’s functions and safety features. Practice on scrap wood to gain confidence. Always wear safety goggles and follow the manufacturer’s instructions for safe operation.
Conclusion
Using a miter saw for crown molding makes the job easier and neater. Take your time to measure and cut carefully. Practice on scrap wood before starting on your project. Always keep safety in mind while working with the saw.
Clean cuts help the molding fit perfectly on corners. With patience and the right technique, your room will look professional. Enjoy the process and watch your space transform beautifully. Keep these tips handy for your next crown molding task.