
Are you ready to transform your large furniture pieces into smooth, stunning works of art? Using a belt sander might seem tricky at first, but once you know the right steps, it becomes a powerful tool in your hands.
This guide will show you exactly how to use a belt sander safely and effectively, so you can save time and get professional-looking results. Keep reading—you’re about to unlock a skill that will make your furniture projects easier and more satisfying than ever before.
Credit: www.familyhandyman.com
Choosing The Right Belt Sander
Using a belt sander on large furniture helps smooth rough surfaces fast. Picking the right sander makes your work easier and better.
Knowing the types, power, and features of belt sanders guides you to the best choice for big projects.
Types Of Belt Sanders
There are different belt sanders. Each suits certain tasks and furniture sizes.
- Handheld Belt Sanders:Portable and good for flat surfaces.
- Stationary Belt Sanders:Fixed machines for heavy sanding jobs.
- Detail Belt Sanders:Small and useful for tight corners.
For large furniture, handheld or stationary belt sanders are best. They cover big areas quickly.
Power And Size Considerations
Power and size affect how well the sander works on big pieces.
- Motor Power:Choose at least 6 amps for strong sanding.
- Belt Size:Larger belts like 3″ x 21″ cover more surface fast.
- Speed Settings:Variable speeds help control sanding depth.
Higher power and bigger belts save time and reduce effort on large furniture.
Essential Features To Look For
Some features make using a belt sander safer and easier on big projects.
- Dust Collection:Keeps your workspace clean and safe.
- Ergonomic Handles:Reduce hand fatigue during long sanding sessions.
- Adjustable Belt Tracking:Helps keep the belt aligned for smooth sanding.
- Easy Belt Change:Saves time when switching sanding belts.
Pick a sander with these features for better comfort and control.
Preparing Your Workspace
Using a belt sander on large furniture requires a clean and safe workspace. Preparing your area helps you work better and avoid accidents.
Organizing your space makes sanding easier and faster. It also protects your furniture and tools.
Clearing And Securing The Area
Remove all clutter from your workspace before sanding. This prevents trips and keeps the sander from hitting objects.
Secure the furniture on a stable surface. Use clamps or non-slip pads to keep it from moving while you sand.
- Clear the floor and nearby surfaces
- Move fragile items away
- Clamp furniture firmly to a workbench
- Use non-slip mats under furniture legs
Proper Lighting And Ventilation
Good lighting helps you see scratches and rough spots clearly. Natural or bright white lights work best.
Ventilate the area to remove dust and fumes. Open windows or use fans to keep air flowing during sanding.
- Use bright lamps or daylight bulbs
- Open windows or doors
- Place fans to direct dust outside
- Wear a dust mask to protect your lungs
Safety Gear Essentials
Wear safety gear to protect yourself from dust and debris. Always have these items ready before sanding.
Gloves, goggles, and ear protection keep you safe and comfortable while working with a belt sander.
- Dust mask or respirator
- Safety goggles
- Ear protection like earplugs or earmuffs
- Work gloves to protect your hands
Setting Up The Belt Sander
Using a belt sander on large furniture pieces requires proper setup. This ensures smooth sanding and avoids damage.
Start by understanding the parts of your sander and how to prepare it for the job. This guide covers key setup steps.
Selecting The Correct Sandpaper Grit
Choose sandpaper grit based on the wood condition and sanding stage. Coarse grit removes old finish fast but may scratch wood.
- Use 40-60 grit for rough sanding and removing old paint.
- Use 80-120 grit for smoothing wood surface.
- Use 150-220 grit for finishing and preparing for stain or paint.
Installing And Tensioning The Belt
Proper belt installation and tension keep the sander working well. Check that the belt fits snugly and tracks straight.
Follow these steps to install and tension the belt:
- Unplug the sander before starting.
- Release the tension lever to remove the old belt.
- Align the new belt so the arrows point in the sanding direction.
- Place the belt over rollers and close the tension lever.
- Adjust tracking knob to center the belt on rollers.
Adjusting Speed Settings
Set the sander speed based on the wood type and sanding task. Lower speed prevents damage on soft wood.
| Speed Setting | Best Use |
| Low | Soft woods and fine sanding |
| Medium | General sanding on hardwoods |
| High | Removing old finishes and rough sanding |

Credit: www.bobvila.com
Sanding Techniques For Large Furniture
Using a belt sander on large furniture pieces can save time. It also helps create a smooth surface for finishing. Proper sanding techniques ensure even results and avoid damage.
This guide covers key sanding steps. You will learn how to start, apply pressure, follow wood grain, and handle tricky corners and edges.
Starting With Coarse Grit
Begin sanding with coarse grit sandpaper to remove old finishes and rough spots. This grit is usually between 40 and 60. It removes material quickly but can leave scratches if used too long.
Change to finer grits as the surface becomes smoother. This process prepares the wood for staining or painting.
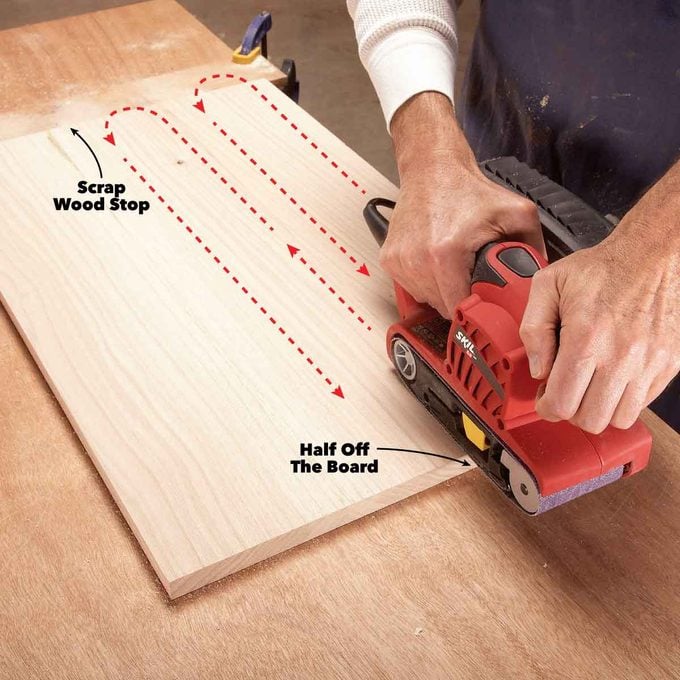
Maintaining Even Pressure
Keep steady, even pressure while sanding. Pressing too hard can create uneven surfaces and wear down the sandpaper fast. Too little pressure may not remove enough material.
- Hold the sander flat against the surface
- Use your arms, not just your wrists, to guide the tool
- Move the sander in slow, controlled motions
- Check the surface frequently for smoothness
Sanding With The Grain
Always sand in the direction of the wood grain. This method prevents scratches that go against the grain. Sanding with the grain helps the finish adhere better and look cleaner.
Managing Corners And Edges
Corners and edges need gentle handling. Belt sanders can be too rough for tight areas. Use finer grit sandpaper by hand or a detail sander for these parts.
| Area | Recommended Tool | Grit Level |
| Flat Surfaces | Belt Sander | Coarse to Fine (40-120) |
| Edges | Detail Sander or Sanding Block | Fine (100-150) |
| Corners | Hand Sanding with Sandpaper | Fine (150+) |
Preventing Common Issues
Using a belt sander on large furniture can save time and effort. It also can cause problems if not handled right.
Knowing how to avoid common issues helps keep your work smooth and your furniture safe.
Avoiding Gouges And Dips
Gouges happen when you press the sander too hard in one spot. Dips occur if the sander stays too long on one area.
Keep the sander moving evenly and gently across the surface. Let the belt do the work, not your force.
- Hold the sander flat and steady
- Move it in smooth, even strokes
- Do not stop in one place for long
- Check the surface often for marks
Dealing With Belt Slippage
Belt slippage happens when the sanding belt loses grip. This causes uneven sanding and can damage the belt.
Make sure the belt is tight and properly installed. Check the tension before you start sanding.
- Turn off the sander before adjusting
- Tighten the belt using the tension knob
- Replace worn or damaged belts quickly
- Keep the belt clean from dust and oil
Minimizing Dust And Debris
Dust and debris can block your view and harm your lungs. It also can clog the sander and reduce its life.
Use dust collection tools and wear a mask. Clean your work area often to keep dust low.
- Attach a vacuum or dust bag to the sander
- Wear a protective mask and goggles
- Work in a well-ventilated space
- Wipe surfaces and floors regularly
Finishing Touches
After sanding large furniture pieces, finishing touches make a big difference. These steps ensure the surface feels smooth and looks great. Taking time here improves the final result.
We will cover switching to fine grit, cleaning the surface, and inspecting for any imperfections. Each part is important for a perfect finish.
Switching To Fine Grit For Smoothness
Start by changing your belt sander to a fine grit belt. This helps remove scratches left by coarser grits. It also smooths the wood for a better look and feel.
- Use 120 to 220 grit sandpaper for fine sanding.
- Sand evenly and gently over the entire surface.
- Keep the sander moving to avoid deep marks.
- Check the surface often to see progress.
Cleaning The Surface
Remove dust and debris after sanding. A clean surface helps paint or finish stick better. It also shows any spots you missed.
| Cleaning Tool | Purpose |
| Vacuum Cleaner | Remove loose dust |
| Tack Cloth | Pick up fine dust |
| Soft Brush | Clean corners and crevices |
| Damp Cloth | Wipe remaining dust gently |
Inspecting For Imperfections
Look closely at the surface to find dents, scratches, or rough spots. Fixing these before finishing saves time later.
- Use good light to see the surface clearly.
- Run your hand over the wood to feel rough areas.
- Mark any problem spots with a pencil.
- Sand marked areas again lightly with fine grit.
- Clean the surface once more after sanding.
Maintenance Tips For Your Belt Sander
Keeping your belt sander in good shape helps it work well for big furniture projects. Regular care stops problems and saves money.
This guide shows easy ways to clean, store, and check your belt sander. Follow these tips to keep it ready for use.
Cleaning And Storage
Clean your belt sander after each use. Remove dust and debris from the belt and motor area. Use a soft brush or cloth to wipe it down.
Store the sander in a dry, cool place. Keep it away from moisture to avoid rust and damage. Cover it to protect from dust.
- Use compressed air to blow out dust inside
- Wipe down the sanding belt and rollers
- Keep the power cord untangled and dry
- Store in a tool box or on a shelf with a cover
Replacing Belts
Change the sanding belt when it wears out or tears. A worn belt gives poor sanding results and can damage the tool.
Make sure to use the right size and type of belt for your sander. Follow the instructions in the user manual for replacement.
- Turn off and unplug the sander
- Release the tension lever to remove the old belt
- Align the new belt on the rollers
- Re-engage the tension and check belt tracking
Regular Inspections
Inspect your belt sander often to find problems early. Check the belt, rollers, and motor for signs of wear or damage.
Look for loose parts or unusual noises during use. Fix small issues before they become bigger and costly.
- Check belt condition and tension
- Examine rollers for smooth rotation
- Inspect power cord for cuts or frays
- Listen for strange sounds when running

Credit: feltingandfiberstudio.com
Frequently Asked Questions
What Is The Best Belt Sander For Furniture?
Selecting a belt sander depends on your needs. Look for models with variable speed settings and dust collection. A wide belt is also beneficial for large furniture pieces. Popular brands include Makita, Bosch, and DeWalt. Always check for customer reviews and ratings before purchasing.
How Do I Prepare Furniture For Sanding?
Start by cleaning the furniture surface to remove dust and debris. Check for any loose parts or nails and secure them. Use tape to cover areas you don’t want sanded. This ensures a smooth and even sanding process. Proper preparation leads to better results.
What Grit Sandpaper Should I Use?
For large furniture pieces, begin with 80-grit sandpaper to remove old finishes. Gradually move to 120-grit for smoothing and finishing. Adjust the grit based on the furniture’s condition and desired finish. Always test on a small area first to ensure the best results.
How Do I Avoid Sanding Marks?
To avoid sanding marks, keep the belt sander moving continuously. Never press too hard; let the sander’s weight do the work. Sand with the grain of the wood for a smoother finish. Regularly check your work to ensure even sanding and avoid repeated mistakes.
Conclusion
Using a belt sander on large furniture can save time and effort. Take your time and move the sander evenly across the surface. Always wear safety gear to protect yourself. Keep the sandpaper clean and replace it when needed. Practice on scrap wood before starting your project.
With patience and care, your furniture will look smooth and polished. Enjoy the process and the results you create.