Are you tired of rummaging through cluttered drawers or scattered toolboxes every time you need a specific screw or nail? Imagine a workspace where every tiny piece is neatly organized, easy to find, and instantly accessible.
It sounds like a dream, but with the right strategy, it can be your reality. In this guide, you’ll discover the simple yet effective way to use bins for storing screws and nails. By the end, you’ll know how to streamline your storage, save time, and reduce frustration.
Dive in to transform your workspace into a haven of order and efficiency!

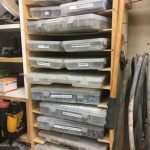
Credit: www.temu.com
Choosing The Right Bins
Organizing screws and nails helps you find them fast. Using bins is a smart way to store these small items.
Picking the right bins makes your storage neat and easy to use. Think about material, size, and design.
Material Options
Bins come in many materials. Choose one that lasts and fits your workspace.
Plastic bins are light and easy to clean. Metal bins are strong but can rust. Clear bins let you see contents quickly.
- Plastic: lightweight and affordable
- Metal: durable but may rust
- Clear: easy to identify items
Size And Shape Considerations
Bins come in different sizes and shapes. Pick a size that fits your screws and nails well.
Small bins work for tiny screws. Larger bins hold bigger nails. Shape affects how you store and access items.
- Small bins for tiny parts
- Large bins for big nails and screws
- Shallow bins for easy reach
- Deep bins for more storage
Stackable Vs. Individual Bins
Stackable bins save space by going up. Individual bins let you move each container easily.
Stackable bins work well on shelves. Individual bins are good if you need to carry parts around.
- Stackable: saves floor and shelf space
- Individual: easy to transport and sort
- Choose based on your workspace and use

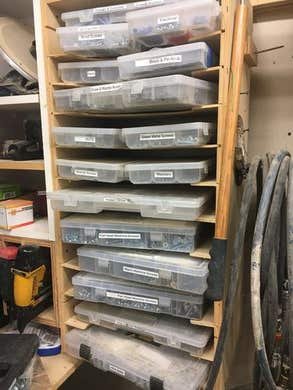
Credit: www.amazon.ca
Sorting Screws And Nails
Keeping screws and nails organized helps you find them fast. Using bins for storage makes your workspace neat. Sorting them properly avoids mixing different types and sizes.
This guide focuses on sorting screws and nails by size, type, and labeling. Each method helps you keep your collection tidy and easy to use.
Sorting By Size
Sort screws and nails by their length and thickness. This way, you can quickly pick the right size for your project. Use separate bins or compartments for each size group.
- Short screws and nails go together
- Medium sizes have their own section
- Long screws and nails are stored separately
- Keep very thin and very thick ones apart
Sorting By Type
Divide screws and nails by their head and thread types. This makes it easier to find the exact one you need. Use a table to track common types and their features.
| Type | Description | Common Use |
| Flat Head Screw | Flat top, countersinks into material | Woodwork and furniture |
| Phillips Head Screw | Cross-shaped slot for screwdriver | General construction |
| Round Head Nail | Domed top, smooth shaft | Finish carpentry |
| Coil Nail | Connected in coil for nail guns | Framing and roofing |
Labeling Techniques
Label each bin or compartment clearly. Use easy-to-read labels to save time. Include size and type information on each label.
- Size in inches or millimeters
- Type of screw or nail
- Material or coating (e.g., galvanized)
- Use icons or simple drawings if helpful
Maximizing Space Efficiency
Storing screws and nails properly saves time and space. Bins help keep these small items organized. Using the right methods makes your workspace neat.
Smart storage ideas allow you to use every inch of your area. This guide covers ways to store screws and nails efficiently in bins.
Using Dividers
Dividers separate different types of screws and nails inside bins. They prevent mixing and make finding items faster. You can use plastic, wood, or cardboard dividers.
- Measure your bin’s size before cutting dividers.
- Create sections for each screw or nail size.
- Label each section clearly to identify contents.
- Adjust divider height to fit various screw lengths.
- Use removable dividers for flexible storage needs.
Vertical Storage Ideas
Stacking bins vertically saves floor and shelf space. Use racks or shelves to hold bins in layers. Clear bins help you see contents without opening them.
| Tip | Benefit |
| Use stackable bins | Maximizes vertical space |
| Label front of each bin | Quick identification |
| Keep heavy bins at bottom | Prevents tipping |
| Use uniform bin sizes | Easy stacking |
Utilizing Wall Space
Mount bins on walls to free up workbench and floor space. Use pegboards or wall-mounted racks to hold small bins. This keeps screws and nails within reach.
- Install a pegboard near your work area.
- Attach small bins with hooks or brackets.
- Group bins by screw or nail type on the wall.
- Use magnetic strips to hold metal containers.
- Keep frequently used items at eye level.
Maintaining Organization
Using bins to store screws and nails helps keep your workspace tidy. It also saves time when you need to find the right item.
To keep your storage system effective, you should maintain organization regularly. This will make your work easier and faster.
Regular Inventory Checks
Check your bins often to see what screws and nails you have left. This helps prevent running out of important items.
Write down what you need to buy before starting a new project. This saves trips to the store.
- Count each type of screw and nail
- Note low stock items
- Organize bins by size and type
Cleaning And Upkeep
Keep your bins clean to avoid mixing dirt with screws and nails. Dust and debris can cause problems in your projects.
Wipe the bins regularly with a dry cloth. Remove any rust or dirt from the screws and nails.
- Clean bins weekly or after big projects
- Check for moisture that can cause rust
- Use rust remover if needed
Replacing Damaged Bins
Replace bins that are cracked or broken. Damaged bins can spill your screws and nails, causing a mess.
Use sturdy bins that fit well in your storage space. This helps keep everything safe and organized.
- Check bins monthly for cracks or breaks
- Replace bins that do not close properly
- Choose durable materials for long use
Diy Custom Bin Solutions
Bins are a great way to organize screws and nails. Customizing these bins makes your workspace neat and efficient.
DIY custom bin solutions help you find what you need quickly. You can use simple materials to build useful storage options.
Repurposing Household Items
Look around your home for containers to store screws and nails. Small jars, old plastic boxes, and egg cartons work well.
- Use empty spice jars for tiny screws
- Cut egg cartons to hold different nails
- Recycle plastic containers to separate sizes
- Stack small boxes to save space
Building Custom Compartments
Create compartments inside bins to keep screws and nails sorted. Use cardboard, wood, or plastic dividers for clear sections.
| Material | Use | Tips |
|---|---|---|
| Cardboard | Make simple dividers | Cut to fit bin size, fold edges |
| Wood | Strong, long-lasting compartments | Use thin plywood for easy cutting |
| Plastic Sheets | Flexible and waterproof | Glue or tape inside bins |
Adding Labels And Tags
Labeling bins and compartments helps identify contents fast. Use clear and simple tags to avoid confusion.
- Write names on masking tape or stickers
- Use a permanent marker for durability
- Color code labels for quick visual sorting
- Attach small tags with string for removable labels
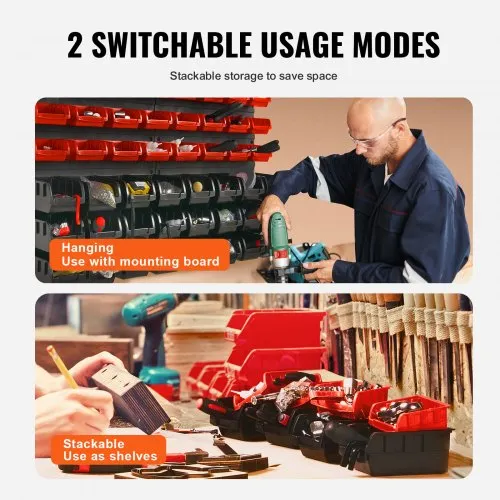
Credit: www.vevor.ca
Safety Tips For Storage
Storing screws and nails properly keeps your workspace safe and organized. Using bins helps prevent accidents and makes it easy to find items.
Following simple safety tips can reduce risks and protect everyone around your storage area.
Avoiding Overloading
Do not fill bins beyond their weight limit. Overloading can cause bins to break or tip over.
Heavy bins are harder to handle and increase the chance of spills and injuries.
- Check the bin’s weight capacity before filling
- Distribute weight evenly inside the bin
- Use multiple bins for large amounts
Secure Lid Usage
Always close lids tightly after use. Lids keep screws and nails from spilling out.
Secure lids protect your tools from dust and moisture, extending their life.
- Choose bins with locking lids for extra safety
- Check lids for cracks or damage regularly
- Replace lids if they do not close securely
Childproofing Storage Areas
Keep bins with sharp items out of children’s reach. Store them in high or locked places.
Childproofing prevents accidents and keeps kids safe from injury.
- Use locked cabinets or storage boxes
- Label bins clearly to avoid confusion
- Educate children about dangers of sharp objects
Frequently Asked Questions
What Are The Best Bins For Storing Screws And Nails?
Plastic or metal compartment bins with adjustable dividers work best. They keep screws and nails organized and prevent mixing. Clear bins help quickly identify contents. Choose bins that fit your workspace and storage needs.
How Do Bins Prevent Screws And Nails From Mixing?
Bins have separate compartments that keep each type of screw or nail apart. This separation stops mixing and saves time during projects. Using labeled bins further improves organization and ease of access.
Can Bins Protect Screws And Nails From Rust?
Yes, bins made of plastic or metal with tight lids help keep moisture out. This prevents rust and corrosion. Adding silica gel packs inside bins can further absorb moisture and protect contents.
How Should I Label Bins For Screws And Nails?
Use clear, easy-to-read labels specifying size and type. Label both the bin lid and front for quick identification. Consistent labeling improves organization and speeds up finding the right screws or nails.
Conclusion
Using bins to store screws and nails keeps your workspace neat and tidy. It helps you find the right items quickly. Sorting by size and type saves time and avoids frustration. Clear bins let you see contents without opening them.
Labeling each bin adds extra convenience. This simple system protects your hardware from damage and loss. Keeping tools organized makes projects run smoother. Try this method to keep your supplies in order. You’ll enjoy a cleaner and more efficient workspace every day.