Are you tired of sifting through piles of tools every time you need a wrench or a screwdriver? Imagine how much easier it would be if every tool had its own designated spot on a sleek, compact garage tool wall.
You could transform your cluttered garage into an organized haven where everything is within arm’s reach. Creating a tool wall might sound like a daunting task, but it doesn’t have to be. This guide will show you simple, step-by-step methods to build a tool wall that maximizes your space and minimizes the mess.
Let’s dive into the secrets of turning chaos into order, and discover how you can enjoy a stress-free, efficient workspace every time you step into your garage.
:max_bytes(150000):strip_icc()/39221-793fb3eadac3427b8317b8ff0c0698ff.jpg)
Credit: www.woodmagazine.com
Choosing The Right Wall
Creating a compact garage tool wall starts with picking the right wall. The wall should fit your tools and be easy to reach.
Think about the space you have, the wall type, and the size before you start hanging tools.
Assessing Wall Space
Look at all the walls in your garage. Find one that is free of doors and windows.
Check if the wall space is clear enough to hold your tools without clutter.
- Choose a wall with enough height and width
- Avoid walls with pipes or electric panels
- Pick a wall near your workbench for easy access
Considering Wall Material
Wall material affects how you mount your tool holders. Different materials need different anchors or hooks.
Common materials include drywall, concrete, and wood. Each has its own strength and mounting options.
- Drywall:Use anchors or find studs for support
- Concrete:Use masonry screws or anchors
- Wood:Screws go directly into studs or plywood
Measuring Available Area
Measure the height and width of the wall space you chose. Write down the exact size.
Knowing the size helps plan where each tool will go and avoid overcrowding the wall.
- Use a tape measure for accuracy
- Note any obstacles like outlets or switches
- Plan space for future tool additions
Credit: www.familyhandyman.com
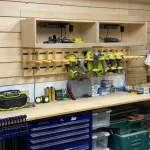
Selecting Tool Storage Options
Choosing the right tool storage helps keep your garage neat and tools easy to find. A good setup saves space and time.
Many options exist for organizing tools on a wall. Pick what fits your tools and garage size best.
Pegboards And Hooks
Pegboards offer flexible storage with many holes for hooks. You can hang tools of different shapes and sizes.
Hooks hold tools securely and can be moved to new spots. This setup keeps tools visible and easy to grab.
- Easy to install and adjust
- Works well for hand tools and small items
- Keep tools off the floor and counters
Magnetic Strips
Magnetic strips hold metal tools firmly on the wall. They offer quick access and save shelf space.
These strips are good for screwdrivers, wrenches, and pliers. Keep them clean for strong magnet power.
- Simple to mount and use
- Great for small metal tools
- Helps keep tools organized in one place
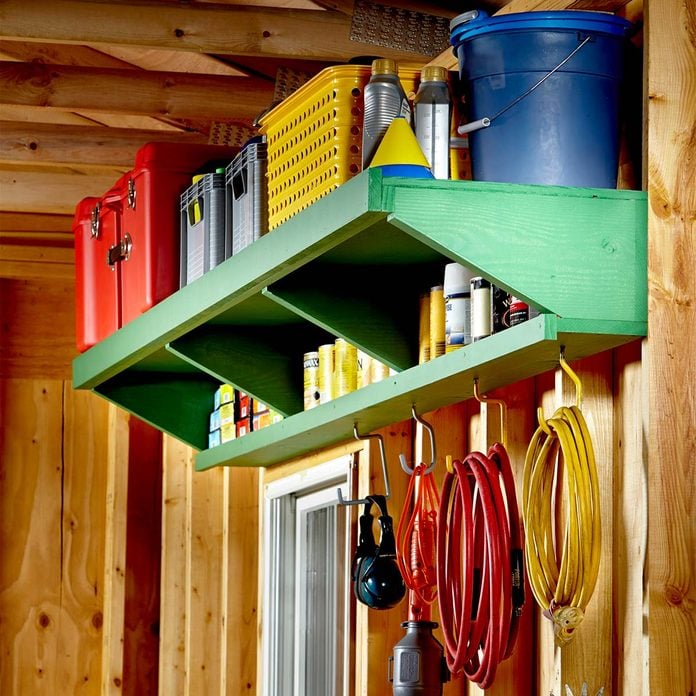
Shelving Units
Shelving units hold larger tools and containers. They offer space for boxes, power tools, and paint cans.
Use strong shelves to support heavy items. Adjustable shelves fit different tool sizes and shapes.
- Good for bulky or heavy tools
- Keep items off the floor
- Can be combined with other storage options
Custom Tool Holders
Custom holders fit specific tools perfectly. They can be made from wood, metal, or plastic.
These holders keep tools stable and easy to find. You can design them for drills, hammers, or paintbrushes.
- Made to fit your tools exactly
- Helps keep tools neat and secure
- Can add a personal touch to your garage
Planning Your Layout
Creating a compact garage tool wall starts with good planning. A clear layout helps keep tools organized and easy to find.
Think about how you use your tools and the space available. Plan your wall to save space and increase efficiency.
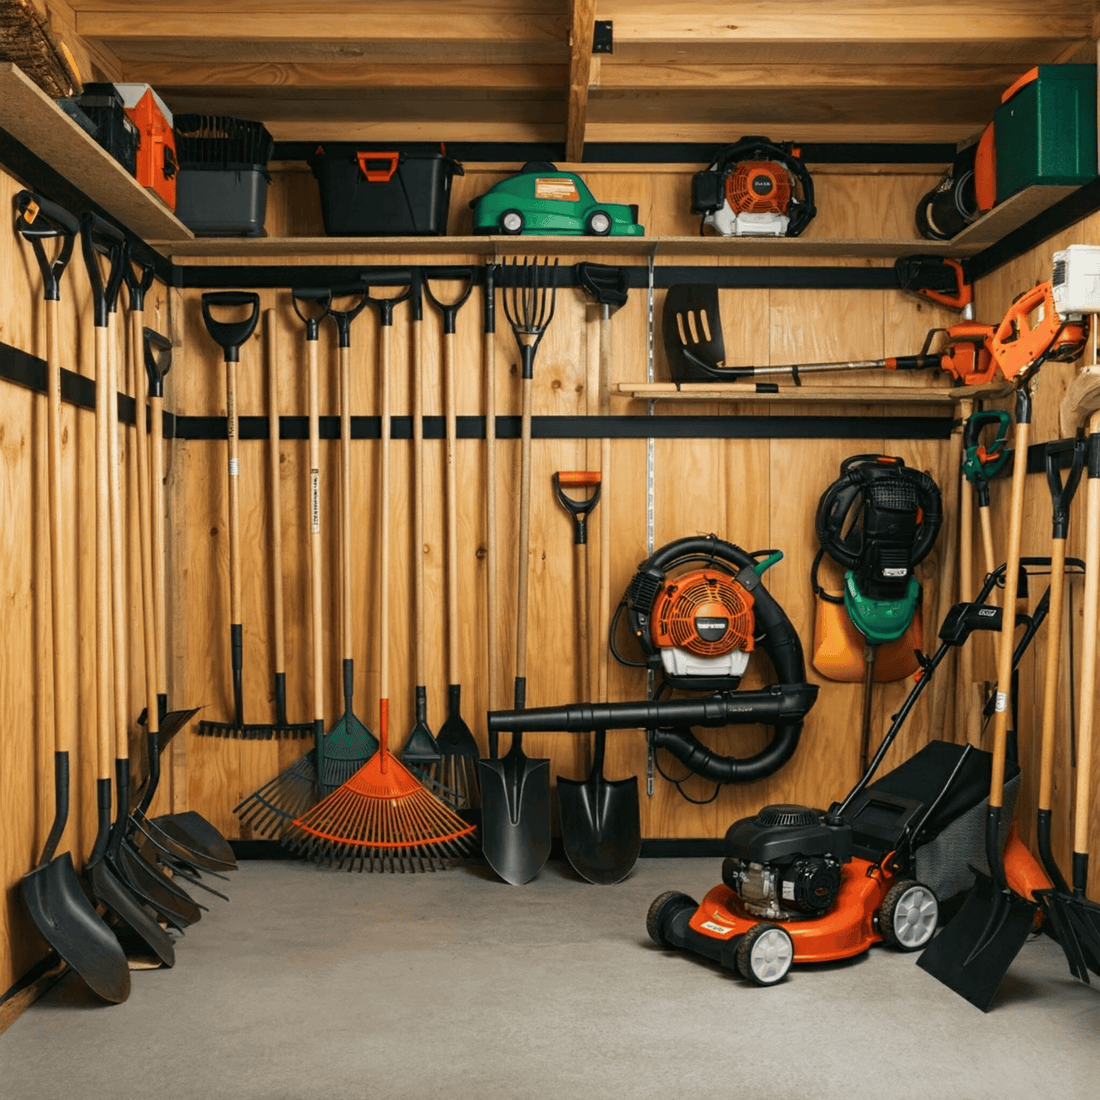
Grouping Tools By Type
Group similar tools together to find them quickly. Keep hand tools, power tools, and measuring tools in separate areas.
This method reduces the time spent searching and helps maintain order on your tool wall.
- Hand tools: hammers, screwdrivers, pliers
- Power tools: drills, sanders, saws
- Measuring tools: tape measures, levels, squares
Maximizing Vertical Space
Use the full height of your wall to store tools. Vertical storage keeps the floor clear and uses space well.
Install pegboards, shelves, and hooks to hang tools at different heights. This keeps tools visible and easy to reach.
- Use pegboards for small tools and accessories
- Install shelves for larger items
- Add hooks for hanging cords and cables
Creating Zones For Easy Access
Divide your tool wall into zones based on how often you use each tool. Keep daily tools in easy-to-reach spots.
Place less-used tools higher or lower on the wall. This system saves time and keeps the workspace tidy.
- Daily use zone: tools you grab often
- Occasional use zone: tools used sometimes
- Rare use zone: tools used rarely or seasonally
Installation Tips
Creating a compact garage tool wall saves space and keeps tools easy to find. Proper installation helps the wall stay strong and safe.
Follow these tips to install pegboards, hooks, and shelves securely for long-lasting use.
Securing Pegboards And Shelves
Attach the pegboard to the wall studs for the best support. Use screws that fit the pegboard holes and hold tightly.
Shelves should have brackets screwed into studs. This prevents shelves from bending or falling under weight.
- Find wall studs using a stud finder
- Use screws long enough to go deep into studs
- Space screws evenly for better support
- Check pegboard and shelf level before tightening screws
Proper Hook Placement
Place hooks at easy-to-reach heights for quick access. Group similar tools together for better organization.
Leave enough space between hooks so tools hang without touching each other. This keeps tools safe and easy to grab.
- Hang heavy tools lower for safety
- Put small tools in clusters for quick use
- Keep frequently used tools at eye level
- Use different hook sizes for varied tools
Using Anchors For Heavy Tools
Use wall anchors if you cannot screw into studs. Anchors hold heavy tools firmly on drywall or plaster.
Choose anchors rated for the tool weight. Install them carefully to avoid damage to the wall.
- Use toggle bolts for very heavy tools
- Plastic anchors work for medium weights
- Always follow anchor package instructions
- Test anchors by gently pulling before hanging tools
Maintaining An Organized Tool Wall
A well-organized tool wall keeps your workspace clean and efficient. It helps you find tools quickly and saves time on projects.
Regular care of your tool wall makes it last longer and stay useful. Simple habits can keep your tools in the right place.
Regular Tool Inventory
Check your tools often to know what you have and what is missing. This stops you from buying duplicates or losing important items.
- Set a monthly date to review all tools
- Inspect tools for damage or wear
- Note tools that need replacement or repair
- Remove tools you no longer use
Labeling Storage Spots
Labels help you put tools back quickly. Each tool should have a clear spot with a name or picture.
| Tool | Label Type | Placement |
| Hammer | Text label | Above hook |
| Screwdriver | Icon label | Drawer front |
| Wrench | Color-coded tag | Wall peg |
| Drill | Text and icon | Storage shelf |
Cleaning And Upkeep
Keep your tool wall clean to avoid rust and dirt buildup. A tidy space makes work safer and easier.
Follow this simple cleaning routine:
- Dust the wall and tools weekly
- Wipe tools with a dry cloth after use
- Use oil to protect metal parts
- Check hooks and holders for tightness
Space-saving Hacks
Creating a compact garage tool wall helps keep your space neat. Smart storage ideas save room and keep tools ready to use.
Use clever designs that fit small spaces well. This guide shows easy ways to save space with your tool wall.
Foldable Workbenches
Foldable workbenches save space by folding up when not in use. They give you work surfaces only when needed.
Pick benches with strong hinges and simple locking systems. Mount them on walls to free floor space.
Multi-use Storage Solutions
Use storage that holds many tool types in one place. This cuts clutter and fits more items on your wall.
- Magnetic strips for metal tools
- Hooks for hanging garden tools or cords
- Clear bins for small parts and screws
- Pegboards with adjustable hooks and shelves
- Stackable containers to save floor space
Utilizing Corners And Odd Spaces
Corners and small gaps often go unused. Fit shelves or racks in these spots to add more storage.
| Space | Storage Idea | Benefit |
| Corner Walls | Corner shelves or L-shaped racks | Use vertical space well |
| Above Doors | Hanging racks or narrow shelves | Keep rarely used tools out of the way |
| Under Windows | Low cabinets or bench storage | Extra seating and tool space |
| Behind Doors | Over-the-door hooks or racks | Hidden storage without clutter |
Credit: trimyxs.com
Frequently Asked Questions
How Do I Start Building A Compact Garage Tool Wall?
Begin by assessing your tool collection and available wall space. Measure accurately, select suitable wall panels, and plan tool placement for easy access and organization.
What Materials Are Best For A Garage Tool Wall?
Use durable materials like plywood or pegboard for the base. Steel hooks, magnetic strips, and shelves help securely hold various tools and maximize space.
How Can I Maximize Space On A Small Garage Wall?
Utilize vertical space with hooks and shelves. Group similar tools together and use labeled containers to keep the wall organized and clutter-free.
What Tools Should I Prioritize On My Garage Wall?
Place frequently used tools like hammers, screwdrivers, and wrenches within easy reach. Less-used tools can go higher or in harder-to-access spots.
Conclusion
Creating a compact garage tool wall saves space and keeps tools handy. It helps you work faster and stay organized. Use simple materials and plan the layout well. Hang tools where you can reach them easily. Regularly check and tidy your tool wall to keep it neat.
A well-made tool wall makes your garage look better too. Try building one and see how much easier your projects become. Small changes can bring big improvements in your workspace.