Have you ever hesitated to move your garden bulbs, fearing you might damage them in the process? You’re not alone.
Transplanting bulbs can feel daunting, especially when you want to ensure they continue to bloom beautifully year after year. Yet, with the right approach, you can transplant bulbs without a hitch. Imagine the satisfaction of seeing your favorite flowers thrive in their new spot, rewarding your effort with a burst of color and life.
In this guide, you’ll discover simple, effective techniques to transplant bulbs safely and successfully. Ready to transform your garden with confidence? Let’s dive in and explore how you can achieve this with ease.

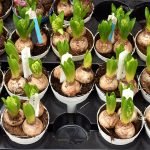
Credit: thetropicalgrower.com
Choosing The Right Time
Transplanting bulbs at the right time helps keep them healthy. It reduces damage and helps them grow well.
Knowing when to move bulbs is important. This guide explains how to pick the best time.
Seasonal Timing For Bulbs
Most bulbs do best when you transplant them during their dormant season. This is when the plant is not actively growing.
Usually, this happens in late summer or early fall after the leaves have died back. Bulbs can also be moved in early spring before growth starts.
- Late summer to early fall: best for most spring-flowering bulbs
- Early spring: good for bulbs that bloom in late spring or summer
- Avoid transplanting when bulbs are actively growing leaves or flowers
Signs Bulbs Are Ready To Move
Look for clear signs that bulbs are ready to be dug up. This helps avoid damage during transplanting.
Leaves turning yellow or brown show the bulb is entering dormancy. At this time, the bulb stores energy and stops growing above ground.
- Leaves have died back and turned brown or yellow
- Soil is dry around the bulbs
- Bulbs feel firm and full when gently lifted
- No new shoots or flowers appear above ground

Credit: plnts.com
Preparing The New Site
Transplanting bulbs needs a good new location. The right place helps bulbs grow strong and healthy.
Before planting bulbs, prepare the soil and check sunlight and drainage. These help bulbs bloom well.
Soil Requirements
Bulbs need loose, well-drained soil. Hard or wet soil can cause bulbs to rot.
Mix compost or sand into the soil to improve its texture and drainage. This helps roots grow easily.
- Use soil that drains water quickly
- Add organic matter like compost
- Loosen soil to about 12 inches deep
Sunlight And Drainage
Choose a sunny spot for bulbs that need full sun. Some bulbs grow well in partial shade.
Good drainage is important. Avoid low spots where water stays after rain.
- Pick a place with 6+ hours of sunlight for sun-loving bulbs
- Check that water does not pool after rain
- Raise the planting area if drainage is poor
Tools And Materials Needed
Transplanting bulbs requires care to avoid damage. Using the right tools helps you dig and move bulbs safely.
This guide covers the essential tools and protective gear you need for successful bulb transplanting.
Essential Gardening Tools
You need tools that make digging gentle and easy. These tools help you lift bulbs without breaking them.
- Trowel – for digging small holes and loosening soil
- Garden fork – to gently lift bulbs and soil
- Hand rake – to clear soil and debris
- Bulb planter – for making perfect holes
- Watering can – to moisten soil after planting
- Buckets or baskets – to carry bulbs safely
- Sharp pruning shears – to trim dead leaves or roots
Protective Gear
Protective gear keeps your hands and clothes safe. It also prevents injuries while working in the soil.
- Gardening gloves – to protect hands from dirt and sharp objects
- Knee pads or a garden kneeler – for comfort when working low
- Long-sleeve shirt and pants – to avoid scratches and insect bites
- Hat – to shield from sun while working outdoors
Digging Up Bulbs Safely
Transplanting bulbs requires care to avoid damage. Digging up bulbs safely helps them grow well in a new spot.
Follow simple steps to protect bulbs while moving them. This keeps bulbs healthy and ready to bloom again.
Loosening The Soil
Start by loosening the soil around the bulbs. Hard soil can break bulbs if pulled too fast.
Use a garden fork or small shovel to gently loosen soil. Work around the bulb area to free roots carefully.
- Insert the tool 6-8 inches away from the bulb
- Lift soil gently without digging too deep
- Work in a circle around the bulb cluster
- Avoid pulling bulbs directly from hard soil
Lifting Bulbs Without Damage
After loosening soil, lift bulbs carefully to avoid bruising or breaking. Damaged bulbs may not grow well later.
Use your hands or a garden tool to lift bulbs with some soil attached. Handle each bulb gently by its base.
- Lift bulbs slowly from under the roots
- Keep soil around bulbs to protect them
- Place bulbs in a container with ventilation
- Do not drop or squeeze bulbs during transplant
Handling Bulbs With Care
Transplanting bulbs needs gentle handling to keep them healthy. Rough treatment can harm bulbs and reduce growth.
Careful handling helps bulbs adjust well to new soil. It improves their chance to bloom beautifully.
Cleaning And Inspecting Bulbs
Clean bulbs softly by brushing off dirt. Avoid washing with water unless necessary to stop rot.
Look for signs of damage or disease. Remove any soft or moldy parts before planting.
- Use a soft brush or cloth to clean
- Check for soft spots and mold
- Discard damaged or diseased bulbs
- Handle bulbs one at a time gently
Avoiding Bruises And Cuts
Bulbs bruise and cut easily. Bruises can cause rot and stop growth.
Use your hands to hold bulbs softly. Avoid dropping or squeezing them hard.
- Wear gloves to protect bulbs and hands
- Lift bulbs carefully from soil or containers
- Use clean, sharp tools if cutting is needed
- Do not stack bulbs too tightly during transport
Planting Bulbs Correctly
Transplanting bulbs without damage helps flowers grow strong and healthy. Planting bulbs correctly ensures they bloom beautifully.
Pay attention to how deep and far apart you plant bulbs. Also, place bulbs in the right position for best growth.
Proper Depth And Spacing
Plant bulbs at the right depth to protect them from cold and pests. Too shallow or too deep planting can harm the bulb.
Give bulbs enough space to grow roots and leaves. Crowding bulbs can stop flowers from blooming well.
- Plant bulbs two to three times as deep as their height
- Space small bulbs about 2-3 inches apart
- Leave 4-6 inches between larger bulbs
- Check specific bulb instructions for exact depth and spacing
Orientation And Positioning
Place bulbs with the pointed end up and the flat end down. This helps shoots grow up and roots grow down.
Position bulbs in well-drained soil with enough sunlight. Avoid spots where water pools after rain.
- Pointed end faces upward for proper sprouting
- Plant bulbs in sunny or partly shaded areas
- Choose soil that drains water quickly
- Avoid soggy or compacted soil to prevent rot
Aftercare For Transplanted Bulbs
After transplanting bulbs, proper care helps them grow strong. Good aftercare reduces stress on the bulbs.
Knowing how to water, mulch, and fertilize will keep bulbs healthy. These steps support root growth and flowering.
Watering Techniques
Water bulbs gently but deeply after transplanting. This helps settle the soil around the roots.
Keep the soil moist but not soggy for the first few weeks. Too much water can cause bulb rot.
- Water early in the morning or late in the afternoon
- Use a watering can or gentle hose spray
- Check soil moisture regularly
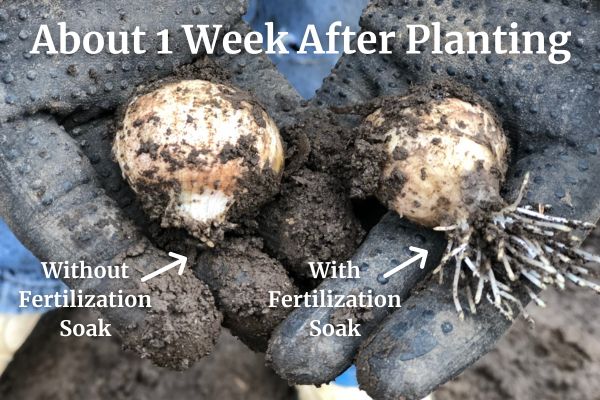
Mulching And Fertilizing
Mulch keeps soil temperature steady and retains moisture. Use organic mulch like shredded leaves or bark.
Fertilize bulbs with a balanced, slow-release fertilizer. Apply it after the shoots appear above ground.
- Spread mulch 2-3 inches thick around bulbs
- Avoid piling mulch against the stems
- Use fertilizer with equal parts nitrogen, phosphorus, and potassium
- Follow package instructions for amount and timing
Credit: keeneorganics.com
Common Mistakes To Avoid
Transplanting bulbs can be tricky if you don’t take care. Many gardeners harm bulbs by making simple mistakes.
Knowing what to avoid helps your bulbs grow healthy and strong after moving.
Overwatering And Underwatering
Giving bulbs too much water can cause them to rot. Too little water makes bulbs dry and weak.
Keep the soil moist but not soaked. Water bulbs right after transplanting to help roots settle.
- Water bulbs deeply but allow soil to dry a bit between watering
- Avoid water pooling around the bulbs
- Check soil moisture regularly during dry or hot weather
Ignoring Pest And Disease Signs
Pests and diseases can damage bulbs quickly. Ignoring them can kill your plants.
Look for spots, holes, or mushy areas on bulbs before and after transplanting. Remove any damaged bulbs.
- Inspect bulbs carefully for signs of pests or rot
- Use clean tools and fresh soil to prevent spreading disease
- Control pests early with safe methods like handpicking or natural sprays
Troubleshooting Transplant Issues
Transplanting bulbs can sometimes cause problems like wilting or rot. These issues can harm your plants if not fixed quickly.
Knowing how to spot and handle these problems helps your bulbs grow strong after transplanting.
Dealing With Wilting Or Rot
Wilting may happen when bulbs lose too much water. Rot often starts if the soil is too wet or bulbs are damaged.
Check bulbs for soft or dark spots, which show rot. Remove any rotten parts carefully to stop it from spreading.
- Water bulbs only when soil is dry
- Use well-draining soil to avoid water buildup
- Handle bulbs gently to prevent bruising
- Remove damaged bulbs to protect others
Encouraging Recovery And Growth
After transplanting, give bulbs time to adjust. Keep soil moist but not soaked to help roots grow.
Place bulbs in a shaded area at first. Move them to sunnier spots once they start growing new leaves.
- Water regularly but avoid overwatering
- Apply a light fertilizer to support growth
- Protect bulbs from pests and harsh weather
- Check bulbs weekly for signs of stress
Frequently Asked Questions
How Do I Safely Dig Up Bulbs For Transplanting?
Use a garden fork or spade to gently loosen soil around bulbs. Lift bulbs carefully to avoid bruising or cutting. Handle bulbs by the base, not the shoots, to prevent damage.
When Is The Best Time To Transplant Flower Bulbs?
Transplant bulbs during their dormant period, typically in late summer or early fall. This timing ensures roots establish before growth resumes in spring, reducing transplant shock.
How To Prepare Soil Before Replanting Bulbs?
Loosen soil and add organic matter like compost. Ensure good drainage to prevent bulb rot. Avoid compacted or waterlogged soil for healthy bulb growth.
Can I Transplant Bulbs With Green Shoots?
It’s best to transplant bulbs before shoots emerge. However, if shoots are small, transplant gently and water well. Larger shoots may break, affecting bloom quality.
Conclusion
Transplanting bulbs takes care and patience. Handle bulbs gently to avoid harm. Choose the right time to dig and move them. Keep soil moist but not wet after planting. Give bulbs enough space to grow healthy roots. Watch them bloom beautifully in their new spot.
Follow these steps for happy, thriving bulbs every season. Gardening success comes from small, careful actions. Enjoy the process and the lovely results.