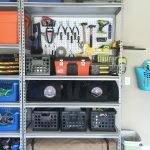
Imagine having your workspace neat and organized, with your drills and tools easily accessible and in clear sight. No more rummaging through cluttered drawers or losing precious time searching for the right tool.
Setting up a pegboard for your drills can transform your work area into a streamlined, efficient zone that boosts your productivity. In this guide, you’ll discover how to set up a pegboard that not only looks great but also maximizes your space and keeps your drills exactly where you need them.
Whether you’re a DIY enthusiast or a professional, following these simple steps will revolutionize your workflow. Curious about how this small change can make a big difference? Read on to unlock the secrets to an organized and efficient workspace.
Choosing The Right Pegboard
Setting up a pegboard for your drills helps keep your workspace tidy. Picking the right pegboard is key for holding your tools safely.
Think about the material, size, and hole pattern before buying. These factors affect how well your pegboard works.
Material Options
Pegboards come in wood, metal, and plastic. Each material has strengths and weaknesses.
Wood pegboards are easy to drill and affordable. Metal boards are strong but can be heavy. Plastic pegboards resist moisture but may not hold heavy drills.
- Wood: Affordable, easy to customize, may warp with moisture
- Metal: Durable, supports heavy tools, often more expensive
- Plastic: Lightweight, moisture resistant, less weight support
Size And Thickness
The size of your pegboard depends on the space you have and the number of drills. Make sure it fits your wall or workbench.
Thickness matters for strength. Thicker boards hold heavier drills better and last longer.
- Choose size based on available wall or workspace
- Minimum thickness of 1/4 inch is good for light tools
- Use 1/2 inch or thicker for heavier drills
Hole Patterns
Hole spacing affects how you place hooks and holders. Standard spacing helps you find accessories easily.
Most pegboards use 1-inch hole spacing in a grid. Some have different patterns like hexagonal or smaller holes.
- Standard grid: 1 inch apart, easy to find hooks
- Hexagonal pattern: more hook placement options
- Smaller holes: better for small hooks, less strength
Credit: medium.com
Gathering Necessary Tools And Supplies
Setting up a pegboard for your drills needs the right tools and supplies. This helps you mount the pegboard securely and organize your drills well.
Below are the main supplies you will need. They fall into three groups: mounting hardware, pegboard hooks and holders, and measuring and marking tools.
Mounting Hardware
Mounting hardware secures the pegboard to the wall. It must hold the board firmly so it can carry the weight of your drills safely.
- Screws – choose ones that fit your wall type
- Wall anchors – needed for drywall or hollow walls
- Washers – used with screws to spread pressure
- Spacers – keep the pegboard slightly away from the wall
Pegboard Hooks And Holders
Hooks and holders keep your drills and accessories organized on the pegboard. Pick the right types to fit your drill sizes and shapes.
| Type | Use | Example |
| Single hooks | Hang individual drills or small tools | Standard metal hook |
| Double hooks | Hold heavier drills securely | Wide double-prong hook |
| Tool holders | Keep drill bits and accessories | Plastic bins or clip holders |
Measuring And Marking Tools
Good measuring and marking tools help place the pegboard and hooks accurately. This ensures your drills hang evenly and safely.
- Measuring tape – for wall space and pegboard size
- Level – to keep the pegboard straight
- Pencil or marker – to mark screw and hook spots
- Stud finder – to locate wall studs for strong mounting
Preparing The Wall Space
Setting up a pegboard for drills starts with preparing the wall space. You need to choose the right spot and make sure it is clean and ready. This helps the pegboard stay strong and safe.
Careful preparation makes installing the pegboard easier. Follow these steps to prepare your wall correctly.
Selecting Location
Pick a wall area that is easy to reach and near your workbench. The spot should have enough space for your drills and other tools. Avoid areas with pipes or electrical wires behind the wall.
Clearing And Cleaning Area
Clear the wall and floor space near the wall. Remove any furniture, nails, or hooks. Clean the wall surface to remove dust and dirt for better pegboard grip.
- Move furniture away from the wall
- Remove old nails or screws
- Wipe the wall with a damp cloth
- Let the wall dry completely
Locating Studs
Find the wooden studs behind the drywall to secure your pegboard. Studs provide strong support for heavy drills. Use a stud finder or tap the wall to listen for solid spots.
| Method | Description | Tips |
|---|---|---|
| Stud Finder | Electronic tool that detects studs behind walls | Move slowly and mark each stud location |
| Tapping Method | Tap the wall and listen for a solid sound | Hollow sound means no stud; solid means stud |
| Measure from Corner | Studs usually start 16 or 24 inches from corners | Mark spots at these intervals |
Credit: www.vevor.com
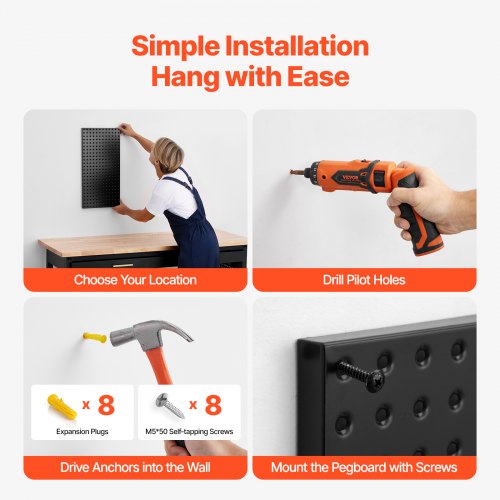
Installing The Pegboard
Setting up a pegboard for drills helps keep your workspace neat. Proper installation ensures the board stays strong.
This guide explains how to mark drill points, drill holes, and secure the pegboard to the wall.
Marking Drill Points
Mark the wall where you want to place the pegboard. Use a pencil for clear, easy-to-remove marks.
Make sure the marks match the pegboard’s mounting holes or studs behind the wall.
- Hold the pegboard against the wall
- Use a level to keep it straight
- Mark the spots for drilling
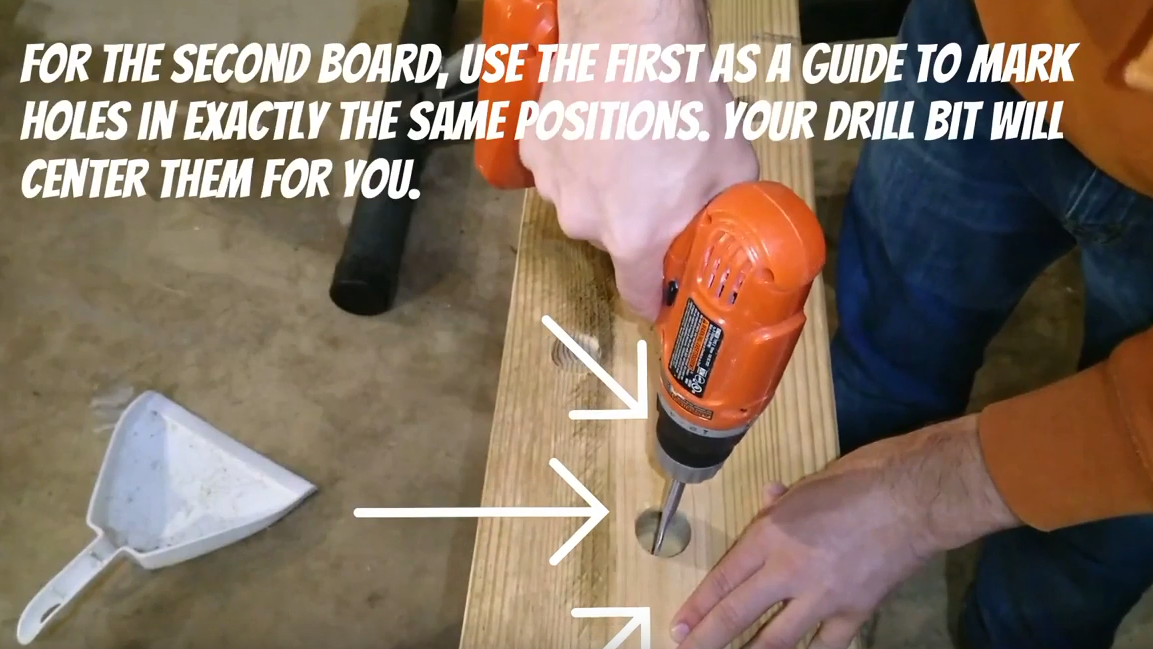
Drilling Holes
Use a drill with the right bit size for your wall anchors or screws. Drill carefully on the marked points.
Wear safety glasses to protect your eyes from dust and debris.
- Choose drill bit size based on wall anchors
- Keep drill steady and perpendicular
- Drill holes at the pencil marks
Securing Pegboard To Wall
Insert wall anchors into the drilled holes if needed. Then, hold the pegboard and screw it into place.
Check the pegboard is secure and level before hanging drills or tools.
- Push wall anchors into holes
- Align pegboard with holes
- Drive screws through pegboard into anchors
- Tighten screws firmly but do not over-tighten
Organizing Drills And Accessories
Setting up a pegboard for drills helps keep your workspace neat. It makes tools easy to find and saves time. A well-organized pegboard also protects your drills and accessories from damage.
Use hooks, labels, and smart arrangement to create a system that works for you. This guide covers how to choose hooks, arrange drills by size and type, and label for quick access.
Choosing Appropriate Hooks
Select hooks that hold your drills safely and fit the pegboard holes. Some hooks are straight, while others have curves or clamps for extra grip. Make sure the hooks can support the drill’s weight without bending.
- Use strong hooks for heavy drills
- Pick small hooks for drill bits and accessories
- Choose hooks with rubber tips to prevent slipping
- Consider double hooks for larger drills
Arranging By Size And Type
Group drills by their size and use. Place frequently used drills at eye level. Keep smaller drills and accessories in separate sections. This order helps you find what you need quickly and keeps the pegboard tidy.
| Category | Placement on Pegboard |
| Large Corded Drills | Lower center for strong support |
| Cordless Drills | Middle row for easy reach |
| Small Drills and Drivers | Top or side areas |
| Drill Bits and Accessories | Use small hooks or containers |
Labeling For Easy Access
Labels help you spot your tools quickly. Use clear, readable text on labels. Place them near each drill or accessory. Labels reduce the time spent searching and keep the pegboard organized.
- Write drill type (e.g., “Cordless Drill”)
- Include drill size or model number
- Mark accessory sections (e.g., “Bits”, “Chargers”)
Maintaining Your Pegboard Setup
Keeping your pegboard clean and organized helps you find drills fast. Regular care keeps the board looking good and working well.
Check your setup often to make sure everything stays safe and easy to use.
Regular Cleaning Tips
Dust and dirt can build up on your pegboard and tools. Clean the board at least once a month to keep it neat.
- Use a soft cloth or brush to wipe the board and hooks.
- Remove tools before cleaning to avoid damage.
- Check for rust or wear on metal hooks and replace if needed.
- Clean drill bits and accessories before putting them back.
Rearranging For New Tools
When you get new drills or accessories, update your pegboard. This keeps your workspace tidy and tools easy to find.
| Action | Reason |
| Remove unused hooks | Free space for new tools |
| Group similar drills together | Find items faster |
| Label sections | Help identify tools quickly |
| Adjust hook positions | Fit different sizes and shapes |
Safety Considerations
Keep your pegboard safe by following simple rules. Avoid accidents and protect your tools.
- Secure hooks firmly to avoid falling tools.
- Place heavy drills on lower hooks to prevent injury.
- Check that all tools are hung properly after use.
- Wear safety gloves when handling sharp drill bits.

Credit: www.amazon.com
Frequently Asked Questions
How Do I Choose The Right Pegboard For Drills?
Select a sturdy pegboard made of metal or high-quality wood. It should support the weight of your drills and accessories safely.
What Tools Do I Need To Set Up A Drill Pegboard?
You need a drill, screws, wall anchors, a level, measuring tape, and pegboard hooks to mount and organize your drills properly.
How High Should I Mount A Pegboard For Drills?
Mount the pegboard at eye level or slightly below for easy access. This height improves visibility and convenience when grabbing drills.
Can I Customize Pegboard Layout For Different Drill Sizes?
Yes, arrange hooks and shelves to fit various drill sizes. Customize spacing to keep drills secure and organized efficiently.
Conclusion
Setting up a pegboard for drills helps keep your workspace tidy. You can find your drill quickly and save time. The process is simple and does not take long. Use hooks and holders to fit each drill perfectly. This setup also protects your tools from damage.
A well-organized area makes projects easier and more fun. Try this method to improve your tool storage today. You will enjoy a neat and efficient workspace every time.