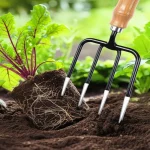
Are you looking to give your garden a breath of fresh air? If you want your plants to thrive, aeration is key.
Using a garden fork might just be your secret weapon. Imagine the satisfaction of seeing your plants flourish, all because you took the time to aerate the soil properly. This guide is designed to help you master the art of using a garden fork for aeration, ensuring your garden is healthy and vibrant.
You’ll discover simple techniques that can make a big difference. Ready to transform your garden and watch it bloom? Keep reading to learn how you can easily improve your soil’s health and boost your garden’s growth.
Credit: gardenitemreviews.com
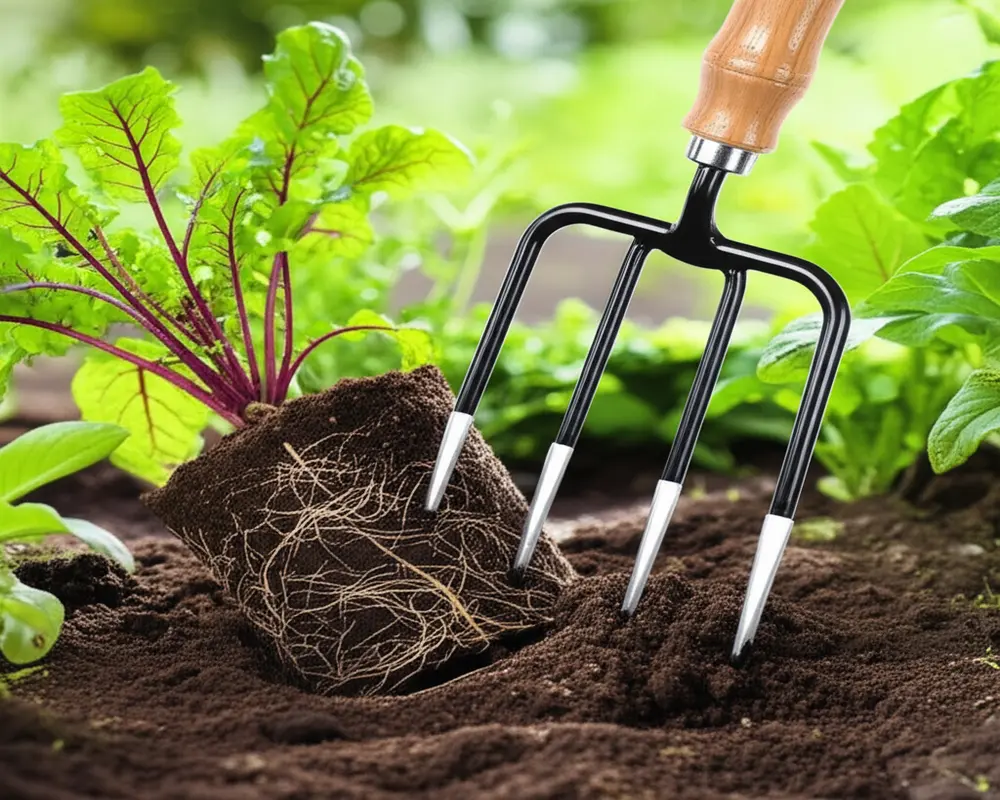
Choosing The Right Garden Fork
A garden fork is a useful tool for aerating soil and turning compost. Picking the right one makes your gardening tasks easier and more effective.
Consider the type, material, and size to find a garden fork that fits your needs and strength.
Types Of Garden Forks
Garden forks come in different styles for various tasks. Knowing the types helps you choose the best fork for aeration.
- Digging Forks:Strong tines for breaking hard soil and digging.
- Border Forks:Smaller forks with shorter tines for light soil work and plant beds.
- Manure Forks:Usually wider with more tines, designed for moving mulch and compost.
- Leaf Forks:Light and flexible, made to handle leaves and soft debris.
Material And Durability
Material affects the fork’s strength and how long it lasts. Good materials resist rust and damage.
| Material | Features | Best For |
| Carbon Steel | Strong and sharp, may rust without care | Heavy soil and tough jobs |
| Stainless Steel | Rust-resistant and durable | Wet climates and regular use |
| Aluminum | Lightweight but less strong | Light gardening and small jobs |
| Wood (Handle) | Comfortable grip, can wear out | General use with care |
| Fiberglass (Handle) | Strong and weatherproof | Long-lasting and tough jobs |
Size And Handle Design
The size and handle style affect comfort and control. Choose a size that matches your height and strength.
- Handle Length:Short handles give more control; long handles reduce bending.
- Handle Shape:Straight handles suit general use; D-shaped handles offer better grip.
- Weight:Heavier forks work better in hard soil but can tire you quickly.
- Grip Material:Rubber or textured grips prevent slipping and add comfort.
Preparing Your Lawn For Aeration
Before using a garden fork to aerate your lawn, you need to get it ready. Proper preparation helps the fork work better and improves lawn health.
Preparation includes choosing the right time, clearing the area, and making sure the soil is ready for aeration.
Timing And Weather Conditions
Pick a day with mild weather for aeration. Avoid very hot or rainy days.
Early spring or fall is best because the grass grows well then. Dry soil is easier to work with.
- Choose a cool, dry day
- Do not aerate when soil is frozen
- Early spring or fall works best
Clearing Debris And Obstacles
Remove leaves, sticks, and stones from your lawn. These can block the garden fork or damage it.
Check the lawn for toys, wires, or other items that might get in the way or cause injury.
- Rake leaves and grass clippings
- Pick up sticks and stones
- Remove any obstacles like toys or wires
Moistening The Soil
Water your lawn a day before aeration. Moist soil is easier to penetrate with the garden fork.
Do not soak the soil. It should be damp but not muddy or too wet.
- Water the lawn lightly 24 hours before
- Check soil moisture by touching it
- Soil should feel damp, not wet
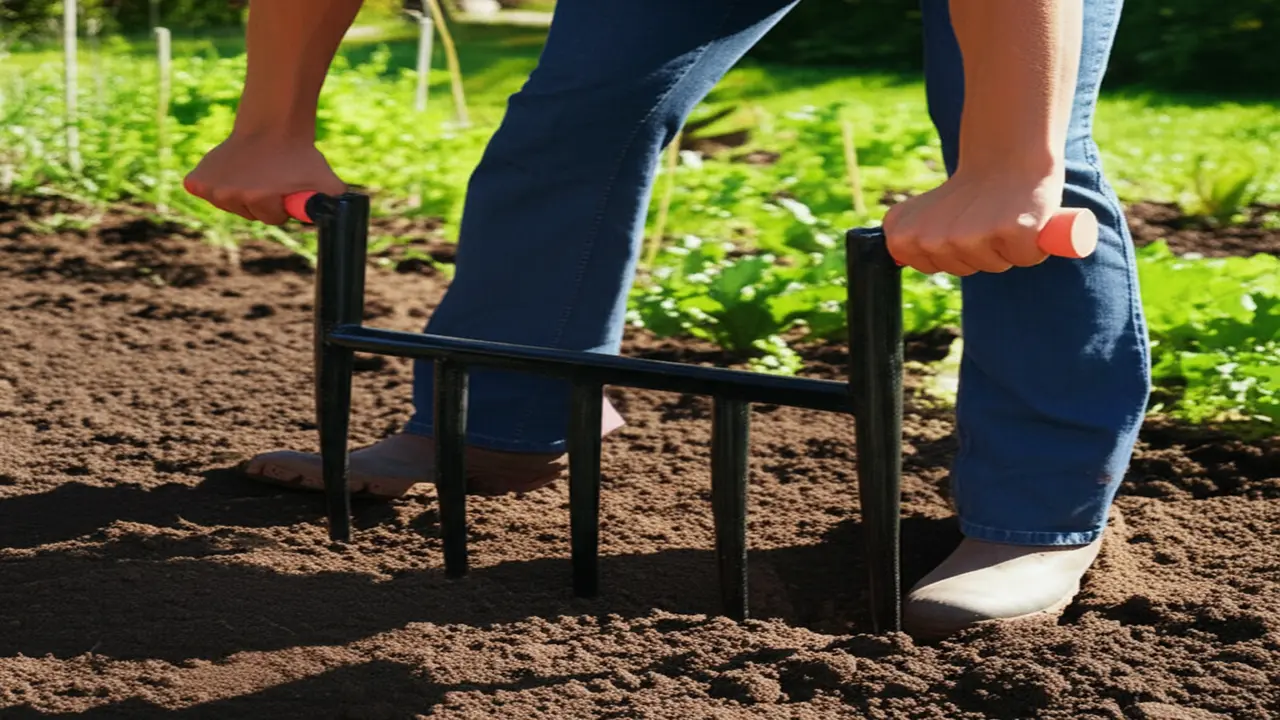
Aeration Techniques With A Garden Fork
A garden fork is a simple tool to help aerate soil. Aeration improves soil health and helps plants grow.
This guide explains how to use a garden fork for soil aeration. Follow these tips for best results.
Proper Insertion And Depth
Insert the garden fork straight into the soil to the right depth. Usually, this is about 4 to 6 inches deep.
Push the fork down gently to avoid damaging plant roots. Lift the soil slightly to create air pockets.
- Insert tines straight down
- Go 4 to 6 inches deep
- Lift soil gently after insertion
Spacing Your Holes
Make holes evenly spaced across the area. Space holes about 6 to 8 inches apart for good coverage.
This spacing allows air, water, and nutrients to reach the roots well. Avoid making holes too close together.
- Space holes 6 to 8 inches apart
- Cover the whole area evenly
- Do not crowd holes too close
Using The Fork Safely
Wear gloves to protect your hands from blisters and dirt. Keep a firm grip on the fork handle.
Use your legs to push down, not just your back. This helps avoid strain and injury during aeration.
- Wear gloves for hand protection
- Hold the handle firmly
- Use leg strength to push fork down
- Take breaks to avoid fatigue
Post-aeration Care
After using a garden fork for aeration, your lawn needs care to recover well. Proper post-aeration care helps grass grow strong.
Follow simple steps to keep soil healthy and encourage new grass growth after aerating.
Watering And Fertilizing
Water your lawn deeply after aeration. This helps soil absorb moisture and nutrients.
Apply fertilizer to support grass growth. Use a balanced fertilizer for best results.
- Water early in the morning or late in the evening
- Avoid overwatering to prevent soil compaction
- Use fertilizer with nitrogen, phosphorus, and potassium
Seeding And Overseeding
Aeration creates holes that are perfect for spreading new grass seed. This helps fill bare spots.
Overseeding improves lawn thickness and prevents weeds from growing.
- Choose grass seed that matches your existing lawn
- Spread seed evenly over aerated areas
- Keep the soil moist until seeds sprout
Maintaining Soil Health
Good soil health keeps your lawn green and strong. Aeration helps, but you must keep soil balanced.
Add organic matter like compost to improve soil texture. Avoid compacting soil by heavy walking.
- Test soil pH yearly to check acidity
- Add lime or sulfur if soil pH is off
- Use mulch to protect soil and retain moisture
Common Mistakes To Avoid
Using a garden fork for aeration helps your soil breathe and grow better plants. Some mistakes can harm your soil or waste your effort. Avoid these common errors to keep your garden healthy.
Learn about the mistakes many gardeners make when aerating with a garden fork. Fixing these will improve your garden’s health.
Over-aerating
Putting a garden fork in the soil too often or too deep can damage plant roots. It also disrupts soil structure and can dry out the ground.
Too much aeration makes soil loose and weak. It can cause plants to struggle to get nutrients and water.
- Aerate only once or twice a year
- Insert the fork about 4 to 6 inches deep
- Focus on compacted areas, not the whole garden
Ignoring Soil Conditions
Different soils need different care. Clay soil and sandy soil do not aerate the same way. Ignoring soil type can reduce aeration benefits.
Wet soil is harder to aerate and can get damaged easily. Dry soil may need watering before aeration to avoid breaking soil crumbs.
- Check soil moisture before aerating
- Know your soil type: clay, sandy, or loamy
- Adjust aeration depth based on soil type
Using The Wrong Tools
Not all garden forks are good for aeration. Some are too heavy or have wrong-sized tines. Using the wrong tool makes the job harder and harms the soil.
Choose a garden fork with sharp, strong tines that can easily penetrate the soil. Avoid using pitchforks or forks made for other tasks.
- Use a garden fork made for soil work
- Pick one with 4 to 5 strong tines
- Make sure the handle is comfortable and sturdy

Credit: jimsmowing.com.au
Additional Tips For Better Results
Using a garden fork for aeration improves your lawn’s health. Some extra tips can help you get even better results.
These tips include how to combine aeration with other care, when to aerate during the year, and tools that help your lawn stay healthy.
Combining Aeration With Other Lawn Care
Aeration works well with other lawn care tasks. Doing them together makes your lawn stronger and greener.
After aerating, it is a good idea to fertilize and water your lawn. These steps help the roots grow deep and healthy.
- Use fertilizer after aeration to feed the grass
- Water the lawn well to help nutrients soak in
- Remove weeds before aeration for better soil contact
Seasonal Considerations
The best time to aerate depends on your grass type and climate. Aerate when the grass grows actively for best results.
Cool-season grasses do well with aeration in early spring or fall. Warm-season grasses benefit most in late spring or early summer.
- Aerate cool-season lawns in spring or fall
- Aerate warm-season lawns in late spring or early summer
- Avoid aerating when grass is dormant or frozen
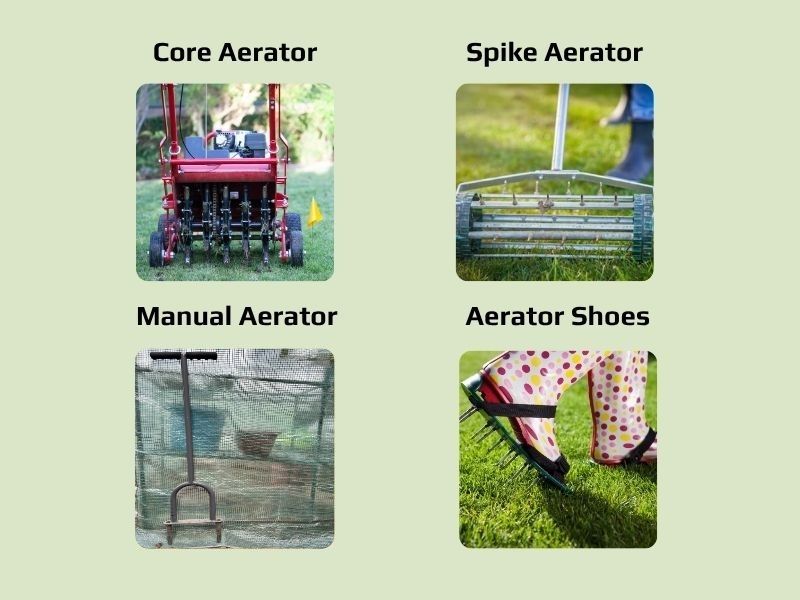
Tools For Complementary Tasks
Several tools help you with lawn care tasks alongside aeration. These tools make your work easier and more effective.
Use a lawn rake to remove dead grass and leaves. A spreader helps apply fertilizer evenly. Watering cans or hoses keep the soil moist after aeration.
- Garden rake for clearing debris
- Fertilizer spreader for even nutrient distribution
- Watering can or hose for thorough watering
- Lawn mower to cut grass before aeration
Credit: www.lawnstarter.com
Frequently Asked Questions
What Is The Purpose Of Using A Garden Fork For Aeration?
A garden fork aerates soil by creating holes that allow air, water, and nutrients to reach plant roots. It improves soil drainage and promotes healthier plant growth.
How Do You Properly Use A Garden Fork For Aeration?
Insert the garden fork vertically into the soil and gently rock it back and forth. Repeat across the lawn or garden area, spacing holes evenly for effective aeration.
When Is The Best Time To Aerate Soil With A Garden Fork?
The best time to aerate is during early spring or fall when soil is moist but not waterlogged. Avoid aerating during dry or frozen conditions.
Can A Garden Fork Improve Compacted Soil?
Yes, a garden fork breaks up compacted soil by loosening it. This allows roots to expand and improves soil structure for better plant health.
Conclusion
Using a garden fork helps keep soil healthy and plants strong. It breaks up hard soil and lets air and water reach roots. This makes your garden grow better and stay green. Regular aeration stops soil from getting too tight.
Grab your garden fork and start working in small areas. Take your time and enjoy the process. Good soil means happy plants and a beautiful garden. Simple tools, simple care, great results. Give your garden the air it needs to thrive.