Have you ever wondered how to plant seeds more efficiently in your garden? You’re not alone.
Many gardeners are searching for ways to make their planting process smoother and more effective. Imagine a tool that could transform how you plant seeds, saving you time and effort. That tool is a dibber. In this guide, you’ll discover how a dibber can be your new best friend in the garden.
Learn the secrets of how to use it to achieve healthier, more vibrant plants. Stick with us, and you’ll uncover tips that can revolutionize your gardening experience, making it more enjoyable and rewarding. Ready to dig deeper? Let’s get started!

Credit: www.amazon.ca
Choosing The Right Seeds
Planting seeds with a dibber helps place them at the right depth. Choosing the right seeds is important for good growth. You want seeds that fit your garden and climate.
Good seeds start healthy plants. Picking the right kind saves time and effort later.
Selecting Seeds For Your Climate
Seeds grow best in climates they like. Check if the seed suits your area’s temperature and rainfall. Some plants need warm weather, others prefer cool.
Local seed varieties often work well. They adapt to local pests and soil. Choose seeds labeled for your zone or region.
- Know your climate zone
- Pick seeds that thrive in your season
- Consider how much sun your garden gets
- Use local or regional seed brands
Considering Seed Size And Type
Seed size affects how you plant them with a dibber. Small seeds need shallow holes, big seeds need deeper ones. This helps seeds sprout well.
Seed type matters too. Some seeds are easy to plant, others need special care. For example, beans are large and easy to place. Tiny flower seeds need gentle handling.
- Use a small dibber for tiny seeds
- Make deeper holes for large seeds
- Follow seed packet instructions
- Group similar seed types together

Credit: www.amazon.ca
Picking A Suitable Dibber
A dibber is a simple tool used to make holes for planting seeds. Picking the right dibber helps seeds grow better.
Choosing a suitable dibber depends on the material, design, and size. These factors affect how easy and effective the planting is.
Materials And Designs
Dibbers come in different materials like wood, plastic, and metal. Each material has its own benefits and drawbacks.
Designs vary from simple pointed sticks to ones with handles. Choose a design that feels comfortable and fits your planting needs.
- Wood:Lightweight and natural but can wear out quickly.
- Plastic:Durable and easy to clean but may break under pressure.
- Metal:Strong and long-lasting but can be heavy and cold to hold.
- Handle designs:Help grip and apply pressure easily.
- Simple pointed tips:Good for small seeds and soft soil.
Choosing The Right Size
The size of the dibber should match the seed type and soil condition. A wrong size can harm seeds or make planting hard.
Use a small dibber for tiny seeds and a bigger one for larger seeds or bulbs. Consider the soil too, soft soil needs smaller holes.
- Small dibbers create shallow holes for small seeds.
- Medium dibbers suit most vegetable seeds and flowers.
- Large dibbers make deep holes for big seeds and bulbs.
- Choose a length that is comfortable to hold and use.
Preparing The Soil
Good soil preparation helps seeds grow strong roots. It makes planting easier and improves seed health.
Preparing the soil well is the first step before using a dibber to plant seeds. It sets the stage for healthy plants.
Loosening And Moistening The Soil
Loosen soil with a garden fork or trowel to let air reach roots. Hard soil stops roots from growing well.
Moisten the soil lightly before planting. Wet soil helps seeds settle and start to sprout faster.
- Use a fork to break up hard clumps
- Remove large stones while loosening soil
- Water soil lightly but avoid sogginess
- Check soil moisture with your fingers
Removing Weeds And Debris
Clear weeds and debris so seeds get all the nutrients and space they need. Weeds compete for water and light.
Pick out dead leaves, sticks, and stones. Clean soil helps seeds grow straight and healthy.
- Pull weeds by hand or use a hoe
- Remove sticks and stones from soil surface
- Dispose of garden debris away from planting area
- Keep soil clean for best seed growth

Credit: www.amazon.ca
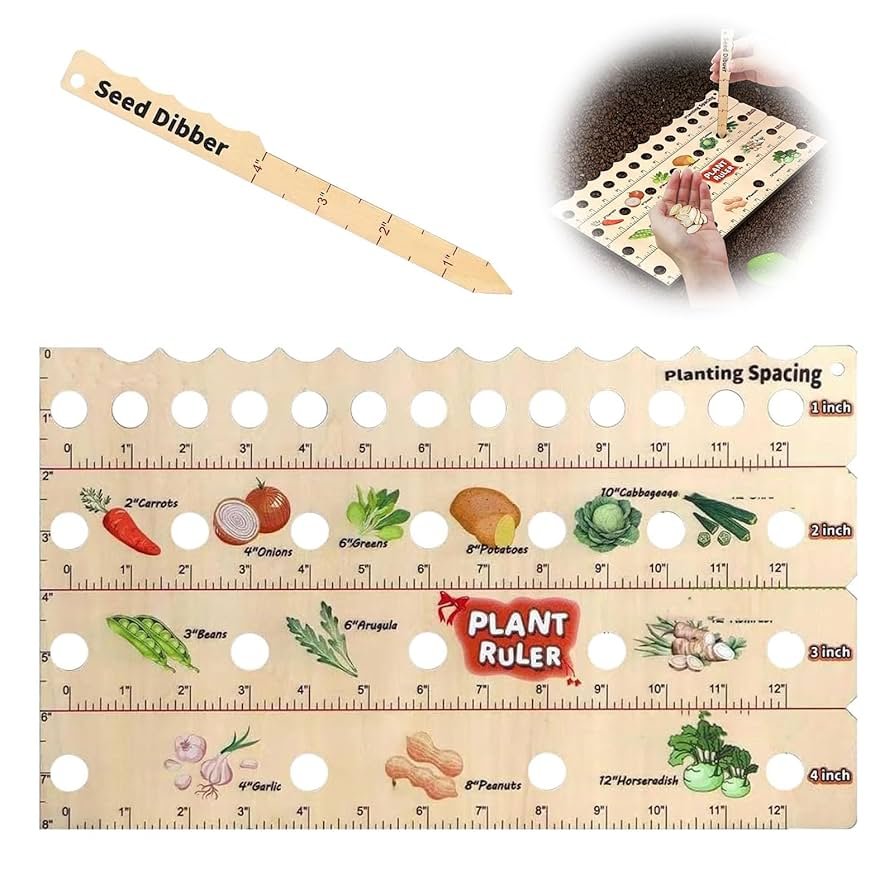
Marking Planting Spots
Marking the right spots for planting seeds helps your garden grow well. Using a dibber makes this task easier and more accurate.
This guide shows you how to measure space and use a dibber for marking seed spots correctly.
Measuring Proper Spacing
Proper spacing gives plants room to grow and get sunlight. It stops crowding and helps air flow around each plant.
- Check seed packet instructions for recommended distance.
- Use a tape measure or ruler to mark intervals.
- Mark spots lightly with a stick or your finger.
- Keep rows evenly spaced for easy care and harvesting.
- Adjust spacing for different plant types and sizes.
Using The Dibber For Precision
A dibber helps make perfect holes at the right depth and spacing. This tool creates uniform spots for seeds to sprout strong.
| Step | Action |
| 1 | Hold the dibber vertically above the marked spot. |
| 2 | Push the dibber into the soil to the recommended depth. |
| 3 | Remove the dibber carefully, leaving a neat hole. |
| 4 | Place the seed inside the hole. |
| 5 | Cover the seed gently with soil. |
Planting Seeds With A Dibber
Using a dibber helps make holes in soil for planting seeds. It makes planting easier and more precise.
A dibber is a simple tool that creates the right space for seeds to grow well. It saves time and effort in the garden.
Creating Holes At Correct Depths
Planting seeds at the right depth is important for good growth. If seeds are too deep, they may not sprout. If too shallow, they can dry out.
- Check seed packet for recommended depth
- Use the dibber to make holes matching that depth
- Press the dibber gently to avoid compacting soil
- Keep holes evenly spaced to give each seed room
Dropping Seeds Into Holes
After making holes, drop one or two seeds into each hole. Use your fingers or a small tool to place seeds carefully.
| Seed Type | Seeds per Hole |
| Carrot | 1-2 |
| Radish | 2-3 |
| Pea | 1 |
| Lettuce | 2-3 |
Covering And Watering Seeds
Planting seeds with a dibber helps make holes for seeds quickly. After placing seeds in the holes, it is important to cover them properly. Covering seeds correctly protects them and helps them grow well.
Watering seeds with care is also very important. Too much water can wash away seeds. Too little water can stop seed growth. Use the right watering techniques for healthy seedlings.
Filling Holes Gently
After dropping seeds into the holes made by a dibber, fill the holes gently with soil. Press the soil lightly to avoid pushing seeds too deep. Loose soil lets air and water reach the seeds.
Use your fingers or a soft tool to cover the seeds. Be careful not to disturb the seed’s position. A soft touch helps seeds stay in place and start to sprout.
Watering Techniques For Seedlings
Water seedlings carefully to keep the soil moist but not soaked. Use a watering can with a fine rose or a spray bottle for gentle watering. This avoids washing away seeds or damaging tiny plants.
Water early in the morning or late in the afternoon. This helps water soak into the soil and reduces evaporation. Check soil moisture often and water when the top feels dry.
Caring For Seedlings
After planting seeds with a dibber, seedlings need careful care. Good care helps young plants grow strong and healthy.
Watch seedlings often to meet their needs. Water, light, and protection help seedlings survive and thrive.
Monitoring Growth
Check seedlings daily for signs of growth. Look at their leaves, stems, and soil condition.
Keep soil moist but not wet. Adjust water based on weather and soil dryness.
- Note leaf color and size
- Watch for wilting or drooping
- Check soil moisture regularly
- Thin crowded seedlings to avoid competition
Protecting From Pests And Weather
Young seedlings are fragile and can be harmed by pests or harsh weather. Take steps to protect them.
Use barriers like mesh or covers to keep insects and animals away. Move seedlings indoors if weather is bad.
- Use natural pest repellents
- Cover seedlings during strong winds or frost
- Remove damaged leaves to stop diseases
- Place seedlings where they get morning sun
Common Mistakes To Avoid
Planting seeds with a dibber is simple but needs care. Avoiding common mistakes helps seeds grow strong.
Two big mistakes are planting seeds too deep or too shallow and watering them wrong. Learn to avoid these errors.
Planting Too Deep Or Shallow
Planting seeds at the right depth is important. Too deep can stop the seed from growing. Too shallow can dry the seed out.
- Check seed packet for suggested depth
- Use the dibber to make holes of the right size
- Cover seeds lightly with soil
- Do not press soil too hard on top
Overwatering Or Underwatering
Watering seeds the right amount keeps them alive. Too much water can rot seeds. Too little water can stop growth.
| Watering Issue | Effect on Seeds | How to Fix |
| Overwatering | Seeds rot and fail to sprout | Water lightly, allow soil to dry between watering |
| Underwatering | Seeds dry out and die | Keep soil moist but not wet |
Frequently Asked Questions
What Is A Dibber And Why Use It For Planting?
A dibber is a pointed gardening tool used to make holes for seeds. It helps plant seeds at consistent depths. Using a dibber improves seed placement and germination rates. It saves time and effort during planting.
How Deep Should I Plant Seeds With A Dibber?
Plant seeds at a depth twice their size using a dibber. This ensures proper soil coverage and moisture retention. Avoid planting too deep as it may delay germination. Follow seed packet instructions for specific depth guidelines.
Can I Use A Dibber For All Seed Types?
A dibber works well for most small to medium seeds. It is ideal for vegetables, flowers, and herbs. Very fine or tiny seeds may require broadcasting or surface sowing. Adjust the hole size to suit seed type.
How Do I Maintain And Clean My Dibber?
Clean the dibber after each use to prevent soil buildup. Wipe it with a damp cloth and dry thoroughly. Occasionally sharpen the tip for easier soil penetration. Store in a dry place to avoid rust.
Conclusion
Planting seeds with a dibber makes gardening easier and more precise. You create perfect holes for seeds quickly and with less effort. This tool helps seeds grow better by placing them at the right depth. Using a dibber saves time and improves your garden’s success.
Try it in your next planting to see the difference. Gardening becomes simple and rewarding with the right tools. Start planting today and enjoy healthy, strong plants tomorrow.
