
Are you tired of rough surfaces ruining your projects? Getting that perfect smooth finish can feel tricky, but the right sanding method makes all the difference.
You’ll discover the best sanding techniques that will transform your work from rough to flawless. Whether you’re a beginner or looking to sharpen your skills, these simple tips will help you achieve a professional look every time. Keep reading to unlock the secrets to a smooth, polished finish that will impress everyone.
Choosing The Right Sandpaper
Choosing the right sandpaper is key for a smooth finish on any project. Different tasks need different sandpaper types and grits.
This guide explains how grit sizes, material types, and when to replace sandpaper affect your work.
Grit Sizes And Their Uses
Sandpaper grit size shows how rough or smooth the abrasive is. Lower numbers mean rougher grit. Higher numbers mean finer grit.
- Coarse grits (40-60) remove paint and shape wood fast.
- Medium grits (80-120) smooth surfaces and remove small scratches.
- Fine grits (150-180) prepare surfaces for finishing.
- Very fine grits (220-400) polish and finish smooth surfaces.
Material Types
| Material | Best Use | Durability |
| Aluminum Oxide | Wood and metal sanding | High |
| Garnet | Wood finishing | Medium |
| Silicon Carbide | Metal and plastic smoothing | High |
| Ceramic | Heavy-duty sanding | Very High |
When To Replace Sandpaper
Using worn sandpaper can ruin your finish. Replace it when it no longer cuts well or clogs often.
- Sanding takes longer than usual.
- Paper feels smooth instead of rough.
- Clogged with dust or debris even after cleaning.
- Visible damage like tears or holes.

Credit: romerohardwoodfloor.com
Hand Sanding Techniques
Hand sanding is a simple way to smooth surfaces. It gives you control and precision. Using the right method helps avoid scratches and uneven spots.
This guide covers key hand sanding methods. Learn how to sand with the grain, use a sanding block, and avoid common mistakes.
Sanding With The Grain
Sanding with the grain means moving the sandpaper along the wood fibers. This prevents scratches and keeps the surface smooth. Always check the wood grain direction before you start.
Using A Sanding Block
A sanding block helps apply even pressure. It stops your hands from creating dips or uneven spots. Wrap sandpaper tightly around the block for best results.
- Choose a block size that fits your project
- Use fine grit for finishing touches
- Keep the block flat on the surface
- Replace sandpaper when worn out
Avoiding Common Mistakes
| Mistake | How to Avoid |
| Using too much pressure | Use gentle, even strokes |
| Sanding across the grain | Always follow the grain direction |
| Not changing sandpaper grit | Start coarse, finish fine |
| Ignoring dust buildup | Wipe surface often |
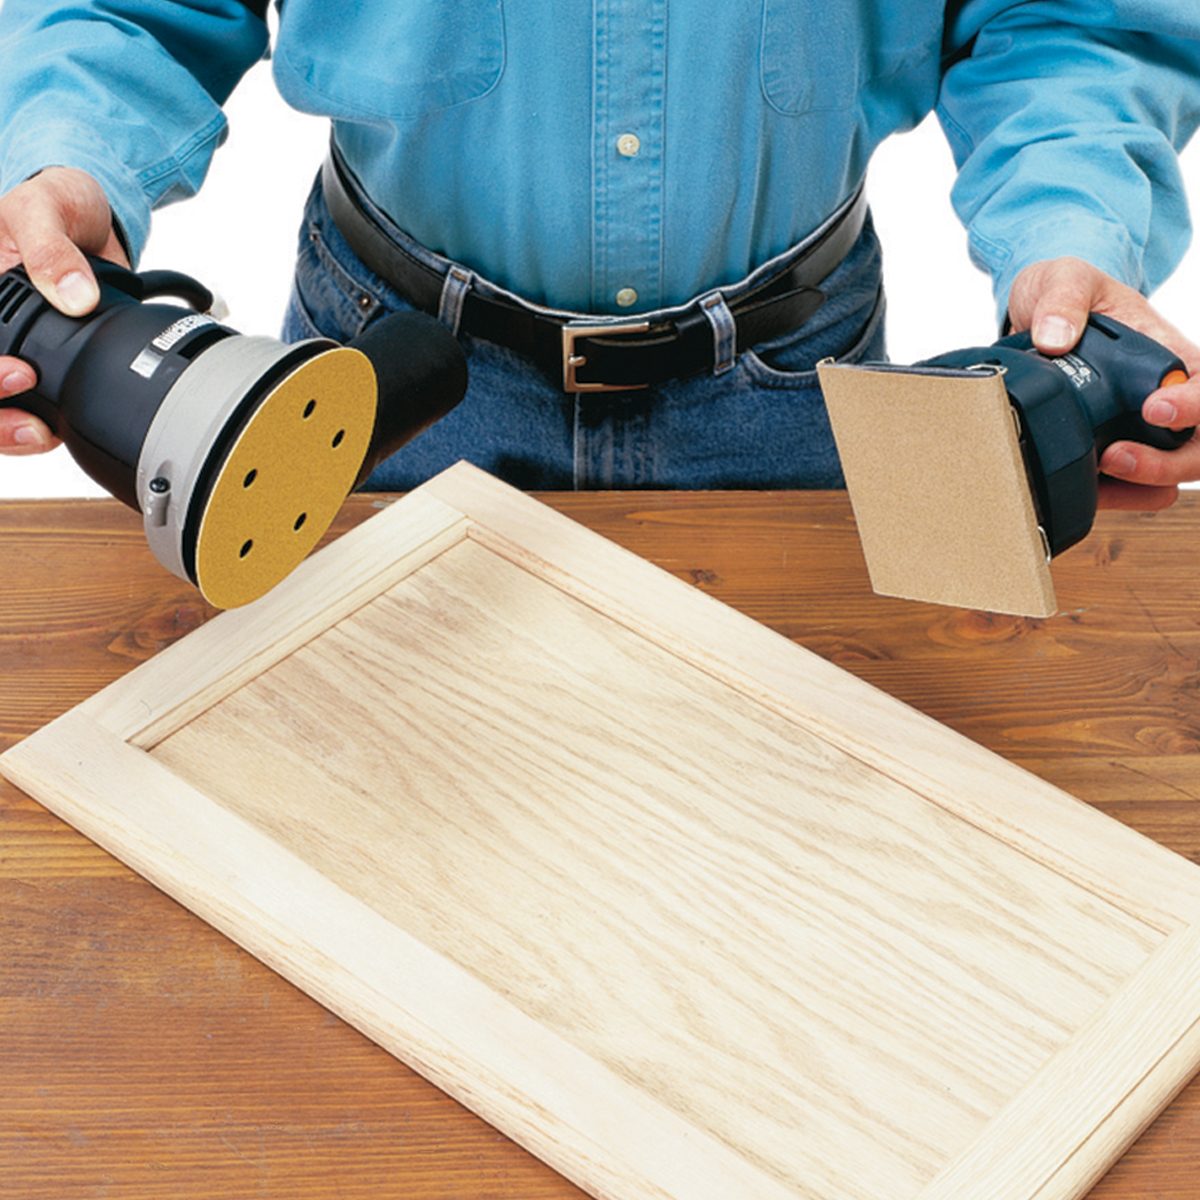
Power Sanding Tools
Power sanding tools make it easier to smooth wood and other surfaces. They save time and give a consistent finish.
Using the right power sander helps you get a clean, flat surface before painting or staining.
Orbital Sanders
Orbital sanders move the sanding pad in small circles. This motion prevents swirl marks on the surface.
They are good for light sanding and finishing work on flat surfaces. Orbital sanders work well on wood, metal, and plastic.
- Use fine grit sandpaper for smooth finishes
- Hold the sander flat and move it evenly
- Do not press too hard to avoid damage
Belt Sanders
Belt sanders use a continuous loop of sandpaper. They remove material quickly and are best for rough surfaces.
These sanders are good for large areas and heavy sanding jobs. They help level uneven wood or remove old finishes.
- Start with coarse grit for fast removal
- Move the sander along the grain of wood
- Keep a steady hand to avoid gouges
Detail Sanders
Detail sanders have small, pointed pads to reach tight spaces. They are ideal for corners and intricate parts.
Use detail sanders for fine work and areas where bigger sanders cannot fit. They help prepare edges and curves.
- Choose the right shape of sanding pad for your project
- Use light pressure for delicate areas
- Work slowly to avoid over-sanding small details

Credit: mrsander.co.uk
Wet Sanding For Extra Smoothness
Wet sanding is a popular technique used to achieve a very smooth finish on surfaces. It uses water to lubricate the sandpaper and reduce dust.
This method helps remove fine scratches and leaves a polished, even surface. It is often used in woodworking, automotive, and painting projects.
When To Use Wet Sanding
Wet sanding works best on hard surfaces like metal, plastic, and painted wood. Use it after dry sanding to improve smoothness.
It is ideal for final finishing steps before polishing or applying a clear coat. Avoid wet sanding on soft surfaces that can absorb water.
- To remove fine scratches from paint or clear coat
- To smooth out finishes after drying or curing
- To prepare surfaces for polishing or buffing
- On hard, non-porous materials
Proper Techniques
Use fine grit sandpaper (1000 to 3000 grit) for wet sanding. Soak the sandpaper in water for 10-15 minutes before use.
Keep the surface wet while sanding to avoid clogging the paper. Use gentle, circular motions and check your progress often.
- Soak sandpaper in water before starting
- Keep surface and sandpaper wet during sanding
- Use light pressure to avoid damaging the surface
- Sand in small, circular or back-and-forth motions
- Rinse surface frequently to see scratches clearly
Safety Tips
Wear gloves to protect your skin from irritation. Use eye protection to guard against splashes of water and debris.
Work in a well-ventilated area to avoid inhaling dust. Keep the workspace clean and dry to prevent slips and falls.
- Wear gloves and eye protection
- Keep the area well-ventilated
- Clean water and tools regularly
- Be careful of slippery floors
Sanding Between Coats
Sanding between coats is key to a smooth finish on wood or painted surfaces. It removes bumps and dust before the next layer.
This process helps each coat stick better and looks more even when done right.
Timing For Best Results
Wait until the finish is dry but not fully cured before sanding. This makes sanding easier and avoids damage.
Sanding too soon can smudge the finish. Sanding too late may clog your sandpaper.
- Check the product label for drying times
- Lightly touch the surface to test dryness
- Usually, wait 30 minutes to 2 hours before sanding
Choosing The Right Grit
Use fine grit sandpaper between coats. It smooths the surface without removing too much finish.
Start with 220 grit or higher for most finishes. Coarser grit may leave scratches.
- 220 to 320 grit for sanding between coats
- Use very fine grit (400+) for final sanding
- Change sandpaper often to keep it clean
Avoiding Surface Damage
Sanding too hard can ruin your finish. Use light pressure and gentle, even strokes.
Keep the sandpaper flat on the surface to avoid creating grooves or dips.
- Use a sanding block for flat surfaces
- Check your work often to avoid over-sanding
- Clean dust off before applying the next coat
Finishing Touches
Sanding is key to a smooth and even surface. The right sanding methods improve the look and feel of your work.
Paying attention to the final sanding steps helps avoid scratches and rough spots. It sets the stage for a great finish.
Final Sanding Steps
Use fine grit sandpaper to smooth the surface gently. Sand in the direction of the grain to avoid marks.
Lightly sand all edges and corners. Check for any rough areas and smooth them carefully.
- Start with 220-grit sandpaper for the final pass
- Use a sanding block for even pressure
- Remove dust between sanding passes
Cleaning The Surface
Cleaning removes dust and debris that can spoil the finish. Use a tack cloth or a damp rag to wipe the surface.
Make sure the surface is dry before applying any finish. Dust left behind can cause bumps or rough spots.
- Wipe all sanding dust carefully
- Use a vacuum for tight spaces
- Check the surface under good light
Preparing For Finish Application
Prepare the surface to help the finish stick well. Light sanding with very fine grit can help finishes adhere better.
Make sure the surface is clean and dry. Remove any oils or fingerprints before finishing.
- Use 320-grit or finer sandpaper for prep
- Remove all dust before finish
- Work in a clean, dust-free area
Credit: www.familyhandyman.com
Frequently Asked Questions
What Is The Best Sanding Method For Wood Surfaces?
The best sanding method for wood is starting with coarse grit and finishing with fine grit sandpaper. Use a sanding block or orbital sander for even pressure. Always sand in the grain direction to avoid scratches and achieve a smooth finish.
How Do I Choose The Right Sandpaper Grit?
Choose sandpaper grit based on the surface condition. Start with 60-80 grit for rough surfaces, 120-150 for smoothing, and 220+ for final finishing. Finer grits create a smoother finish but remove less material.
Can Sanding By Hand Achieve A Smooth Finish?
Yes, hand sanding can achieve a smooth finish. Use a sanding block to apply even pressure and sand in the grain direction. It’s slower but offers control, ideal for small or detailed areas.
How Important Is Sanding Between Coats Of Paint?
Sanding between paint coats is crucial. It removes imperfections and helps the next coat adhere better. Use fine-grit sandpaper (220-320 grit) and sand lightly to avoid removing too much paint.
Conclusion
Achieving a smooth finish requires the right sanding methods. Start with coarse grit for rough surfaces. Gradually move to finer grits for smoothness. Always sand with the grain of the wood. Keep tools clean for best results. Wet sanding helps in achieving a polished look.
Protective gear is important for safety. Consistent pressure ensures even sanding. Practice makes perfect. Try different techniques to see what works best. Remember, patience is key for a flawless finish. With the right approach, your projects will look professional. Enjoy the process and the results will follow.
Happy sanding!