If you want to create strong, beautiful wood joints that last, mastering the dovetail joint is a must. This technique has been used by woodworkers for centuries because it combines strength with a stunning look.
Whether you’re building a drawer, a box, or a piece of furniture, knowing how to make a perfect dovetail joint will take your skills to the next level. In this tutorial, you’ll learn simple steps and pro tips that make the process easy, even if you’re new to woodworking.
Ready to impress yourself and others with your craftsmanship? Let’s dive in and get those joints looking sharp and holding tight!
Dovetail Joint Basics
Dovetail joints are strong wood connections used by carpenters. They lock two pieces of wood together without nails or screws.
This joint is popular for its strength and decorative look. It lasts long and holds well under pressure.
What Is A Dovetail Joint
A dovetail joint fits two wood parts at right angles. The edges have shapes like a bird’s tail. These shapes interlock tightly.
This joint stops the wood from pulling apart. It is made by cutting pins and tails on the wood ends.
Types Of Dovetail Joints
There are several types of dovetail joints. Each type suits different wood projects and looks.
- Through Dovetail: The pins and tails show on both sides.
- Half-Blind Dovetail: Only one side shows the pins and tails.
- Sliding Dovetail: One piece slides into a long tail-shaped groove.
- Secret Mitered Dovetail: Hidden joint with a smooth corner.
Common Uses In Woodworking
Woodworkers use dovetail joints for many projects. The joint adds strength and beauty to furniture.
| Project | Reason for Use |
|---|---|
| Drawers | Strong corners that hold up to pulling |
| Boxes | Durable and decorative edges |
| Cabinets | Secure frame connection |
| Furniture | Long-lasting joints that look nice |

Credit: www.newtonmakes.com
Essential Tools And Materials
Making a dovetail joint requires specific tools and materials. Using the right equipment helps create strong and neat joints. This guide covers the basics you need before starting your project.
Understanding which hand and power tools to use, along with choosing the right wood, will set the foundation for your work. Each section explains important items to prepare.
Hand Tools Needed
Hand tools give you control and precision. They are essential for cutting and fitting dovetail joints carefully.
- Dovetail saw: For fine, accurate cuts
- Chisels: To clean and shape the joints
- Marking gauge: For marking wood depth and lines
- Combination square: To check angles and measurements
- Mallet: To tap chisels gently
- Pencil: For marking cutting lines
Power Tools For Efficiency
Power tools speed up the process and reduce manual effort. They are helpful for rough cuts and repetitive tasks.
| Tool | Use | Benefit |
|---|---|---|
| Router | Cutting precise dovetail shapes | Saves time and improves uniformity |
| Band saw | Cutting wood pieces roughly | Faster than hand sawing |
| Drill | Starting holes for chiseling | Speeds up waste removal |
| Orbital sander | Smoothing wood surfaces | Prepares wood for finishing |
Choosing The Right Wood
Select wood that fits your project needs. Wood choice affects the joint’s strength and appearance.
Consider these factors when picking wood:
- Hardness:Hardwoods like oak and maple hold joints well.
- Grain:Straight grain reduces splitting.
- Moisture:Use dry wood to avoid warping.
- Workability:Softer woods are easier to cut but less durable.
Preparing Wood For Joints
Preparing wood properly is important for strong dovetail joints. Good preparation helps pieces fit tightly together. It also makes the joint look neat and professional.
This guide shows how to measure, mark, cut, and lay out wood for perfect dovetail joints.
Measuring And Marking
Use a ruler or measuring tape to get exact wood sizes. Measure twice to avoid mistakes. Mark the wood clearly with a pencil or marking knife.
Mark the pins and tails carefully. Accurate marks guide your cuts and keep joints tight.
- Use a marking gauge for consistent depth
- Draw clear lines for cutting edges
- Double-check measurements before marking
Cutting Wood Accurately
Cut slowly and follow your marks closely. Use a fine-tooth saw for smooth edges. Keep your saw steady to avoid angled cuts.
Use chisels to clean the cuts and remove waste wood. Sharp tools make clean cuts easier and safer.
- Use a backsaw for straight, controlled cuts
- Cut just outside the marked lines
- Chisel carefully to avoid splitting the wood
Layout Tips For Precision
Plan your layout before cutting. Mark all parts clearly and check alignment. Use a square to keep lines straight.
Keep the layout consistent on both pieces of wood. This helps the pins and tails fit perfectly.
- Use a marking knife for sharp, thin lines
- Check all lines with a try square
- Number parts if needed to avoid confusion
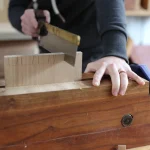
Step-by-step Cutting Process
Making a dovetail joint needs careful cutting. Each part fits tightly for strength.
This guide shows how to cut dovetail joints step-by-step. Follow each part closely.
Marking The Tails
Start by marking the tails on one board. Use a pencil and a square tool.
Measure and mark the angles of each tail carefully. Keep marks clear and straight.
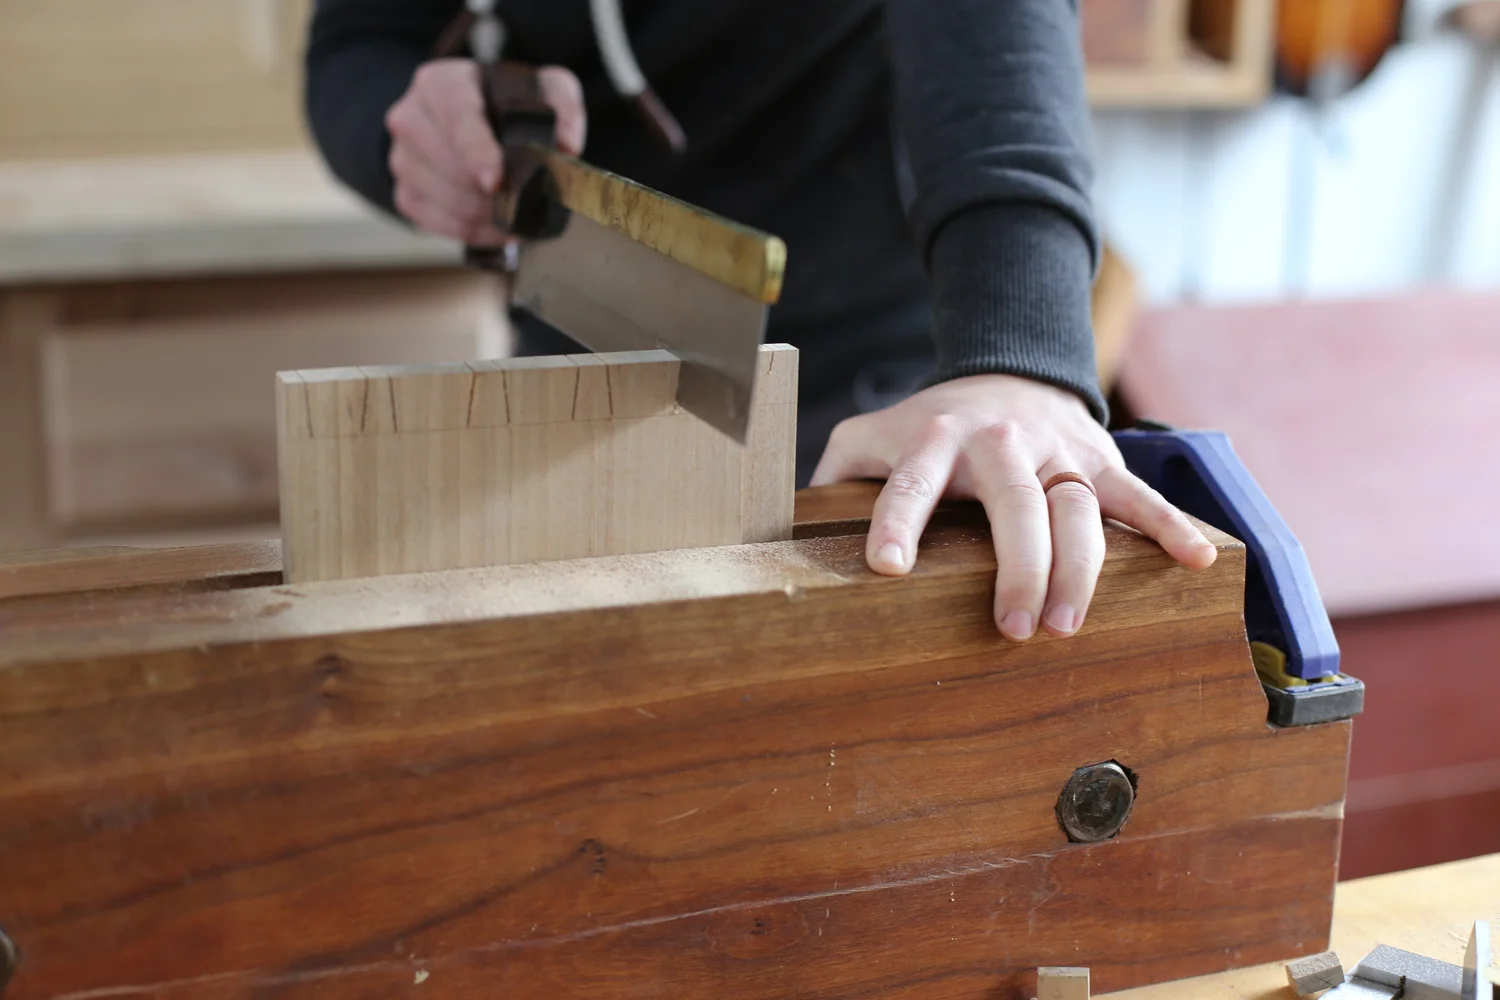
Sawing The Tails
Use a fine saw to cut along the tail lines. Cut slowly to keep edges clean.
Stop cutting at the baseline. Use a chisel to remove wood between tails.
Transferring Tail Marks To Pins
Place the tails board on the pin board. Align edges carefully for accuracy.
Use a marking knife or pencil to trace the tails onto the pin board. Mark all tail shapes.
Cutting The Pins
Cut along the pin lines with a saw. Cut carefully to keep the pins tight.
Remove the waste wood between pins with a chisel. Check fit as you work.
Cleaning And Fitting The Joint
Use chisels to clean any rough edges on tails and pins. Smooth surfaces help fit.
Test the joint by fitting tails into pins. Make small adjustments for a snug fit.
Tips For Perfect Fit
A dovetail joint is strong and looks great if you fit it well. Taking time to get a perfect fit makes your project last longer.
These tips help you avoid errors and adjust the joint until it fits just right. Testing the joint ensures it holds tight and aligns correctly.
Avoiding Common Mistakes
Cutting the tails and pins unevenly causes gaps or a loose fit. Use sharp tools and mark carefully before cutting.
Check your measurements twice. Cutting too deep or shallow weakens the joint or makes it hard to assemble.
- Use a marking gauge for consistent depth
- Keep saw cuts straight and follow lines exactly
- Clean out waste wood smoothly with chisels
- Test fit parts before final assembly
Fine-tuning The Joint
Use a file or sandpaper to gently adjust tight areas. Remove small amounts of wood to improve the fit.
Fit the tails and pins together often while trimming. This helps avoid over-sanding and keeps the joint snug.
- Trim edges that stick out
- Sand inside corners lightly
- Keep the joint tight but not forced
- Check that parts line up flush
Testing For Strength And Alignment
After fitting, press the joint firmly to check strength. It should resist movement and hold without gaps.
Look for even alignment between connected pieces. The surfaces should be flush and edges straight.
- Press the joint and wiggle gently
- Check both outside faces for flushness
- Look for gaps along the joint line
- Make final adjustments if needed before glue

Credit: m.youtube.com
Advanced Techniques
Advanced dovetail joints add strength and style to your woodworking. These techniques need precision and practice. This guide covers half-blind dovetails, sliding dovetails, and jigs for better results.
Each method has unique benefits. Learning these helps you build strong, neat joints for drawers, shelves, and cabinets.
Half-blind Dovetails
Half-blind dovetails hide the joint from the front, giving a clean look. The tails fit into the pins without showing on the front face. This technique is common in drawer fronts.
- Mark the pins on the drawer front carefully.
- Cut the tails on the side piece at a slight angle.
- Use a router or chisel to remove waste from the pins.
- Test fit and adjust for a tight joint.
- Glue and clamp the joint firmly.
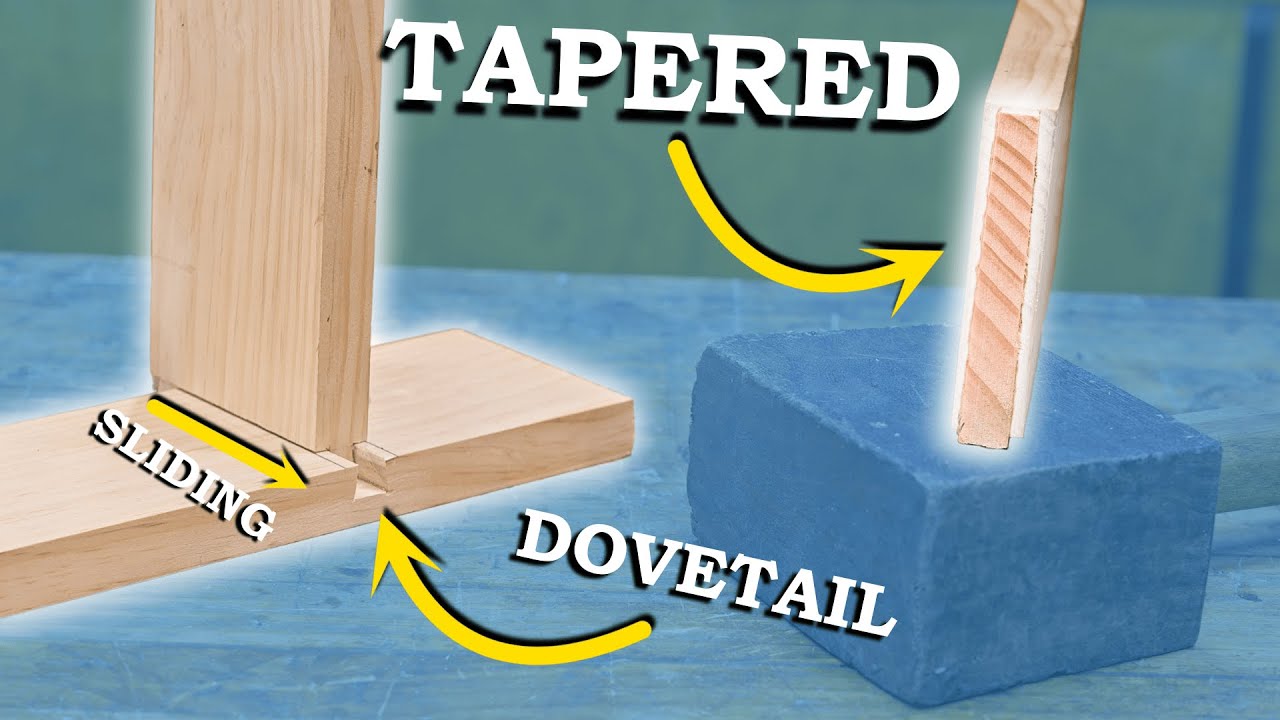
Sliding Dovetails
Sliding dovetails join two pieces at right angles with a sliding fit. One piece has a dovetail groove, and the other has a matching tail that slides in. This joint is strong and resists pulling apart.
| Tool | Purpose |
| Router with dovetail bit | Create the groove and tail |
| Marking gauge | Mark depth and width precisely |
| Chisel | Clean up edges and corners |
| Clamps | Hold pieces during glue-up |
Using Jigs For Consistency
Jigs help make repeatable dovetail cuts. They guide your tools to keep angles and spacing uniform. This saves time and improves accuracy, especially for multiple joints.
Common jig features include:
- Adjustable guides for different joint sizes
- Stops to control cut depth
- Templates for tail spacing
- Clamps to hold workpieces steady
Use jigs with a router or saw to improve your dovetail work.
Finishing And Maintenance
Finishing and maintaining a dovetail joint is key to its strength and look. Proper care helps the joint last longer and stay neat.
This guide covers sanding, gluing, clamping, and protecting the wood surface for best results.
Sanding And Smoothing
Sanding removes rough edges and makes the joint smooth. Use fine-grit sandpaper to avoid damage. Sand along the wood grain for a clean finish.
- Start with medium-grit sandpaper (120-150 grit)
- Finish with fine-grit sandpaper (220 grit)
- Check all surfaces for splinters or rough spots
- Wipe dust off with a dry cloth before finishing
Applying Glue And Clamping
Use wood glue for strong, lasting joints. Apply glue evenly inside all pins and tails. Clamp the joint tight to hold it in place while drying.
- Apply a thin layer of glue on all joint surfaces
- Fit the joint pieces together firmly
- Clamp the joint using appropriate clamps
- Keep clamps on for at least one hour
- Remove clamps and let dry for 24 hours
Protecting The Wood Surface
Protect the wood from moisture and wear with a finish. Choose a finish that fits your project’s use and look. Apply multiple thin coats for best results.
| Finish Type | Protection Level | Drying Time |
| Oil (e.g., linseed) | Medium | 6-8 hours |
| Polyurethane | High | 4-6 hours |
| Wax | Low | 1-2 hours |
| Lacquer | High | 30 minutes – 1 hour |
Credit: www.youtube.com
Frequently Asked Questions
What Is A Dovetail Joint Used For?
A dovetail joint is used in woodworking to join two pieces of wood securely. It provides strong resistance to pulling apart. It is commonly used in drawers, cabinets, and furniture for durability and aesthetic appeal.
How Do You Cut Dovetail Joints Accurately?
Cut dovetail joints accurately by marking precise angles and spacing. Use a dovetail saw or jig for clean cuts. Practice steady hand movements and ensure tight fitting to achieve professional results.
What Tools Are Needed For Dovetail Joints?
Essential tools include a dovetail saw, chisels, marking gauge, and a mallet. A dovetail jig can also help beginners achieve precise cuts. These tools ensure clean, accurate, and strong joints.
Are Dovetail Joints Stronger Than Other Joints?
Yes, dovetail joints are stronger due to their interlocking design. They resist tension and shear forces better than butt or lap joints. This makes them ideal for heavy-use furniture and drawers.
Conclusion
Creating a dovetail joint can seem challenging. But practice makes it easier. Start with simple projects. Gradually improve your skills and confidence. Dovetail joints offer strength and beauty. Perfect for crafting sturdy furniture. Remember to measure twice, cut once. Careful measurements lead to better results.
Use sharp tools for clean cuts. Patience is key during the process. Woodworking is rewarding and fun. Enjoy the journey of learning. Share your projects with others. Inspire and learn from fellow woodworkers. Happy crafting with your dovetail joints!