Are you planning to upgrade your home’s electrical system or tackle a DIY project? Installing an electrical breaker can seem daunting, but it doesn’t have to be.
With the right guidance, you can confidently enhance the safety and efficiency of your electrical setup. In this guide, you’ll discover clear, step-by-step instructions that make the installation process straightforward and stress-free. Imagine the peace of mind you’ll feel knowing your home is protected from electrical hazards.
Curious about where to start and how to ensure everything is done correctly? Read on, and empower yourself with the knowledge to safely and effectively install an electrical breaker.

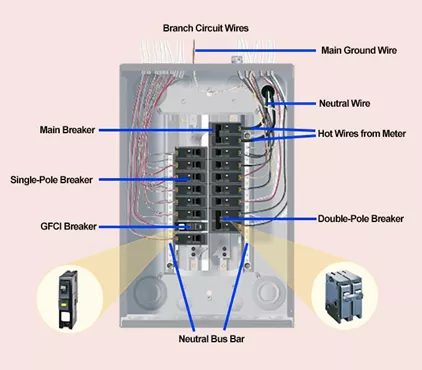
Credit: spadepot.com
Choosing The Right Breaker
Choosing the right electrical breaker is important for safety and performance. A breaker protects your home’s electrical system from damage.
This guide helps you pick the correct breaker by explaining types, size, and panel compatibility.
Types Of Circuit Breakers
There are several types of circuit breakers. Each type serves a different purpose in your electrical system.
- Standard Breakers: Protect general circuits like lights and outlets.
- Ground Fault Circuit Interrupters (GFCI): Protect against electric shocks near water.
- Arc Fault Circuit Interrupters (AFCI): Detect dangerous electrical arcs to prevent fires.
- Double-Pole Breakers: Used for high-power appliances like ovens or dryers.
Breaker Size And Capacity
Breaker size must match the wire and device it protects. Too small or too large breakers can cause hazards.
| Breaker Size (Amps) | Typical Use | Wire Gauge |
| 15 | Lighting and outlets | 14 AWG |
| 20 | Kitchen appliances | 12 AWG |
| 30 | Air conditioners | 10 AWG |
| 50 | Electric ranges | 6 AWG |
Compatibility With Panel
Not all breakers fit all panels. Check the brand and model of your panel before buying a breaker.
Use this checklist to ensure compatibility:
- Find panel brand and model number inside the panel door.
- Choose breakers approved for your panel brand.
- Match breaker shape and connection type to panel slots.
- Consult panel manual or electrician if unsure.
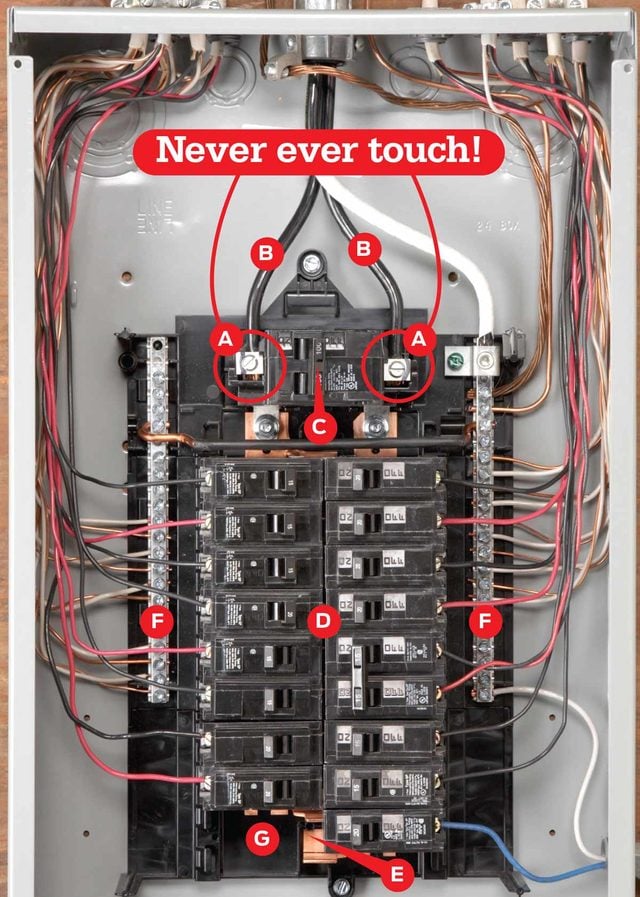
Credit: www.familyhandyman.com
Tools And Materials Needed
Installing an electrical breaker requires the right tools and materials. Using proper equipment keeps you safe and makes the job easier.
This guide covers the essential tools, safety gear, and extra supplies you need for a smooth installation.
Essential Tools
You need specific tools to install a breaker correctly. These tools help you cut wires, test circuits, and secure the breaker in place.
- Screwdrivers (flathead and Phillips)
- Wire strippers
- Voltage tester or multimeter
- Needle-nose pliers
- Cable cutters
- Nut driver set
- Flashlight or headlamp
Safety Gear
Safety gear protects you from electrical shocks and injuries. Always wear the right equipment before starting work.
- Insulated gloves
- Safety glasses
- Rubber-soled shoes
- Long-sleeve shirt and pants
- Hard hat (if required)
Additional Supplies
Extra materials help finish the installation and keep your work neat. These supplies support the wiring and breaker setup.
- Electrical tape
- Cable ties
- Breaker panel labels
- Wire connectors (wire nuts)
- Replacement breaker
Preparing The Electrical Panel
Installing an electrical breaker needs careful preparation of the electrical panel. This process ensures safety and proper function.
Follow clear steps to prepare the panel before installing a breaker. This guide covers power shutoff, inspection, and workspace setup.
Power Shutoff Procedures
Turn off power to avoid electrical shock. Confirm the power is off before starting work.
- Locate the main breaker in your electrical panel.
- Switch the main breaker to the off position.
- Use a voltage tester to check that power is off.
- Inform others in your home or workplace about the power shutdown.
- Wear insulated gloves and safety glasses for protection.
Panel Inspection
Inspect the panel for damage or wear before installing the breaker. Look for signs of rust, loose wires, or burn marks.
| Inspection Item | What to Check |
| Panel Cover | Secure and free of cracks |
| Wiring | No frayed or exposed wires |
| Breakers | Properly seated and not damaged |
| Grounding | Connections tight and secure |
Workspace Setup
Prepare your workspace for easy access and safety. Keep tools organized and the area clean.
- Clear the floor near the panel of any clutter.
- Arrange tools within reach but away from the panel.
- Use a bright light source to see inside the panel clearly.
- Keep a fire extinguisher nearby for emergencies.
- Wear non-conductive shoes to reduce shock risk.
Installing The Breaker
Installing an electrical breaker is a key step in setting up your home’s electrical system. This guide will help you install the breaker safely and correctly.
Follow these instructions carefully to avoid damage and ensure proper operation.
Removing Panel Cover
Turn off the main power switch before removing the panel cover. This helps prevent electric shock.
Use a screwdriver to remove the screws holding the panel cover in place. Keep the screws safe for later.
Connecting Wires
Identify the wires that connect to the new breaker. Strip about half an inch of insulation from the wire ends.
Attach the wires to the breaker terminals. Tighten the screws firmly to hold the wires in place.
- Black or red wires connect to the breaker terminal
- White wires connect to the neutral bus bar
- Green or bare wires connect to the ground bus bar
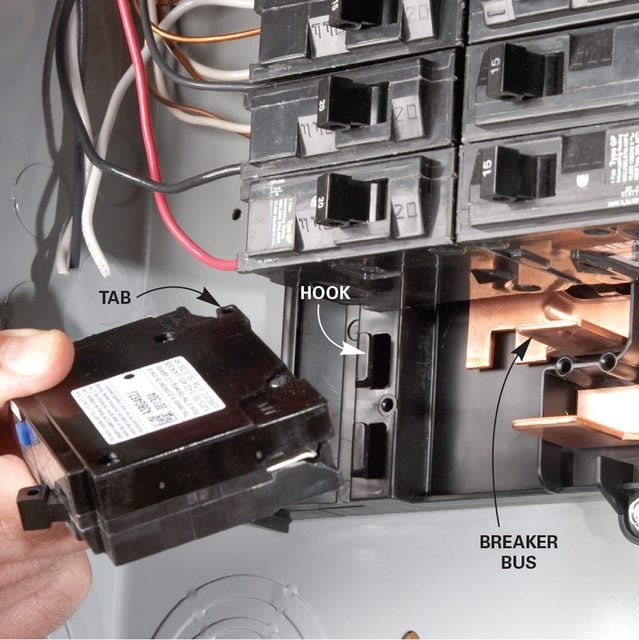
Securing The Breaker
Place the breaker into the slot on the panel. Press it firmly until it snaps into place.
Make sure the breaker is secure and does not move. Replace the panel cover and tighten all screws.
Testing The Installation
After installing an electrical breaker, testing the installation is very important. It helps ensure safety and proper function.
Check the breaker and power flow before using any connected devices. This prevents electrical problems or hazards.
Restoring Power
Once the breaker is installed and tested, restore power to the circuit. Turn the main switch back on carefully.
Make sure the breaker is in the “ON” position. Watch for any sparks or unusual sounds.
Breaker Function Check
Test the breaker’s function by switching it off and on several times. This confirms the switch works correctly.
Use a voltage tester to check if the power stops when the breaker is off. This shows the breaker cuts power safely.
- Turn breaker off
- Check power with a voltage tester
- Turn breaker on
- Verify power returns
Troubleshooting Common Issues
If the breaker trips often or won’t reset, look for wiring mistakes or overloads. Fix these problems quickly.
Check for loose connections, damaged wires, or too many devices on one circuit. These cause common breaker issues.
- Inspect breaker and wires
- Reduce load on the circuit
- Tighten all connections
- Replace faulty breakers if needed
Safety Tips And Best Practices
Installing an electrical breaker requires care and attention. Safety is the top priority to avoid accidents. Use the right tools and follow proper methods to protect yourself and your home.
This guide covers key safety tips to help you install breakers safely. Learn how to avoid hazards, maintain your system, and know when to get expert help.
Avoiding Electrical Hazards
Electrical hazards can cause shocks, burns, or fires. Always take steps to reduce risks during breaker installation.
- Turn off power at the main switch before starting work.
- Use insulated tools to prevent electric shocks.
- Wear rubber-soled shoes and avoid wet areas.
- Check wires and breakers for damage before use.
- Do not touch live wires or terminals.
- Follow manufacturer instructions exactly.
Regular Maintenance
Keeping your electrical breakers in good shape helps prevent failures and hazards. Regular checks keep your system safe and working well.
| Maintenance Task | Frequency | Purpose |
|---|---|---|
| Inspect breaker panel | Every 6 months | Spot signs of wear or damage |
| Test breaker operation | Once a year | Ensure breaker trips correctly |
| Clean panel and area | Every 6 months | Remove dust and debris |
| Tighten loose connections | As needed | Prevent overheating |
When To Call A Professional
Some tasks are too risky for DIY. A licensed electrician can handle complex or dangerous issues safely.
- If you find burnt or melted wiring.
- If breakers trip often without clear reasons.
- If you smell burning or see sparks near the panel.
- If you need to upgrade your breaker panel.
- If you feel unsure about any step in the installation.
Credit: www.familyhandyman.com
Frequently Asked Questions
What Tools Are Needed For Electrical Breaker Installation?
Essential tools include a screwdriver, voltage tester, wire stripper, pliers, and safety gloves. These ensure safe, precise installation and prevent electrical hazards during the process.
How Do I Turn Off Power Before Installing A Breaker?
Switch off the main power breaker in the electrical panel. Verify power is off with a voltage tester before touching any wires to avoid electric shock.
Can I Install A Breaker Myself Safely?
Yes, if you follow safety guidelines and local codes. Always turn off power and use proper tools. When unsure, consult a licensed electrician.
What Size Breaker Is Required For My Circuit?
Breaker size depends on the circuit’s wire gauge and connected load. Match the breaker amperage to wire capacity to prevent overheating and fire risks.
Conclusion
Installing an electrical breaker is key for home safety. Choose the right breaker for your system. Turn off power before starting any work. Follow the steps carefully to avoid mistakes. Check all connections are tight and secure. Test the breaker to ensure it works well.
Proper installation helps prevent electrical problems later. Stay cautious and call a professional if unsure. Safe wiring protects your home and family. Keep these tips in mind for a smooth installation.
