Are you sure your electrical breakers are doing their job when it really counts? A simple test can save you from unexpected power failures or even dangerous electrical fires.
You’ll discover easy and effective electrical breaker testing tips that anyone can follow. By learning these practical steps, you’ll protect your home or workplace and gain peace of mind. Keep reading to find out how to spot problems early and keep your electrical system running safely.

Credit: electricaltrader.com
Choosing The Right Breaker
Electrical breaker testing is important for safety and performance. Choosing the right breaker helps protect your electrical system.
Selecting a breaker depends on the type of circuit and the electrical load. Knowing the basics helps you make a good choice.
Types Of Electrical Breakers
There are several types of electrical breakers. Each type serves a different purpose and fits specific needs.
- Standard Circuit Breakers: Protect circuits from overloads and short circuits.
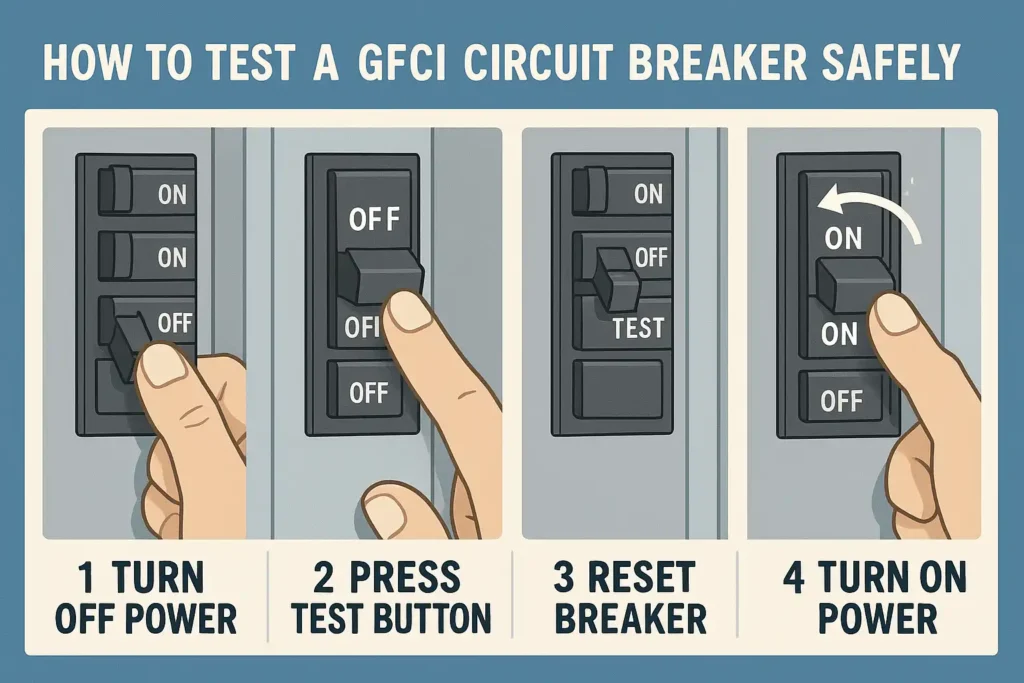
- Ground Fault Circuit Interrupters (GFCI): Detect ground faults and prevent shocks.
- Arc Fault Circuit Interrupters (AFCI): Detect electrical arcs to stop fires.
- Molded Case Circuit Breakers (MCCB): Used for higher power circuits and industrial use.
Breaker Ratings And Specifications
Breaker ratings show the limits of the device. They include current, voltage, and interrupting capacity.
Choosing a breaker with the correct rating is crucial to avoid damage or failure in your system.
| Rating | Description |
|---|---|
| Current Rating (Amps) | Maximum current breaker can handle |
| Voltage Rating (Volts) | Maximum voltage breaker can safely interrupt |
| Interrupting Capacity (kA) | Highest fault current breaker can stop |
Essential Testing Equipment
Testing electrical breakers ensures safety and proper function. Using the right tools helps find problems quickly.
This guide covers important equipment used for electrical breaker testing. Each tool has a specific role in the process.
Multimeters And Testers
Multimeters measure voltage, current, and resistance. Testers check if circuits are live or not. Both are basic tools for any electrician.
- Digital multimeters for precise readings
- Voltage testers for quick checks
- Continuity testers to ensure connections
- Clamp meters to measure current safely
Insulation Resistance Testers
Insulation resistance testers check if wiring insulation is intact. They help prevent electrical shocks and fires.
| Feature | Purpose |
| High voltage output | Tests insulation strength |
| Resistance measurement | Detects insulation leaks |
| Digital display | Shows clear test results |
| Portability | Easy to use on site |
Circuit Analyzer Tools
Circuit analyzers evaluate breaker performance under load. They spot faults like overloads and short circuits.
Common features of circuit analyzers include:
- Real-time data logging
- Automatic fault detection
- Load and trip curve analysis
- Easy connection to breakers
Preparing For Breaker Testing
Breaker testing is important to check if electrical breakers work properly. Preparing well ensures safe and accurate tests.
Follow clear steps before testing to avoid mistakes and hazards. Preparation includes safety checks and proper inspections.
Safety Precautions
Safety is the top priority before testing breakers. Always wear protective gear and follow rules strictly.
Check that the area is dry and free from hazards. Use insulated tools and keep others away from the test zone.
- Wear gloves and safety glasses
- Use insulated tools only
- Keep the testing area clean and dry
- Warn others to stay clear
- Follow all electrical safety standards
Power Isolation Procedures
Turn off power to the breaker before testing. This stops electric shocks and equipment damage.
Use lockout and tagout devices to keep the power off. Confirm no electricity flows through the circuit.
- Switch off the main power supply
- Apply lockout/tagout devices
- Test for voltage absence with a meter
- Do not start testing until power is isolated
Visual Inspection Tips
Look carefully at the breaker before testing. Check for damage, dirt, or loose parts.
Clean the breaker if needed. Tighten any loose screws and note any cracks or burns.
- Inspect for cracks or burns
- Check for dirt or dust buildup
- Verify all screws and connections are tight
- Replace damaged parts before testing
Step-by-step Testing Process
Testing electrical breakers ensures they work safely and correctly. This process checks different parts of the breaker.
Follow these steps to test breakers carefully and avoid problems.
Continuity And Resistance Checks
First, check the continuity to see if the circuit is complete. Measure resistance to find any breaks or damage.
Use a multimeter to test across the breaker terminals. A low resistance means good continuity. High resistance shows a problem.
- Turn off power before testing
- Set multimeter to continuity or resistance mode
- Place probes on breaker terminals
- Check for beep or low resistance reading
- Replace breaker if no continuity is found
Trip Time Measurement
Measure how fast the breaker trips when overloaded. This shows if it reacts quickly to faults.
Use a timer and apply a test current. Record the time it takes for the breaker to switch off.
- Connect test equipment to breaker
- Apply rated fault current
- Start timer as current flows
- Stop timer when breaker trips
- Compare trip time to breaker specifications
Contact Wear Assessment
Check breaker contacts for wear or damage. Worn contacts can cause failure or unsafe operation.
Open the breaker and look for pitting, corrosion, or burning signs on contacts.
- Switch off and isolate the breaker
- Remove cover to access contacts
- Inspect contacts under good light
- Clean minor dirt with a soft cloth
- Replace breaker if contacts show severe wear
Common Issues And Troubleshooting
Testing electrical breakers is important for safety. Problems can cause power loss or damage.
Knowing common issues helps fix breakers faster and avoid accidents.
False Trips And Causes
False trips happen when breakers turn off without real faults. This can interrupt power needlessly.
False trips often happen due to wiring issues or sensitive settings.
- Loose or damaged wiring can cause false trips
- High sensitivity settings trigger trips on small surges
- Environmental factors like moisture or dirt affect breaker sensors
- Electrical noise from nearby machines may cause trips
Breaker Failure Signs
Breaker failure means the device does not trip when it should. This is very dangerous.
Signs include breakers that stay on during faults or show physical damage.
- Breaker does not trip during a test or fault
- Burn marks or melted parts on the breaker
- Unusual noise or smell from the breaker
- Frequent overheating or warm surfaces
Calibration Errors
Calibration errors happen when breakers are not set correctly. This affects their trip times.
Incorrect calibration can cause trips too early or too late, risking damage or outages.
- Using wrong test equipment or settings
- Not following manufacturer calibration steps
- Ignoring regular calibration schedules
- Environmental changes affecting calibration accuracy
Maintaining Breaker Performance
Electrical breakers protect equipment and people from electrical faults. Keeping breakers in good shape helps avoid failures and hazards.
Regular care and checks ensure breakers work when needed. This guide covers tips to maintain breaker performance.
Routine Testing Schedules
Set regular testing times to check breaker function. Tests find problems before they cause damage or outages.
Follow manufacturer guidelines for testing frequency. Adjust schedules based on breaker use and environment.
- Test breakers every 6 to 12 months
- Perform trip tests to check response times
- Inspect mechanical and electrical parts
- Use proper tools and follow safety rules
Cleaning And Lubrication
Keep breakers clean to prevent dust and dirt buildup. Dirt can block moving parts or cause poor connections.
Apply the right lubricants to moving parts. This reduces wear and helps breakers operate smoothly.
- Use dry cloths or brushes for cleaning
- Avoid harsh chemicals that damage parts
- Lubricate hinges and joints lightly
- Do not over-lubricate to prevent dirt attraction
Record Keeping Practices
Keep detailed records of all tests, repairs, and maintenance. Good records help track breaker health over time.
Use logs to schedule future tests and spot recurring issues. Clear records improve safety and reduce downtime.
- Record test dates and results
- Note any repairs or parts replaced
- Track maintenance schedules and actions
- Store records in an organized and accessible place
Advanced Testing Techniques
Testing electrical breakers is key to keeping systems safe. Advanced techniques help find problems early. These methods save time and reduce risks.
Using new tools and data helps technicians check breakers better. This guide covers thermal imaging, automated systems, and data analysis.
Thermal Imaging
Thermal imaging uses a camera to see heat patterns on breakers. Hot spots can show wear or damage. This method finds issues before they cause failure.
- Scan breakers while they are running
- Look for unusual heat or cold areas
- Compare images over time for changes
- Use thermal data to plan repairs
Automated Testing Systems
Automated systems run tests on breakers without manual work. They measure timing, trip settings, and contact resistance. These tools improve test speed and accuracy.
| Test Type | Description | Benefit |
| Timing Test | Measures trip time under load | Finds slow or fast trips |
| Trip Setting Test | Checks breaker settings | Ensures proper protection |
| Contact Resistance Test | Measures electrical resistance | Detects contact wear |
Data Analysis For Predictive Maintenance
Data analysis helps predict when a breaker needs maintenance. It uses past test results and sensor data. This stops failures before they happen.
Key data points to track:
- Trip times
- Temperature trends
- Resistance changes
- Fault history
Analyzing these points helps plan maintenance schedules and avoid downtime.

Credit: dadaoenergy.com

Credit: dadaoenergy.com
Frequently Asked Questions
What Is The Purpose Of Electrical Breaker Testing?
Electrical breaker testing ensures breakers function correctly to protect circuits. It detects faults early and prevents electrical hazards. Regular testing maintains safety and reliability in electrical systems.
How Often Should Electrical Breakers Be Tested?
Electrical breakers should be tested at least once a year. High-risk environments may require more frequent testing. Regular checks help ensure continuous protection and avoid unexpected failures.
What Tools Are Needed For Breaker Testing?
Common tools include insulation testers, multimeters, and test switches. Specialized breaker test sets are used for detailed analysis. Proper tools ensure accurate and safe testing results.
Can Breaker Testing Prevent Electrical Fires?
Yes, breaker testing identifies faulty breakers that could cause overheating. It helps detect issues before they escalate into fires. Regular testing is a crucial fire prevention step.
Conclusion
Regular testing ensures your electrical breakers work efficiently. Simple checks prevent future issues. Safety should always be your top priority. Use these tips to maintain your equipment properly. Remember, a little effort now can save big problems later. Always follow safety guidelines during testing.
Consult professionals when unsure. Proper care extends the life of your breakers. Keep your electrical system safe and reliable. Regular maintenance protects your home and investment. Prioritize these tests for peace of mind.