
Are you struggling to bend electrical conduit just right? Whether you’re a seasoned electrician or a DIY enthusiast, knowing how to bend conduit accurately can save you time, money, and frustration.
This guide will walk you through simple, step-by-step techniques to help you master conduit bending with confidence. By the end, you’ll feel ready to tackle any project without second-guessing your skills. Keep reading to unlock the secrets that make conduit bending easier than you ever thought possible.
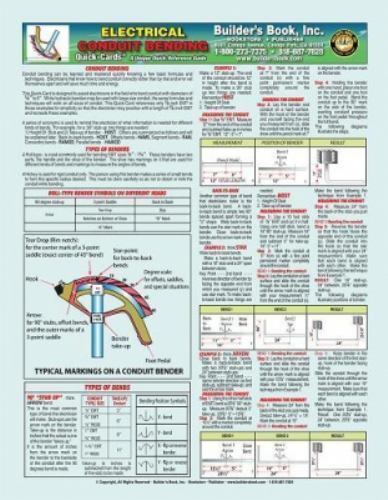
Credit: www.ebay.com
Types Of Electrical Conduits
Electrical conduits protect wiring in buildings. They come in different materials and styles. Each type has its own use and benefits.
Choosing the right conduit helps keep wires safe from damage and weather. It also makes installation easier.
Rigid Metal Conduit
Rigid Metal Conduit (RMC) is a thick, heavy metal tube. It offers strong protection against physical damage. RMC is used in outdoor and industrial settings.
This conduit type is threaded and connected with couplings. It resists corrosion if made from galvanized steel or aluminum.
Flexible Metal Conduit
Flexible Metal Conduit (FMC) is a bendable metal tube. It is used where rigid conduit is hard to install. FMC protects wires in tight or moving spaces.
- Easy to bend and shape
- Good for vibration-prone areas
- Not suitable for outdoor use
- Must be grounded properly
Pvc Conduit
PVC conduit is a plastic tube that resists moisture and chemicals. It is lightweight and easy to cut. PVC is common in underground and wet locations.
| Feature | Benefit |
| Non-metallic | Resists rust and corrosion |
| Lightweight | Easier to handle and install |
| Cost-effective | Lower price than metal conduits |
| Electrical insulation | Reduces electrical hazards |
Intermediate Metal Conduit
Intermediate Metal Conduit (IMC) is thinner and lighter than RMC. It is still strong and used in commercial buildings. IMC is easier to handle and less costly.
IMC is threaded like RMC but weighs less. It offers good protection and is suitable for exposed locations.
Tools Needed For Bending
Bending electrical conduit requires the right tools. Using proper tools makes your work easier and safer.
This guide covers the main tools you need for bending conduit manually and hydraulically. It also explains measuring tools and safety gear.
Manual Benders
Manual benders are simple tools used to bend conduit by hand. They come in different sizes for various conduit diameters.
- Made of metal with a handle for leverage
- Used on-site without power
- Best for small jobs and tight bends
- Requires physical strength and skill
Hydraulic Benders
Hydraulic benders use fluid pressure to bend conduit easily. They are ideal for thick or large conduits.
| Feature | Manual Benders | Hydraulic Benders |
|---|---|---|
| Power source | Human force | Hydraulic pressure |
| Best for conduit size | Small to medium | Medium to large |
| Ease of use | Requires effort | Less effort |
| Portability | Highly portable | Less portable |
Measuring Tools
Measuring tools help ensure accurate bends. Precise measurements prevent mistakes and save time.
- Tape measure for length
- Angle finder to check bend angles
- Marker to mark bend points
- Level to keep conduit straight
Safety Gear
Safety gear protects you from injuries while bending conduit. Always wear proper protection on the job.
- Safety glasses to protect eyes
- Work gloves to protect hands
- Steel-toed boots for foot safety
- Long sleeves to prevent scrapes
Basic Bending Techniques
Bending electrical conduit is a key skill for electricians. It helps fit conduit around corners and obstacles. Using the right technique saves time and materials.
Each type of bend serves a different purpose. Learning basic bends will improve your installation quality. Safety and accuracy matter most in bending conduit.
45-degree Bends
A 45-degree bend changes the conduit direction gently. It is useful for slight turns or to avoid obstacles. Use a conduit bender with the correct size shoe for best results.
90-degree Bends
90-degree bends create sharp turns in conduit runs. These bends are common when conduit needs to go around corners. Mark the conduit before bending to ensure accuracy.
Offset Bends
Offset bends help move conduit around an obstruction. They involve two bends of equal degree but opposite direction. Measure the offset height and distance carefully before bending.
- Measure the height of the obstruction.
- Calculate the distance between bends.
- Mark the bend points on the conduit.
- Make the first bend at the marked point.
- Make the second bend opposite to the first.
Back-to-back Bends
Back-to-back bends allow conduit to reverse direction in a small space. These bends are two 90-degree bends close together. They create a U-shape to change conduit path efficiently.
| Angle | Purpose | Common Use |
|---|---|---|
| 45 Degrees | Gentle direction change | Avoid small obstacles |
| 90 Degrees | Sharp turns | Go around corners |
| Offset | Bypass obstructions | Move conduit around objects |
| Back-to-Back | Reverse direction | Fit conduit in tight spaces |

Credit: www.amazon.ca
Step-by-step Bending Process
Bending electrical conduit correctly is important for a clean and safe installation.
This guide will help you bend conduit with accuracy and ease by following simple steps.
Measuring And Marking
Start by measuring the length of conduit you need to bend. Use a tape measure for accuracy.
Mark the bending point clearly with a permanent marker or pencil. This mark guides your bend.
Setting Up The Bender
Place the conduit into the bender with the mark aligned at the bender’s arrow or shoe.
- Check that the conduit is secure and will not slip during bending.
- Set the bender handle to a comfortable position for applying force.
- Ensure the bender fits the conduit size you are using.
Executing The Bend
Pull the handle slowly and steadily to start bending the conduit around the bender’s form.
Stop when the conduit reaches the desired angle. Avoid quick or jerky movements to prevent kinks.
| Angle Desired | Bender Handle Position |
| 30° | Pull handle halfway |
| 45° | Pull handle three-quarters |
| 90° | Pull handle fully down |
Checking Accuracy
Use a protractor or angle finder to check the bend angle. It should match your mark.
- Confirm the bend is smooth and has no wrinkles.
- Make sure the conduit fits properly in the installation area.
- If needed, make small adjustments carefully.
Common Bending Mistakes
Bending electrical conduit needs care to avoid damage. Mistakes can cause problems during installation and use.
Learn the common bending mistakes to improve your work and keep conduits safe and functional.
Crushing The Conduit
Crushing happens when too much force is used during bending. This weakens the conduit and can cause cracks.
Use the right tools and apply steady pressure to avoid crushing the conduit.
Incorrect Bend Angles
Bends that are too sharp or too shallow can cause fitting issues. Accurate angles help conduits fit properly.
- Mark the angle carefully before bending.
- Use angle guides or bending tools.
- Check bends with a protractor or angle finder.
Inaccurate Measurements
Wrong measurements lead to conduit that is too long or short. This wastes material and time.
| Common Measurement Errors | Effect |
| Skipping allowance for bends | Conduit too short to reach points |
| Measuring from wrong reference points | Misaligned bends and fittings |
| Not double-checking lengths | Material waste and rework |
Overbending
Overbending changes the conduit shape and reduces inside space. It can block cables or cause damage.
- Bend slowly and watch the angle closely.
- Stop bending as soon as the correct angle is reached.
- Practice with scrap conduit to get the feel right.
Tips For Smooth And Precise Bends
Bending electrical conduit correctly is important for a neat and safe installation. Smooth and precise bends help avoid damage and make wiring easier.
Use these tips to improve your bending skills and get better results every time you work with conduit.
Use Proper Tools
Using the right tools makes bending easier and more accurate. Choose a conduit bender that fits the size of your conduit.
A good bender helps you control the angle and prevents kinks. Avoid using makeshift tools that can damage the conduit.
- Use a hand bender for small conduits
- Use a hydraulic bender for larger conduits
- Check tool size matches conduit diameter
- Use a level or angle finder for accuracy
Practice Regularly
Practice bending conduit to improve your skill and confidence. Regular practice helps you learn how much force to apply.
Try bending different angles and sizes. This will prepare you for real jobs and reduce mistakes.
- Start with simple 90-degree bends
- Try offset and saddle bends
- Practice with scrap conduit pieces
- Check your bends with a protractor
Plan Your Bends
Plan each bend before you start to avoid errors. Measure carefully to know where each bend should go.
Mark the conduit with a pencil or tape. This helps you bend at the right spot and angle.
- Measure the distance between bends
- Mark bend points clearly
- Know the required bend angles
- Visualize the final conduit path
Maintain Your Equipment
Keep your bending tools clean and in good condition. Check for damage or wear that can affect your bends.
Lubricate moving parts if needed. Store tools properly to prevent rust and damage.
- Clean tools after each use
- Inspect for cracks or bends
- Lubricate pivot points regularly
- Store in a dry, safe place
Advanced Bending Techniques
Advanced bending techniques help make complex shapes in electrical conduit. These bends allow conduit to fit around obstacles and tight spaces.
These techniques require skill and proper tools. They improve the quality and safety of electrical installations.
Three-point Saddle Bends
A three-point saddle bend lets conduit go over or around obstacles. It uses three bends to create a smooth shape.
This bend is useful for pipes or beams that block the path of the conduit. It keeps the conduit away from the obstacle without sharp angles.
- First bend angles the conduit away from the obstacle
- Second bend runs parallel to the obstacle
- Third bend returns the conduit to its original direction
Compound Bends
Compound bends combine two or more bends on the same conduit section. They allow the conduit to change direction in different planes.
These bends are helpful when conduit must go around corners and up or down. They create smooth transitions without strain on the conduit.
- Start with the first bend at the desired angle
- Rotate the conduit to the second plane
- Make the second bend to complete the direction change
Rolling Off Bends
Rolling off bends create curved conduit runs without sharp edges. They use a rolling motion to form gentle bends.
This technique is useful for long, sweeping bends needed in some installations. It reduces stress and keeps conduit smooth.
- Place the conduit in the bender
- Apply steady pressure while rolling the conduit
- Continue rolling until the desired bend radius is reached

Credit: www.pipe-pal.com
Troubleshooting Bending Issues
Bending electrical conduit can be tricky. Mistakes cause problems that slow your work.
This guide helps fix common bending issues. It covers deformed conduits, wrong angles, and tough materials.
Fixing Deformed Conduits
Conduits can get crushed or flattened during bending. This weakens them and blocks wires.
Use a conduit re-rounding tool to restore shape. Gently work the tool inside the conduit to fix dents.
- Apply steady pressure to avoid new dents
- Check the conduit shape often during repair
- Replace badly damaged conduit for safety
Adjusting Incorrect Angles
Wrong bend angles cause conduit to not fit properly. This can make wiring hard or unsafe.
Use a bending spring or adjustable bender to correct the angle. Slowly bend back to the needed position.
- Mark angles before bending to reduce errors
- Make small adjustments instead of big ones
- Double-check angles with a protractor or angle finder
Dealing With Hard-to-bend Materials
Some conduits, like thick steel, are tough to bend. They need more force and care.
Heat the conduit slightly to soften it. Use proper tools like hydraulic benders for heavy materials.
- Wear gloves to protect your hands from heat
- Bend slowly to avoid cracks or breaks
- Use supports to keep the conduit stable
Frequently Asked Questions
What Tools Are Needed For Electrical Conduit Bending?
You need a conduit bender, tape measure, level, and marker for accurate bends. These tools ensure precise angles and clean bends in electrical conduit.
How Do You Calculate Conduit Bending Angles?
Measure the desired bend angle using a protractor or bending chart. Mark the conduit and use the bender to achieve the exact angle for proper fitting.
What Materials Can Be Bent Using Conduit Bending?
Common materials include EMT, IMC, and rigid metal conduit. Each requires specific techniques and tools for smooth, accurate bends without damaging the conduit.
Why Is Conduit Bending Important In Electrical Installations?
Bending conduit properly ensures safe wiring routes, protects cables, and complies with electrical codes. It prevents damage and maintains system integrity.
Conclusion
Mastering electrical conduit bending takes practice and patience. Start small and focus on basics. Use the right tools for accurate bends. Always measure twice to ensure precision. Safety should be your priority, so wear protective gear. Practice improves your skills over time.
Remember, neat bends make installations look professional. Stay patient, and soon bending will feel natural. Keep learning and refining your techniques. With dedication, you’ll handle conduit bending with ease. Your projects will look great, and you’ll feel proud of your work.
Stay safe, and happy bending!