Are you ready to transform your woodworking projects with stunning decorative edges? Carving decorative edges adds a unique touch that makes your pieces stand out.
Whether you’re a beginner or looking to sharpen your skills, this guide will walk you through simple steps to create beautiful, eye-catching designs. By the end, you’ll have the confidence to turn ordinary wood into extraordinary art. Keep reading, and discover how easy and rewarding carving decorative edges can be for your next project!

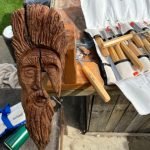
Credit: www.amazon.ca
Tools For Carving Edges
Carving decorative edges requires the right tools. Using proper tools makes your work easier and more precise.
This guide covers the basic tools, blade choices, and safety gear needed for carving edges well.
Essential Carving Tools
You need a few basic tools to start carving edges. These include carving knives, gouges, and chisels.
- Carving knives:Used for fine detail and smooth cuts.
- Gouges:Have curved blades to carve rounded edges.
- Chisels:Help make straight cuts and clean edges.
- Mallet:Used to tap chisels for deeper cuts.
- Sharpening stones:Keep blades sharp for better results.
Choosing The Right Blades
Select blades based on the shape and depth of the edges you want. Some blades work better for curves, others for straight lines.
| Blade Type | Use |
| Straight blade | Cutting straight edges |
| U-shaped gouge | Carving rounded grooves |
| V-shaped gouge | Making sharp angles and details |
| Skew chisel | Fine angled cuts and smooth finishes |
Safety Gear And Maintenance
Wear safety gear to protect yourself while carving. Keep your tools clean and sharp for safe use.
- Use cut-resistant gloves to protect your hands.
- Wear safety glasses to guard your eyes from chips.
- Keep blades sharp to reduce slipping and effort.
- Clean your tools after use to prevent rust.
- Store tools safely to avoid accidents.

Credit: www.schaaftools.com
Types Of Decorative Edges
Decorative edges add style to wood projects. They change simple wood into beautiful designs.
There are many types of edges to choose from. Each style creates a unique look.
Beveled Edges
Beveled edges have a slant cut at the wood’s edge. This angle softens the sharp corner.
This edge type looks clean and modern. It works well for tables and shelves.
Scalloped Edges
Scalloped edges have a series of curves along the edge. They look like waves or shells.
This style adds a classic and decorative touch. It is popular on furniture and frames.
Ogee And Cove Profiles
Ogee edges have an S-shaped curve. Cove edges have a simple concave curve.
Both profiles add elegance to wood pieces. They are common on cabinets and moldings.
Fluted And Reeded Patterns
Fluted edges have deep, rounded grooves. Reeded edges have narrow, rounded ridges.
These patterns add texture and depth. They work well on columns and decorative panels.
Preparing Your Workpiece
Carving decorative edges starts with good preparation. A well-prepared workpiece makes carving easier and safer.
Proper preparation helps you create clean, smooth edges that look beautiful. Follow these steps for the best results.
Selecting Suitable Wood
Choose wood that is easy to carve and holds details well. Softwoods like pine and basswood work well for beginners.
Hardwoods such as cherry and maple offer finer details but need sharper tools and more skill.
- Look for wood with straight grain and few knots
- Avoid wood that is cracked or warped
- Select a size that fits your carving design
Marking And Measuring
Mark your carving lines clearly before starting. Use a pencil or a marking knife for accuracy.
Measure twice to ensure your marks are in the right place. This helps avoid mistakes during carving.
- Use a ruler or measuring tape for straight edges
- Draw guide lines lightly to adjust if needed
- Mark the depth of cuts on the wood surface
Surface Preparation Techniques
Prepare the wood surface by sanding it smooth. This removes rough spots and dirt that can affect carving.
Start sanding with coarse grit sandpaper and finish with fine grit for a smooth feel.
- Remove dust and debris after sanding
- Check for any uneven spots and sand again
- Keep the surface clean to avoid tool slipping
Basic Carving Techniques
Carving decorative edges adds beauty to woodwork. Learning basic techniques helps you create clean and precise designs.
This guide covers how to hold tools, control carving depth, and use templates for better results.
Holding And Positioning
Hold your carving tools firmly but not too tight. Keep your hands steady to avoid slips. Position your workpiece so it stays stable while carving.
- Grip the handle near the blade for control
- Use your other hand to guide the tool
- Keep your fingers away from the cutting edge
- Secure the wood with clamps or a vise
Controlling Depth And Angle
Control the depth of each cut by adjusting the pressure on the tool. Keep the blade angle consistent to create smooth edges.
| Blade Angle | Effect |
| Shallow (15°-30°) | Light, fine cuts |
| Medium (30°-45°) | Moderate depth, smooth edges |
| Steep (45°-60°) | Deeper cuts, rough edges |
Using Templates And Guides
Templates help keep your designs uniform. Guides show where to carve and how deep to cut.
Common types of templates and guides include:
- Paper patterns taped to the wood surface
- Wooden or plastic stencil shapes
- Marking lines drawn with pencil or ruler
Advanced Carving Tips
Carving decorative edges needs skill and patience. These advanced tips help refine your work and improve results.
Focus on symmetry, texture, and fixing mistakes to make your carvings look clean and professional.
Creating Symmetry
Symmetry brings balance to your design. Use guides and measuring tools to keep edges even on both sides.
- Draw light pencil marks for reference points.
- Use a ruler or caliper to check distances.
- Carve small sections on one side, then match on the other.
- Step back often to view the whole piece.
- Make small adjustments to correct uneven areas.
Adding Texture And Detail
Texture adds depth and interest. Use different tools to create varied effects on the edges.
| Tool | Effect | Tip |
|---|---|---|
| Veiner | Thin grooves | Use light pressure for fine lines |
| V-tool | Sharp angles | Carve at consistent angles for uniformity |
| Chip carving knife | Small chips | Remove tiny wood pieces slowly |
| Texturing tool | Rough surfaces | Tap gently to avoid deep cuts |
Correcting Mistakes
Fix errors quickly to keep your design clean. Small mistakes can ruin the look if not handled well.
Try these corrections:
- Sand rough edges gently with fine-grit sandpaper.
- Fill deep cuts with wood filler and let dry before carving again.
- Use a sharp blade to carefully trim excess wood.
- Apply a light finish to hide minor scratches.
Finishing Your Edges
Carving decorative edges adds charm to your wood projects. Finishing these edges well protects the wood and shows off your work.
Proper finishing helps the edges last longer and look smooth. It also makes the details stand out beautifully.
Sanding And Smoothing
Sanding removes rough spots and sharp bits on your carved edges. Use fine sandpaper to make the surface smooth to the touch.
Move the sandpaper gently along the curves and corners. Take care not to sand away the details you carved.
- Start with medium grit sandpaper (around 120 grit)
- Finish with fine grit sandpaper (220 grit or higher)
- Use a sanding sponge for curved edges
- Wipe away dust with a dry cloth before finishing
Applying Stains And Sealants
Stains add color and bring out the wood’s natural grain. Apply stain evenly along the carved edges for a uniform look.
Sealants protect the wood from moisture and dirt. Choose a clear finish to keep the natural look or a glossy one for shine.
- Use a brush or cloth to apply stain carefully
- Let the stain dry fully before sealing
- Apply sealant in thin, even coats
- Allow sealant to dry between coats for best protection
Highlighting Details With Paint
Paint helps your carved edges stand out by adding contrast. Use small brushes to paint fine details without covering the whole edge.
Choose colors that match your design and style. You can paint just the raised parts or the carved patterns for emphasis.
- Use acrylic or wood paint for good coverage
- Apply paint with a fine-tipped brush for precision
- Let the paint dry before handling the piece
- Seal painted areas with a clear coat to protect them
Common Challenges
Carving decorative edges can be tricky. Woodworkers often face issues that slow their progress. Understanding these common challenges helps improve skills and results.
This guide covers key problems such as avoiding splinters and cracks, working with hardwoods, and keeping a consistent design.
Avoiding Splinters And Cracks
Splinters and cracks weaken the edge and spoil the look. Preventing them starts with choosing the right tools and technique.
- Use sharp carving knives or chisels to cut cleanly.
- Carve with the wood grain, not against it.
- Make shallow cuts to avoid stressing the wood.
- Keep wood moist by lightly spraying water if it feels dry.
- Sand edges gently after carving to smooth rough spots.
Dealing With Hardwoods
Hardwoods are tough but offer beautiful finishes. They demand more effort and care during carving.
| Hardwood Type | Difficulty Level | Tip |
| Oak | High | Use sharp tools and take breaks to avoid fatigue. |
| Maple | Medium | Apply steady pressure and keep tools sharp. |
| Cherry | Medium | Carve slowly to prevent burning the wood. |
| Walnut | Low | Work with the grain to reduce resistance. |
Maintaining Consistency
Consistent edges look professional. It takes focus and steady hands to keep your design even.
Try this checklist to keep your edges uniform:
- Mark your design clearly on the wood.
- Use measuring tools like rulers or calipers.
- Carve slowly and check progress often.
- Keep your tools clean and sharp.
- Practice the pattern on scrap wood first.
Inspiration And Design Ideas
Carving decorative edges adds charm to furniture and wood pieces. It lets you express style and skill in your work.
Explore different designs to find the perfect look. Use classic shapes or try fresh, modern styles for variety.
Classic Styles
Classic carved edges often feature smooth curves and repeating patterns. These styles bring a timeless feel to woodwork.
- Beaded edges for a simple, elegant line
- Ogee curves that combine concave and convex shapes
- Fluted designs with vertical grooves
- Scalloped edges for a soft, wavy outline
Modern Interpretations
Modern carved edges often use clean lines and geometric shapes. These designs give a fresh look to traditional carving.
| Design | Description |
| Sharp Angles | Edges cut at precise angles for a bold style |
| Minimalist Grooves | Simple, shallow lines for subtle detail |
| Abstract Shapes | Non-traditional forms creating unique textures |
Mixing Patterns
Combining different carving patterns can add depth and interest. Use this to create custom, eye-catching edges.
Try mixing patterns like these:
- Start with a smooth ogee curve
- Add a thin beaded line inside the curve
- Finish with small fluted grooves at the edge
This mix creates a layered, detailed effect.

Credit: www.schaaftools.com
Frequently Asked Questions
What Tools Are Best For Carving Decorative Edges?
The best tools include chisels, gouges, and carving knives. Use fine-toothed saws for initial cuts. Always choose sharp, quality tools for precision and safety.
How Do I Prepare Wood For Carving Edges?
Sand the wood surface smooth and remove dust. Mark your design clearly with a pencil. Secure the wood firmly to prevent movement during carving.
Which Wood Types Suit Decorative Edge Carving?
Softwoods like pine and basswood are easier for beginners. Hardwoods like oak and maple offer durable, detailed finishes but require more skill.
What Techniques Improve Decorative Edge Carving Accuracy?
Use steady, controlled cuts and follow your marked design. Work slowly to avoid mistakes and sharpen tools regularly for clean edges.
Conclusion
Carving decorative edges adds charm to any project. Simple tools can create intricate designs. Practice makes each cut better. Start with easy patterns, then try more complex ones. Enjoy the process and see creativity bloom. Safety is key, so handle tools with care.
Share your creations with friends and family. They’ll appreciate the artistry. Remember, patience is important. Each piece tells a story. Your carved edges will impress and inspire. Keep exploring new techniques. The journey is as rewarding as the result. Happy carving!