Are you tired of your table saw not performing at its best? Or perhaps you’re noticing a build-up of sawdust and grime that’s hard to ignore?
Keeping your table saw clean is crucial for both its longevity and your safety. In this guide, you’ll discover simple yet effective cleaning techniques that will transform your woodworking experience. Imagine the satisfaction of working with a tool that runs smoothly and efficiently, just like new.
Keep reading, and you’ll learn how to make that a reality with easy steps and practical tips. Your table saw will thank you, and so will your future projects!
Preparing Your Table Saw For Cleaning
Cleaning your table saw keeps it working well and lasts longer. Preparing it correctly makes the job easier and safer.
Before you start, you need to gather tools and follow safety steps. These will help protect you and your saw.
Gathering Necessary Tools
Collect all tools before cleaning your table saw. This saves time and stops interruptions.
- A soft brush to remove sawdust
- Clean cloths for wiping surfaces
- Compressed air can to blow out dust
- Vacuum cleaner with a hose
- Lubricant for moving parts
- Protective gloves to keep hands safe
Safety Precautions To Follow
Follow safety rules to avoid accidents. Always make sure the saw is powered off before cleaning.
| Safety Step | Why It Is Important |
| Unplug the table saw | Prevents accidental starts |
| Wear safety gloves | Protects hands from sharp parts |
| Use eye protection | Stops dust and debris from entering eyes |
| Clean in a well-lit area | Makes it easier to see dirt and hazards |
| Keep children and pets away | Avoids distractions and injuries |
:max_bytes(150000):strip_icc()/101765934-d98d510ef107470f838ef4a7628ab9da.jpg)
Credit: www.woodmagazine.com
Removing The Blade And Components
Cleaning your table saw is important for safety and performance. Removing the blade and related parts lets you clean deeply. This guide helps you remove these parts safely and easily.
Before starting, always unplug the saw to avoid accidents. Use proper tools and follow the steps below carefully.
Detaching The Blade Guard And Fence
The blade guard and fence block access to the saw blade. Removing them first makes cleaning easier. Most models use screws or levers to hold these parts.
- Locate the screws or clamps holding the blade guard in place.
- Use a screwdriver or release the clamps carefully.
- Lift off the blade guard and set it aside.
- Find the fence locking mechanism on the saw table.
- Unlock or loosen the fence to slide it away from the blade.
- Remove the fence completely if possible for better cleaning access.
Removing The Saw Blade Safely
Removing the blade requires care to avoid injury. Follow these steps to take out the blade safely.
| Action | Details |
|---|---|
| Unplug the saw | Ensure no power is connected to prevent accidents. |
| Engage the blade lock | Press the blade lock button or use a wedge to stop blade movement. |
| Loosen arbor nut | Use a wrench to turn the arbor nut counterclockwise. |
| Remove the blade | Carefully lift the blade off the arbor, holding edges with gloves. |
| Store blade safely | Place the blade in a secure spot to protect its teeth and yourself. |
Cleaning The Saw Blade
Cleaning the saw blade keeps your table saw working well. A clean blade cuts smoothly and lasts longer.
Dirt and resin can build up on the blade. This guide helps you clean it safely and well.
Choosing The Right Cleaning Solutions
Pick cleaning solutions made for saw blades. Avoid strong acids or harsh chemicals. These can damage the blade.
- Use mild dish soap mixed with warm water
- Try specialized blade cleaners from hardware stores
- Use mineral spirits for tough resin build-up
- Test any cleaner on a small blade area first
Techniques For Removing Resin And Pitch
Resin and pitch can stick tightly to the blade. Use soft tools to avoid scratches.
| Tool | Use |
| Soft brush | Scrub away loosened resin |
| Plastic scraper | Remove thick pitch |
| Cloth rag | Wipe blade clean |
| Steel wool (fine) | Use gently for stubborn spots |
Drying And Inspecting The Blade
After cleaning, dry the blade well to stop rust. Check the blade for damage or dull teeth.
- Use a dry cloth to remove all moisture
- Look for cracks, chips, or bent teeth
- Replace or sharpen the blade if needed
- Store blade in a dry place
Cleaning The Table Surface And Components
Keeping your table saw clean helps it work better and last longer. Dust and debris can slow down the blade and cause problems.
Regular cleaning protects the table saw parts and keeps your work safe. Focus on the table surface and key components.
Removing Dust And Debris
Dust and debris build up around the blade and on the table surface. They can stop the blade from cutting smoothly.
Use a brush or vacuum to remove dust. Clean around the blade guard and inside the table slots.
- Unplug the saw before cleaning
- Brush off sawdust from the table surface
- Vacuum dust near the blade and motor
- Clear debris from slots and crevices
Lubricating Moving Parts
Moving parts need oil or grease to work well. Lubrication stops parts from wearing out fast.
Apply lubricant to the gears, trunnions, and pivot points. Avoid using too much oil to keep dust away.
- Use saw-specific lubricants only
- Apply to elevation and tilt mechanisms
- Wipe off extra lubricant after applying
- Lubricate regularly to maintain smooth motion
Checking And Cleaning The Motor Housing
The motor housing can fill with dust and reduce motor cooling. This can cause the motor to overheat.
Open the motor cover if possible and blow out dust using compressed air. Do this gently to avoid damage.
- Unplug the saw before opening the motor housing
- Use low-pressure compressed air to clean inside
- Check for loose wires or damage while cleaning
- Keep the motor area dry and dust-free
Reassembling And Testing The Saw
After cleaning your table saw, you need to put all parts back carefully. This helps keep the saw safe and working well. Testing the saw after reassembly checks if everything fits and runs correctly.
Follow each step slowly and carefully to avoid mistakes. Proper reassembly keeps you safe and your saw working longer.
Reinstalling The Blade And Guards
Put the blade back onto the arbor carefully. Make sure the teeth face the right direction. Then, tighten the blade nut firmly but do not overtighten.
- Place the blade on the arbor with teeth facing forward.
- Slide on the washer and blade flange.
- Tighten the blade nut with the correct wrench.
- Reattach the blade guard and riving knife.
- Check all bolts and screws for tightness.
Performing A Function Test
Test the saw to make sure all parts work well after cleaning. Check the blade movement and safety features. Do not run the saw without all guards in place.
| Test | What to Check | Result Needed |
| Blade Spin | Blade spins smoothly without wobble | Blade spins steady and true |
| Blade Guard | Guard moves freely and covers blade | Guard stays in place and moves easily |
| Power On | Saw starts and stops properly | Saw powers on quickly and stops safely |
| Safety Switch | Switch works to cut power quickly | Power cuts off instantly when switched off |

Credit: www.familyhandyman.com
Maintenance Tips For Longevity
Keeping your table saw clean helps it last longer and work better. Dirt and debris can cause damage over time.
Regular care prevents costly repairs and keeps your saw safe to use. Follow simple cleaning steps often.
Routine Cleaning Schedule
Clean your table saw after every use to remove dust and wood chips. This stops buildup on moving parts.
Check the blade, table surface, and motor area. Use a brush or vacuum for tight spots.
- Remove the blade guard and clean under it
- Wipe the table surface with a dry cloth
- Use compressed air to clear dust from the motor
- Lubricate moving parts monthly to keep them smooth
Preventing Rust And Corrosion
Rust can damage your saw and reduce accuracy. Keep metal parts dry and protected.
Apply a thin coat of wax or oil to the table and blade regularly. This blocks moisture from settling.
- Use a rust inhibitor spray on exposed metal
- Store the saw in a dry area to avoid humidity
- Wipe off any water or spills immediately
- Cover the saw with a cloth or plastic cover
Storage Recommendations
Store your table saw in a clean, dry place to protect it from dust and moisture. This helps keep parts working well.
Keep the saw covered and away from heavy traffic areas. This prevents accidental damage.
- Use a dust cover or tarp over the saw
- Keep the saw on a stable surface or stand
- Store blades separately in a safe place
- Check the saw monthly for any signs of wear or rust
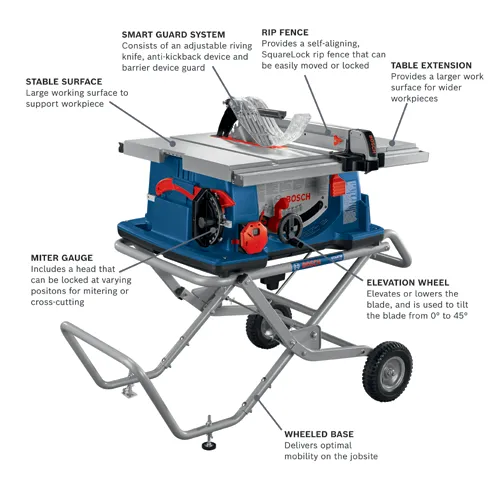
Credit: www.boschtools.com
Frequently Asked Questions
How Often Should I Clean My Table Saw?
You should clean your table saw after every use or at least once a week. Regular cleaning prevents dust buildup and ensures smooth operation.
What Tools Do I Need To Clean A Table Saw?
Essential tools include a brush, vacuum, compressed air, and a soft cloth. These help remove dust and debris without damaging the saw.
How Do I Safely Clean The Table Saw Blade?
Unplug the saw before cleaning. Use a brush and mild cleaner to remove resin and pitch from the blade carefully.
Can I Use Compressed Air To Clean My Table Saw?
Yes, compressed air is effective for removing dust in tight spaces. Use it cautiously to avoid spreading dust into the air.
Conclusion
Cleaning your table saw keeps it working well and safe. Regular care stops dust and debris from building up. Simple steps like wiping and checking parts make a big difference. A clean saw cuts better and lasts longer. Keep your workspace tidy to avoid accidents.
Taking time to clean helps you work with ease. Small efforts now save problems later. Stay consistent and enjoy smooth, safe cuts every time.