Are you looking to master the art of crimping electrical terminals? Whether you’re a DIY enthusiast, a budding electrician, or someone who loves to tinker with gadgets, knowing how to crimp electrical terminals is a valuable skill.
It can make your electrical connections safer, more reliable, and efficient. Imagine having the confidence to tackle electrical projects with ease and precision. In this guide, you’ll discover the secrets to perfect crimping and learn tips that will make your work stand out.
Get ready to elevate your skills and ensure your connections are always secure. Let’s dive into the essentials that will empower you to handle electrical terminals like a pro.

Credit: www.icrimptools.com
Types Of Electrical Terminals
Electrical terminals connect wires to devices or other wires. They make sure the connection is safe and strong.
Different terminals work best for different jobs. Knowing types helps you pick the right one.
Ring Terminals
Ring terminals have a round metal ring at one end. You put a screw through the ring to connect it firmly.
They hold wires tightly and stop them from slipping off. They are good for permanent connections.
- Used in car wiring and electrical panels
- Works well with screws and bolts
- Provides strong and secure connections
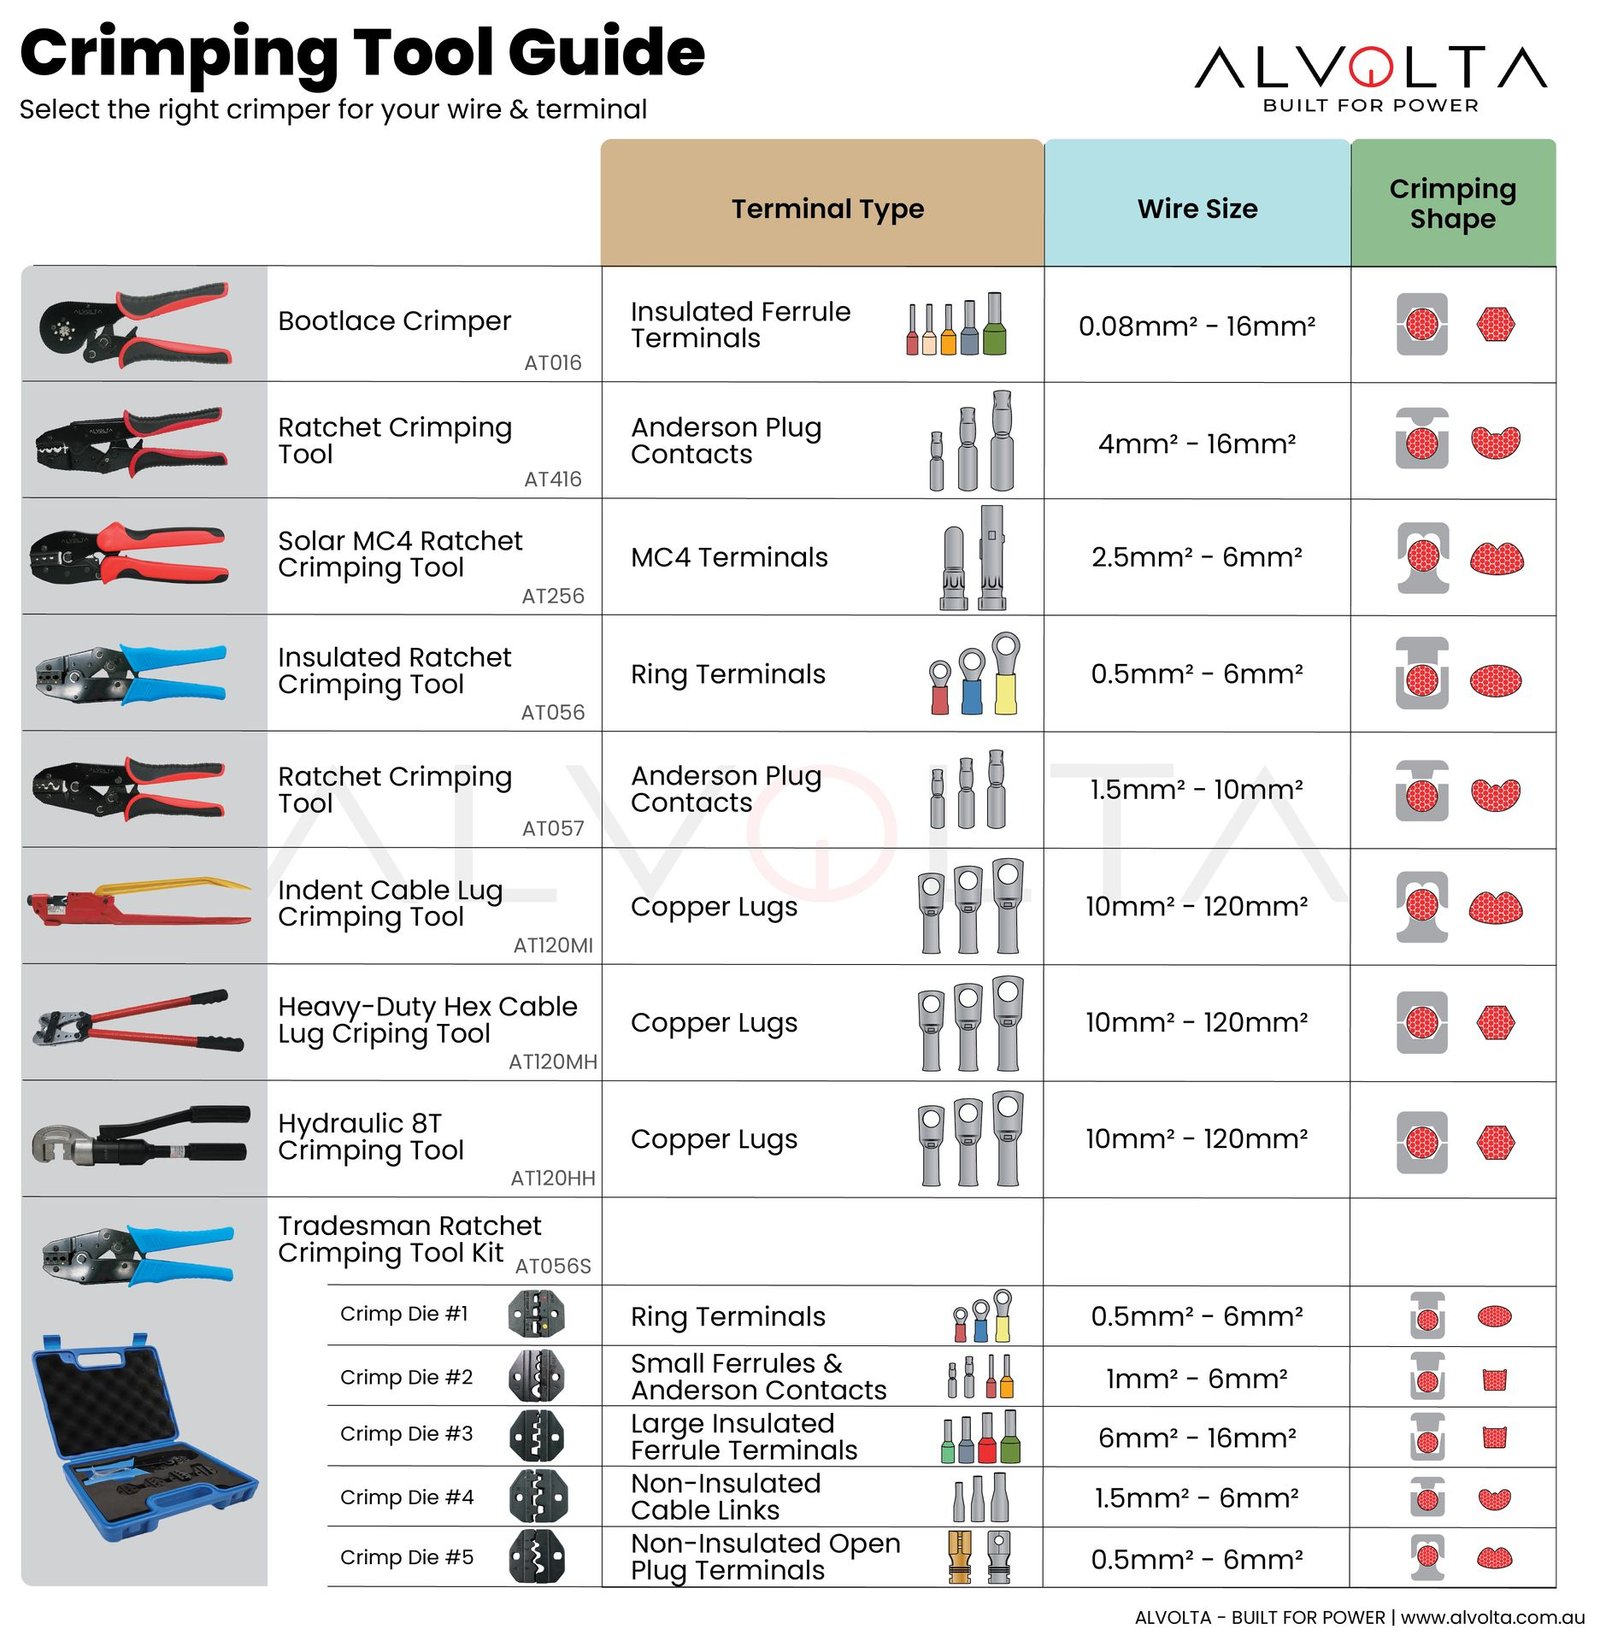
Spade Terminals
Spade terminals have a forked shape. This shape lets you slide them under a screw without removing the screw fully.
They are easy to connect and disconnect. Good for quick repairs and changes.
- Fits tight spaces
- Used in home and automotive wiring
- Offers easy removal and replacement
Butt Connectors
Butt connectors join two wires end-to-end. They create a continuous path for electricity.
You insert wires on each side and crimp to hold them together. They work well for wire repairs.
- Used to extend wire length
- Common in electrical repairs
- Ensures a neat and strong connection
Quick Disconnects
Quick disconnects let you connect and disconnect wires fast. They have a male and female part that snap together.
They are handy for parts that need to be removed often. Used in appliances and vehicles.
- Allows fast wire connection
- Prevents damage from frequent disconnection
- Available in different sizes and types
Credit: sanaco.com.sa
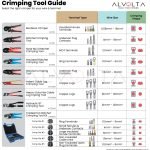
Choosing The Right Tools
Crimping electrical terminals needs the right tools to work well. Using proper tools helps make safe and strong connections.
This guide explains key tools like crimping pliers, wire strippers, heat shrink tubing, and multimeters. Learn what each tool does and why it matters.
Crimping Pliers
Crimping pliers join terminals and wires by pressing them tightly. Choose pliers that fit the terminal size. Good pliers give a firm, even crimp without damaging the wire.
- Pick pliers with adjustable pressure settings.
- Look for insulated handles for safety.
- Check if the pliers match the terminal type.
- Use ratcheting pliers for consistent crimps.
Wire Strippers
Wire strippers remove insulation from wires without cutting the metal inside. Choose strippers with multiple gauge sizes to fit different wires. A clean strip helps a better crimp.
| Feature | Why It Matters |
| Adjustable gauge settings | Fits various wire sizes accurately |
| Sharp blades | Cleanly remove insulation without damage |
| Comfort grips | Reduce hand strain during work |
| Spring-loaded design | Makes stripping easier and faster |
Heat Shrink Tubing
Heat shrink tubing protects and insulates the crimped connection. Choose tubing that fits snugly over the terminal and wire. It shrinks when heated to seal the joint.
- Select tubing with the right diameter for your wire.
- Use tubing with good heat resistance.
- Clear tubing helps inspect the connection.
- Buy tubing in various lengths for flexibility.
Multimeters
Multimeters test electrical connections. They check voltage, current, and resistance. Use a multimeter to confirm the crimp works well and the circuit is safe.
| Multimeter Feature | Purpose |
|---|---|
| Continuity Test | Checks if connection allows current flow |
| Voltage Measurement | Measures electrical potential |
| Resistance Measurement | Tests connection resistance for faults |
| Auto-Ranging | Automatically selects correct measurement range |
Preparing Wires For Crimping
Preparing wires correctly is key to making strong electrical connections. Good preparation helps the crimp hold tightly and last longer.
This guide covers three important steps: stripping wire insulation, twisting wire strands, and selecting the correct wire gauge.
Stripping Wire Insulation
Remove the wire insulation carefully to avoid cutting the wire strands. Use a wire stripper that matches the wire size. Strip only enough insulation to fit into the terminal.
Twisting Wire Strands
After stripping, twist the wire strands tightly. This keeps the strands together and makes it easier to insert into the terminal. Twisting also improves the electrical contact.
- Hold the stripped wire firmly
- Use your fingers or pliers to twist strands clockwise
- Twist until strands are tight and neat
- Avoid over-twisting to prevent breaking wires
Selecting Correct Wire Gauge
Choose the right wire gauge for your terminal and current load. Using the wrong gauge can cause a poor connection or overheating.
| Wire Gauge | Common Terminal Size | Max Current (Amps) |
| 22 AWG | Small | 7 |
| 18 AWG | Medium | 16 |
| 14 AWG | Large | 32 |
Crimping Techniques
Crimping electrical terminals ensures a secure connection. Using the right techniques improves safety and performance.
Following simple steps can help you achieve strong and reliable crimps every time.
Proper Wire Insertion
Insert the wire fully into the terminal barrel. The wire strands must be inside the metal part for a good connection.
- Strip the wire to the correct length
- Make sure no strands are cut or damaged
- Check that the wire fits snugly in the terminal
- Do not let any wire strands extend outside the barrel
Applying Even Pressure
Use a proper crimping tool to apply steady, even pressure. Uneven force can cause weak or damaged crimps.
| Crimping Tool | Purpose | Pressure Type |
| Handheld Crimper | Small terminals | Manual, even pressure |
| Hydraulic Crimper | Large cables | High, controlled pressure |
| Ratchet Crimper | Precision crimps | Consistent pressure |
Checking The Crimp Quality
Inspect each crimp to ensure a strong connection. A good crimp looks tight and uniform without damage.
- The terminal should not move on the wire
- Look for clean, smooth indentations from the crimp tool
- Check for any broken wire strands
- Test the connection by gently pulling the wire
Common Mistakes To Avoid
Crimping electrical terminals is a key step in wiring. Doing it wrong can cause bad connections and safety issues.
Learn about common mistakes people make when crimping terminals. Avoid these errors for better results.
Overcrimping Or Undercrimping
Applying too much pressure can damage the terminal and wire. This is called overcrimping.
Using too little pressure causes a weak connection. This is undercrimping.
- Overcrimping can cut wire strands or deform terminals.
- Undercrimping lets the wire slip out easily.
- Both lead to poor electrical contact and possible failure.
Using Incorrect Terminal Size
Choosing the wrong terminal size causes connection problems. Too large or too small terminals do not fit well.
Incorrect size leads to loose or tight fits that harm the wire and terminal.
- Terminal too big: loose connection and poor conductivity.
- Terminal too small: damages wire strands or terminal body.
- Always match terminal size to wire gauge for secure crimping.
Neglecting Wire Preparation
Not preparing the wire properly before crimping causes weak joints. Remove insulation fully and clean the wire.
Cut wire ends straight and avoid damaged strands for better contact.
- Strip insulation to the right length for the terminal.
- Twist wire strands tightly to prevent fraying.
- Check for corrosion or dirt before crimping.
Testing Crimped Connections
Testing crimped connections ensures they work safely and last long. It helps find weak crimps before use.
There are simple tests to check strength and electrical flow in crimps. Each test shows a different problem.
Visual Inspection
Look closely at the crimp for any visible damage. Check if the wire is fully inside the terminal.
Good crimps have no cracks, gaps, or loose strands. The metal should be tight and smooth around the wire.
- Check wire is fully inserted
- Look for cracks or dents
- Ensure metal wraps tightly
- Confirm no wire strands are outside
Pull Test
Pull the wire gently to test the crimp’s grip. The wire should not pull out or move.
Apply steady force by hand or use a pull tester tool. If the wire slips, the crimp is weak.
- Hold the terminal firmly
- Pull the wire straight out
- Watch for any loosening
- Repeat test if unsure
Electrical Continuity Test
Use a multimeter to check if electricity flows through the crimp. This test shows if the connection is good.
Set the meter to continuity mode and place probes on each side of the crimp. A beep or low reading means good flow.
- Turn on the multimeter
- Set to continuity or resistance
- Place probes on wire and terminal
- Listen for beep or check low resistance
Maintaining Crimping Tools
Keeping crimping tools in good condition is important. It helps make safe and strong electrical connections.
Regular care makes tools last longer and work better every time you use them.
Cleaning And Lubrication
Clean your crimping tools after each use. Remove dirt, dust, and any leftover materials.
Use a soft cloth and mild cleaner. Avoid harsh chemicals that can damage the tool.
- Wipe jaws and handles carefully
- Use light oil on moving parts
- Do not over-lubricate to avoid attracting dirt
Regular Calibration
Check your crimping tools often to make sure they crimp correctly. Calibration keeps the pressure accurate.
If the tool crimps too loose or too tight, it can cause bad connections. Fix this by adjusting or calibrating the tool.
- Test crimp strength on sample terminals
- Use a calibration gauge if available
- Follow the tool manufacturer’s calibration guide
Proper Storage
Store crimping tools in a dry, clean place. This stops rust and damage.
Keep tools in a case or toolbox to protect them from dust and accidents.
- Use a tool pouch or box
- Keep tools away from moisture
- Do not drop or throw tools

Credit: xbcomponents.com
Frequently Asked Questions
What Tools Are Needed For Crimping Electrical Terminals?
You need a crimping tool, wire stripper, and the correct terminals. Quality tools ensure strong, reliable connections. Choosing the right tool size prevents damage to wires and terminals. Proper tools improve safety and durability in electrical work.
How Do You Choose The Right Terminal For Crimping?
Select terminals based on wire gauge and application type. Match terminal size to wire thickness for a secure fit. Consider the terminal’s insulation and material quality. Proper selection prevents poor connections and potential electrical failures.
What Is The Correct Crimping Technique For Terminals?
Strip the wire to the proper length before inserting it. Place the terminal in the crimping tool’s correct slot. Apply firm, even pressure until the terminal is securely attached. Avoid over-crimping to prevent wire damage or loose connections.
Can Crimped Terminals Be Reused Safely?
No, crimped terminals should not be reused. Removing a crimped terminal damages its integrity and connection strength. Always use new terminals for each crimp to ensure safety and reliability in electrical systems.
Conclusion
Proper crimping ensures safe and strong electrical connections. Using the right tools makes the job easier and more reliable. Always check your work to avoid loose or weak crimps. Practice helps improve your technique and confidence. This guide helps you handle terminals with care and skill.
Keep safety first and follow each step closely. Good crimps lead to better performance and fewer problems. Take your time and do it right every time.