
Are you tired of that leaky faucet or ready to upgrade your sink with a stylish new tap? Installing a faucet yourself might seem tricky, but with the right steps, you can do it quickly and confidently.
This guide to installing faucets will walk you through every part of the process, saving you time and money. By the end, you’ll know exactly what to do to get your faucet working perfectly. Keep reading—you’re just a few easy steps away from a fresh, functional sink!

Credit: manuals.plus
Choosing The Right Faucet
Picking the right faucet is important for your kitchen or bathroom. It affects how your sink looks and works.
This guide helps you choose a faucet that fits your style and needs.
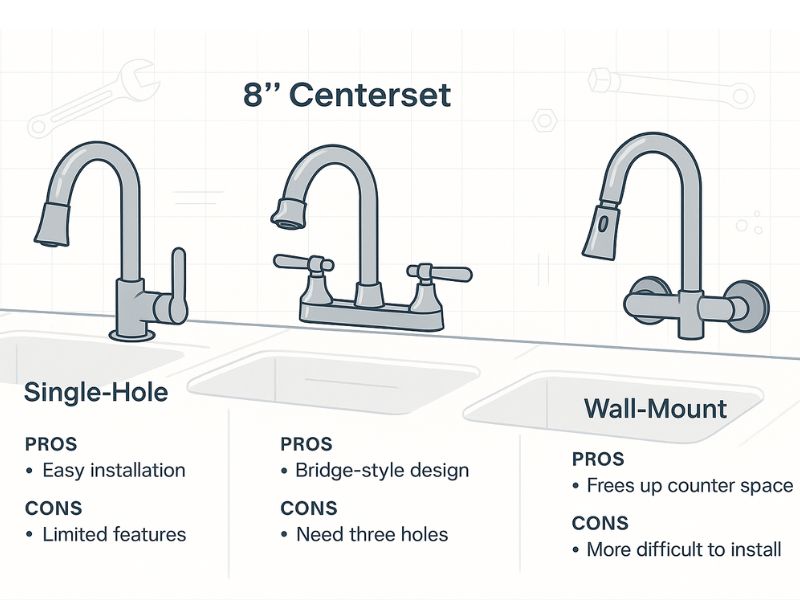
Types Of Faucets
There are many faucet types. Each type has different features and ways to use.
- Single-handle faucets control water with one lever.
- Double-handle faucets have separate controls for hot and cold water.
- Pull-out faucets have a spray head that pulls out for easy use.
- Wall-mounted faucets are fixed on the wall above the sink.
- Touchless faucets use sensors to turn water on and off without touching.
Materials And Finishes
| Material | Durability | Look |
| Brass | High | Classic and shiny |
| Stainless Steel | Very High | Modern and sleek |
| Plastic | Low | Simple and cheap |
| Chrome Finish | Medium | Bright and reflective |
| Matte Black | High | Bold and stylish |
Choose a material that lasts and fits your sink style.
Measuring For A Perfect Fit
Measure your sink and space before buying a faucet. This helps avoid mistakes.
- Measure the number of faucet holes on your sink.
- Check the distance between these holes.
- Measure the height and reach of the faucet spout.
- Consider the space under the sink for connections.
- Think about how you use the sink for easier access.
Gathering Tools And Materials
Installing a faucet needs the right tools and materials. Getting everything ready helps the job go smoothly.
This guide will help you gather what you need before starting the faucet installation.
Essential Tools
You need some basic tools to install a faucet correctly. These tools help you fit and secure parts tightly.
- Adjustable wrench for tightening nuts and bolts
- Basin wrench to reach hard spots under the sink
- Screwdriver for screws on faucet parts
- Plumber’s tape to seal pipe threads
- Utility knife for cutting old sealant or tape
- Bucket to catch water when disconnecting pipes
Additional Supplies
Besides tools, you need some supplies to ensure a good faucet installation. These supplies help create tight seals and protect surfaces.
- New faucet with all included parts
- Plumber’s putty for sealing around the faucet base
- Teflon tape for thread sealing
- Cleaning cloth to wipe surfaces
- Replacement washers or gaskets if needed
- Flashlight to see under the sink clearly
Safety Precautions
Safety is important when installing a faucet. Follow these precautions to avoid accidents and damage.
- Turn off the water supply before starting work
- Wear gloves to protect your hands from sharp edges
- Use eye protection to avoid splashes or debris
- Keep the work area dry to prevent slips
- Use tools carefully to avoid injury
- Check for leaks after installation to prevent water damage
Preparing The Installation Area
Preparing the installation area is key before you install a new faucet. It helps ensure a smooth and safe process.
Follow these steps carefully to get your sink ready for the new faucet.
Shutting Off Water Supply
Turn off the water supply to stop water flow. This prevents leaks and water damage during installation.
- Locate the shutoff valves under the sink.
- Turn the valves clockwise to close them.
- Open the faucet to drain any water left in the pipes.
Removing Old Faucet
Carefully remove the old faucet to avoid damage to your sink or plumbing.
- Use a wrench to loosen the nuts under the sink.
- Disconnect the water supply lines from the faucet.
- Lift the old faucet off the sink carefully.
- Keep all parts in case you need them later.
Cleaning The Sink Surface
Clean the sink surface to remove old grime and sealant. This helps the new faucet fit well and seals properly.
| Cleaning Step | Tools Needed | Purpose |
|---|---|---|
| Remove old sealant | Putty knife or scraper | Clear the surface for new sealing |
| Clean surface | Soap, water, cloth | Remove dirt and grease |
| Dry area | Clean towel | Ensure no moisture remains |

Credit: www.numberanalytics.com
Installing The New Faucet
Installing a new faucet can improve your sink’s look and function. It is important to follow the right steps for a secure fit and leak-free use.
This guide covers the key parts of installation: positioning the faucet, securing the hardware, and connecting water lines.
Positioning The Faucet
Place the faucet over the sink holes carefully. Make sure it fits flat and lines up with the holes correctly.
Check for any gaps or uneven spaces before tightening the faucet down.
Securing Mounting Hardware
Use the mounting nuts and washers to hold the faucet firmly. Tighten them by hand first, then use a wrench.
- Place the rubber gasket or trim ring under the faucet base.
- Slide the mounting nuts onto the faucet tailpieces.
- Tighten nuts evenly to avoid tilting the faucet.
- Check the faucet is stable and does not move.
Connecting Water Lines
Attach the hot and cold water supply lines to the faucet connectors. Make sure to match the hot line to the hot valve and cold line to the cold valve.
| Connection | Action | Tip |
|---|---|---|
| Hot Water Line | Connect to the left faucet inlet | Use plumber’s tape for a tight seal |
| Cold Water Line | Connect to the right faucet inlet | Hand tighten, then use wrench carefully |
| Check for Leaks | Turn on water and inspect all joints | Retighten if needed, but avoid over-tightening |
Testing And Adjustments
After installing a faucet, it is important to test and adjust it. This ensures the faucet works correctly and prevents damage.
Testing helps find leaks, and adjusting controls water flow and temperature. Follow these steps carefully.
Turning On Water Supply
Open the water supply valves slowly. This lets water flow into the faucet without sudden pressure.
Watch and listen for any unusual noises. These can mean a problem with the installation.
Checking For Leaks
Look carefully under the sink and around the faucet base. Check all connections for water drops or wet spots.
- Check supply lines for drips
- Inspect faucet joints and handles
- Look for water pooling under the sink
If you find leaks, tighten connections or replace faulty parts. Fixing leaks early saves water and damage.
Adjusting Water Flow And Temperature
Test the faucet handles to set water flow. Turn handles slowly to find a comfortable flow rate.
Adjust the hot and cold water mix to get the right temperature. Avoid water that is too hot to prevent burns.
- Turn handles to check water pressure
- Mix hot and cold water carefully
- Test water temperature with your hand
Maintenance Tips For Longevity
Keeping your faucet in good shape saves money and time. Regular care helps avoid leaks and damage.
Follow simple maintenance steps to extend the life of your faucet. This guide covers cleaning, mineral buildup, and part replacement.
Regular Cleaning
Clean your faucet weekly with a soft cloth and mild soap. Avoid harsh chemicals that can damage the finish.
- Wipe water spots to prevent stains
- Dry the faucet after use to avoid corrosion
- Use a toothbrush for hard-to-reach areas
- Polish with a non-abrasive cleaner if needed
Preventing Mineral Buildup
Mineral deposits block water flow and damage parts. Use vinegar or a commercial remover to clean buildup.
| Method | Instructions |
|---|---|
| Vinegar Soak | Soak a cloth in vinegar, wrap around faucet, leave 30 minutes, then scrub gently. |
| Brush Cleaning | Use a soft brush to remove loosened minerals after soaking. |
| Commercial Remover | Apply as directed on product label for tough buildup. |
When To Replace Parts
Replace parts if you notice leaks, low water pressure, or worn handles. Timely replacement prevents bigger damage.
- Check washers and O-rings every six months
- Replace cartridges if water flow is uneven
- Change aerators to improve water spray
- Consult a professional if unsure about part replacement
Credit: www.faucetproducer.com
Frequently Asked Questions
How Do I Install A Kitchen Faucet Step-by-step?
First, turn off the water supply. Remove the old faucet carefully. Attach the new faucet and secure it tightly. Connect water supply lines and check for leaks. Finally, turn on the water supply to test the installation.
What Tools Are Needed For Faucet Installation?
You will need an adjustable wrench, basin wrench, plumber’s tape, screwdriver, bucket, and cleaning cloth. These tools help remove the old faucet and securely install the new one without leaks.
How Long Does Faucet Installation Usually Take?
Faucet installation typically takes 30 to 60 minutes. Time depends on faucet type and plumbing complexity. Proper preparation and tools can speed up the process efficiently.
Can I Install A Faucet Myself Without A Plumber?
Yes, with basic plumbing knowledge and tools, DIY installation is possible. Follow instructions carefully, turn off water supply, and test for leaks after installation. Consider professional help if unsure.
Conclusion
Installing a faucet can be simple. Follow the steps and guidelines given. Ensure all tools are ready. Check for leaks after installation. Tighten connections securely. You can do it with patience and care. Save money by doing it yourself. Enjoy your new, functional faucet.
Regular maintenance will keep it working well. Always read the manufacturer’s instructions. Practice makes perfect in home improvement tasks. Happy plumbing!
