Are you ready to transform your woodworking projects with precision and style? Operating a miter saw for angled wood cuts can seem daunting at first, but mastering this tool is the key to unlocking a world of crafting possibilities.
Whether you’re a seasoned DIY enthusiast or just starting your journey into woodworking, understanding how to use a miter saw effectively can save you time and elevate your craftsmanship. Imagine the satisfaction of creating flawless angled cuts that fit together seamlessly, like pieces of a puzzle.
Intrigued? Stick with us as we unveil the secrets to operating a miter saw with confidence, ensuring that every project you undertake is a masterpiece in the making.

Credit: www.findbuytool.com
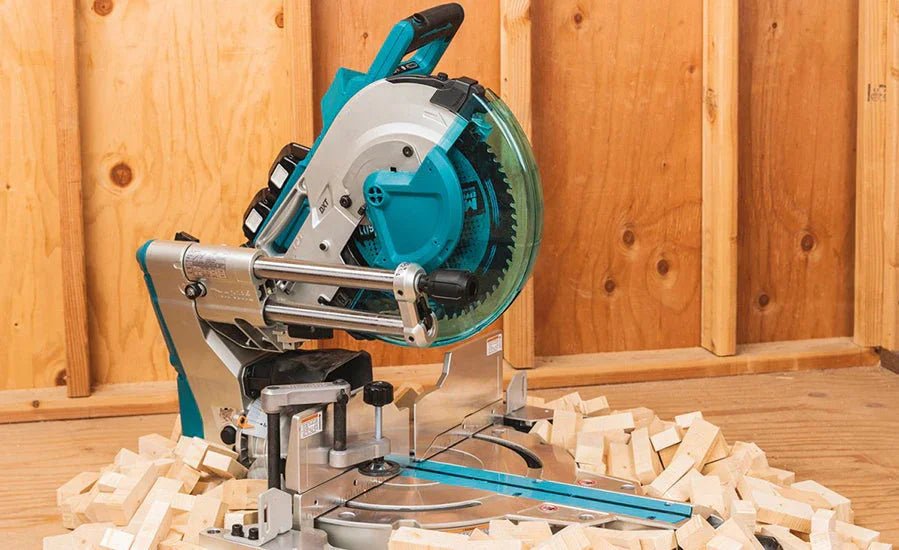
Choosing The Right Miter Saw
Choosing the right miter saw helps you cut angled wood accurately. It also keeps your work safe and efficient.
This guide explains different miter saw types, blade choices, and safety features to consider before buying.
Types Of Miter Saws
Miter saws come in several types. Each type fits different cutting needs and projects.
- Basic Miter Saw:Good for simple crosscuts and angled cuts.
- Compound Miter Saw:Can tilt to cut bevels and angles at the same time.
- Sliding Compound Miter Saw:Has a sliding arm for wider cuts on large wood pieces.
Blade Selection
Blade choice affects cut quality and blade life. Choose blades based on the wood type and cut style.
| Blade Type | Teeth Count | Best For |
| General Purpose | 40 | Softwood and plywood |
| Fine Finish | 60-80 | Hardwood and precise cuts |
| Ripping | 24 | Cutting along the grain |
Safety Features To Look For
Safety features protect you during cutting. Look for these key safety parts on your miter saw.
- Blade guard that covers the blade when not cutting
- Electric brake to stop the blade quickly
- Secure clamps to hold wood firmly
- Adjustable stops for repeatable cuts
- Dust collection port to keep work area clean

Credit: www.weekand.com
Setting Up Your Workspace
Setting up your workspace correctly is important for safe and accurate cuts with a miter saw. A good setup helps you work faster and with better results.
This guide covers key areas to prepare before you start cutting angled wood pieces.
Stable Work Surface
Your miter saw needs a strong, steady surface to sit on. This keeps it from moving while you cut.
Choose a workbench or table that does not wobble. The surface should be level to keep your wood pieces flat.
Proper Lighting
Good lighting helps you see the cutting line clearly. It reduces mistakes and improves safety.
- Use bright overhead lights for general illumination.
- Set up a focused lamp near the saw blade.
- Avoid shadows on your cutting area.
- Natural daylight is helpful but check shadows carefully.
Clamping And Support
Keep your wood steady with clamps and supports to get exact angled cuts.
| Tool | Purpose | Tip |
| Bar Clamp | Holds wood firmly on the table | Use soft pads to avoid marks |
| Support Stand | Supports long pieces of wood | Adjust height to match saw table |
| Stop Block | Ensures repeat cuts at the same length | Clamp securely to the fence |
Preparing Wood For Angled Cuts
Making angled cuts with a miter saw requires careful preparation. You need to get your wood ready before cutting. This helps ensure clean and precise cuts every time.
Proper preparation includes measuring angles correctly, marking cut lines clearly, and choosing the right wood type. Each step affects the final result of your project.
Measuring Angles Accurately
Accurate angle measurement is key for angled cuts. Use a protractor or angle finder tool. These tools help you find exact angles on your wood pieces.
- Place the tool firmly on the wood edge.
- Read the angle measurement carefully.
- Adjust the miter saw to match the angle.
- Double-check measurements before cutting.
Marking Cut Lines
Clear cut lines guide your saw blade and keep cuts straight. Use a sharp pencil or marking knife for precision. Mark both sides of the wood if needed.
Tips for marking cut lines:
- Use a ruler or straight edge to draw lines.
- Mark the waste side of the cut to avoid mistakes.
- Label each piece to avoid confusion during assembly.
Selecting Wood Types
Choose wood that suits your project and saw capabilities. Different woods cut differently. Hardwoods are tough and may need sharp blades. Softwoods cut faster but can splinter.
| Wood Type | Best For | Cutting Tips |
| Pine (Softwood) | General projects, easy to cut | Use sharp blades to reduce splintering |
| Oak (Hardwood) | Furniture and strong joints | Cut slowly with sharp, fine-tooth blades |
| Birch (Hardwood) | Cabinetry and trim work | Clamp wood firmly to avoid movement |
Adjusting The Miter Saw
Adjusting your miter saw correctly helps you make precise angled cuts on wood. It ensures your project pieces fit well together.
This guide covers how to set the miter angle, adjust the bevel angle, and use stops and guides for better accuracy.
Setting The Miter Angle
First, unlock the miter handle or knob to move the saw table. Turn it left or right to the desired angle. Use the scale on the base to find the exact degree.
Once set, lock the handle back in place to secure the angle. Always double-check the angle before making cuts.
Adjusting The Bevel Angle
The bevel angle tilts the saw blade sideways for angled cuts on the wood’s thickness. Unlock the bevel lever or knob to tilt the blade.
- Release the bevel lock.
- Move the saw blade to the needed angle using the bevel scale.
- Lock the bevel lever again to hold the blade angle.
- Check the angle visually or with a protractor.
Adjusting the bevel angle lets you cut bevel joints or compound angles with your miter saw.
Using Stops And Guides
Stops and guides help make repeated cuts that are the same length or angle. They improve speed and accuracy.
| Type | Use |
| Fence | Supports wood and keeps it straight |
| Stop Block | Sets a fixed length for multiple cuts |
| Angle Guide | Helps align wood for precise angled cuts |
Attach stop blocks or angle guides to the fence before cutting. This setup saves time and ensures uniform cuts.
Making Precise Angled Cuts
Using a miter saw to cut wood at an angle needs care and focus. Precise cuts help your project fit well and look good.
In this guide, learn how to position wood, use safe cutting methods, and avoid errors that can spoil your work.
Positioning The Wood
Place your wood firmly against the saw’s fence. This keeps the wood steady and the angle accurate.
Measure and mark the angle clearly before cutting. Check the saw’s angle settings to match your marks.
- Use clamps if the wood is small or unstable
- Align the mark with the saw blade carefully
- Keep your hands away from the blade
Safe Cutting Techniques
Wear safety glasses and ear protection every time you cut. Safety helps prevent injury and keeps you focused.
Start the saw before touching the wood. Let the blade reach full speed for a clean cut.
- Hold the wood firmly but not too tight
- Use a slow, steady motion when cutting
- Wait for the blade to stop before moving the wood
Avoiding Common Mistakes
Double-check your angle settings before cutting. Wrong angles lead to wasted wood and poor fits.
Do not rush the cut. Quick cuts can cause splintering or uneven edges.
- Avoid cutting wood that is not secured
- Do not force the blade through the wood
- Keep the saw clean for better accuracy
Maintaining Your Miter Saw
Keeping your miter saw in good shape helps it work well and last longer. Regular maintenance prevents problems and keeps your cuts clean.
Follow simple steps to clean, sharpen, and check your saw. This makes your work safer and easier.
Cleaning And Lubrication
Clean your miter saw after each use. Remove sawdust and debris from the blade and moving parts. This stops buildup that can slow the saw.
Use a soft brush or compressed air to clean hard-to-reach areas. Apply lubricant to the pivot points and sliding rails to keep the saw moving smoothly.
- Unplug the saw before cleaning
- Brush away sawdust from the blade and base
- Use light oil on moving parts only
- Wipe off excess lubricant to avoid dirt buildup
Blade Sharpening And Replacement
A sharp blade cuts wood cleanly and safely. Dull blades make the saw work harder and can cause rough cuts. Check the blade often for sharpness and damage.
If the blade is dull or chipped, sharpen it or replace it. Use a blade made for wood cutting and the right size for your saw.
- Look for chipped or missing teeth on the blade
- Sharpen the blade with a file or take it to a professional
- Replace the blade if sharpening is not possible
- Always use the correct blade type for your saw
Regular Safety Checks
Safety checks keep your miter saw safe to use. Check the safety guard, power cord, and switches before every job. Fix any problems before starting work.
Make sure the saw locks and stops correctly. Replace worn parts and keep the work area clean to avoid accidents.
- Check the blade guard moves freely
- Inspect the power cord for cuts or frays
- Test the trigger switch and safety lock
- Keep the base and table clean and stable
- Replace any damaged or broken parts immediately
Advanced Tips For Complex Cuts
Using a miter saw for angled wood cuts can be tricky. Complex cuts need careful setup and technique.
These tips will help improve accuracy and safety with difficult angled cuts.
Compound Miter Cuts
Compound miter cuts combine bevel and miter angles. They are used to fit pieces together tightly.
Set the saw’s bevel and miter angles carefully. Make small test cuts to check the fit before cutting your final piece.
- Adjust bevel angle to tilt the blade side to side
- Set miter angle to rotate the blade left or right
- Use a protractor or angle finder for precision
- Secure the wood firmly to avoid movement
Dealing With Crown Molding
Crown molding has angles that are hard to measure. It often needs compound cuts to fit corners perfectly.
Place the molding upside down on the saw fence. Match the molding angle with the saw’s bevel and miter settings.
- Identify the spring angle of the molding
- Set the miter saw bevel to the spring angle
- Adjust the miter angle for corner cuts
- Test cut scrap pieces before final cuts
Using Jigs And Accessories
Jigs help hold wood steady and guide the saw for tricky cuts. They improve accuracy and safety.
Use accessories like hold-down clamps, extension wings, and stop blocks. These tools reduce errors and speed up work.
- Hold-down clamps keep wood from moving during cuts
- Extension wings support longer pieces of wood
- Stop blocks allow repeatable cut lengths
- Angle guides help set precise bevels and miters

Credit: benchmarkabrasives.com
Frequently Asked Questions
How Do You Set Angles On A Miter Saw?
To set angles, unlock the bevel and miter adjustments. Rotate the saw to the desired degree using the scale. Lock the saw in place securely before cutting. Always double-check the angle for accuracy to ensure precise cuts.
What Safety Tips Apply When Using A Miter Saw?
Always wear safety goggles and hearing protection. Keep hands away from the blade. Secure the wood firmly before cutting. Use a sharp blade and maintain proper posture. Never remove safety guards or rush the cutting process.
Can I Cut Bevel And Miter Angles Simultaneously?
Yes, many miter saws allow combined bevel and miter cuts. Adjust the bevel angle by tilting the saw head. Set the miter angle by rotating the saw base. This technique is useful for complex angled wood joints.
What Types Of Wood Suit Angled Miter Cuts Best?
Softwoods like pine and hardwoods like oak work well. Ensure wood is dry and free from defects. Choose wood that fits your project requirements. Proper wood selection improves cut quality and joint strength.
Conclusion
Operating a miter saw for angled cuts takes practice and care. Always measure twice to avoid mistakes. Keep your hands clear of the blade. Use the saw’s angle settings to get precise cuts. Take your time and work steadily. With patience, your cuts will look clean and accurate.
Safety and accuracy go hand in hand here. Follow these steps, and your angled wood projects will turn out great.