Are you tired of your angle grinder giving up on you right when you need it most? Whether it’s a stubborn blade or a motor that refuses to turn, these issues can grind your projects to a halt.
But before you think about buying a new tool, why not explore how you can repair it yourself? In this comprehensive guide to repairing angle grinders, you’ll discover simple, step-by-step solutions to get your tool back in action. By the end of this article, not only will you save money, but you’ll also feel a sense of accomplishment every time you power up your trusty grinder.
Dive in to learn how you can tackle those pesky problems and extend the life of your angle grinder.

Credit: extoltools.com
Common Angle Grinder Issues
Angle grinders are handy tools used for cutting and grinding. They can stop working properly for several reasons.
Knowing the common problems helps you fix them quickly and safely. This guide covers usual angle grinder troubles.
Power Problems
Power problems are common in angle grinders. The tool may not start or might stop suddenly.
These issues can be caused by a bad power cord, loose plug, or a blown fuse. Check these parts first.
- Inspect the power cord for cuts or damage
- Ensure the plug fits tightly in the outlet
- Replace blown fuses or reset circuit breakers
Motor Malfunctions
The motor can overheat or stop running. This can happen if dust or debris blocks airflow inside.
Worn brushes also cause motor problems. Replacing brushes may restore the motor’s function.
- Clean vents and remove dust regularly
- Check motor brushes for wear and replace if needed
- Do not overload the grinder to avoid overheating
Switch Failures
The switch turns the grinder on and off. If it stops working, the tool will not start or may run without control.
Switch failures often result from dirt buildup or worn contacts inside. Cleaning or replacing the switch can help.
- Check if the switch feels loose or stuck
- Use compressed air to clean inside the switch
- Replace the switch if cleaning does not fix the issue
Bearing Wear And Tear
Bearings support the grinder’s spinning parts. Worn bearings cause noise and vibration during use.
Replacing bearings improves performance and prevents further damage to the tool.
- Listen for unusual grinding or rattling sounds
- Check for wobbling in the grinding wheel
- Replace bearings if the tool vibrates excessively
Tools Needed For Repairs
Repairing an angle grinder requires the right tools. Using proper tools makes the job easier and safer.
This guide covers the basic hand tools, specialized repair kits, and safety equipment you need.
Basic Hand Tools
Basic hand tools help with most common repairs on angle grinders. You can find them in any toolbox.
- Screwdrivers (flathead and Phillips)
- Adjustable wrench
- Allen keys or hex wrenches
- Needle-nose pliers
- Wire cutters
- Hammer
Specialized Repair Kits
Specialized kits include parts and tools made for angle grinder repairs. They save time by having everything in one place.
| Kit Component | Description |
| Carbon Brushes | Replace worn brushes for motor function |
| Spanner Wrench | Remove and tighten grinding discs |
| Replacement Bearings | Fix noisy or rough wheel rotation |
| Brush Spring | Maintain brush contact with motor |
| Small Screwdrivers | Access tiny screws inside the grinder |
Safety Equipment
Safety gear protects you during repairs. Always wear the proper equipment to avoid injuries.
- Safety goggles to protect your eyes
- Work gloves to protect your hands
- Dust mask to avoid inhaling particles
- Ear protection if you test the grinder
- Non-slip footwear for stable standing
Diagnosing Problems Quickly
Fixing angle grinders fast saves time and effort. Knowing how to spot issues helps you repair them right.
Look for common signs and test parts step-by-step. This guide shows how to find problems quickly.
Visual Inspection Techniques
Start by checking the angle grinder’s outside. Look for broken parts or loose pieces. Dirt and dust can hide damage.
Check the power cord for cuts or frays. Look at the switch to see if it moves freely. Also, examine the grinding wheel for cracks.
- Check for cracks on the grinding wheel
- Look for loose screws or parts
- Inspect the power cord for damage
- Make sure the switch works smoothly
- Clean dirt and dust from vents
Testing Electrical Components
Use a multimeter to test the power cord and switch. Make sure the grinder gets electricity. Test brushes for wear or damage.
Check the motor windings for breaks or shorts. Faulty electrical parts can stop the grinder from working or cause sparks.
- Test power cord continuity with a multimeter
- Check switch operation and continuity
- Inspect carbon brushes for wear
- Measure motor winding resistance
- Look for electrical shorts or damage
Identifying Mechanical Faults
Listen for strange sounds when the grinder runs. Check the bearings and gears for wear. Loose parts can cause vibration.
Make sure the spindle locks and rotates correctly. Mechanical faults can reduce performance or stop the tool.
- Check for unusual noise or grinding sounds
- Inspect bearings for smooth rotation
- Examine gears for wear or damage
- Test spindle lock and rotation
- Look for loose or missing parts
Fixing Power Issues
Power problems can stop your angle grinder from working. You can fix many issues yourself. This guide shows how to check and repair common power faults.
Start with simple checks. Then move to parts that wear out or fail. Always unplug the tool before working on it.
Checking Power Supply And Cords
Look for damage on the power cord. Cuts, cracks, or frayed wires can cause power loss. Test the outlet with another tool to ensure it works.
- Unplug the grinder before inspection
- Check the plug for loose or bent prongs
- Look along the cord for cuts or wear
- Use a multimeter to test for continuity
- Try a different outlet to rule out socket issues
Replacing Brushes
Brushes wear down and stop the motor from running. Replace brushes if your grinder stops or loses power suddenly. Brushes are easy to remove and replace.
| Brush Type | Signs to Replace | Replacement Tips |
|---|---|---|
| Carbon Brushes | Short motor run, sparks, or no power | Match size and shape exactly |
| Graphite Brushes | Grinder stops under load | Install carefully to avoid damage |
| Spring-Loaded Brushes | Uneven motor speed or noise | Check springs for wear too |
Repairing Or Replacing Switches
A faulty switch can stop power flow. Check if the switch feels loose or does not click well. Replace or clean the switch contacts to restore function.
Follow these steps to repair or replace the switch:
- Unplug the grinder and open the casing
- Locate the switch and inspect for damage
- Use a multimeter to test switch continuity
- If faulty, remove the switch from its holder
- Install a new switch matching the model
- Reassemble the grinder and test operation
Motor Repairs And Maintenance
Maintaining the motor of an angle grinder keeps it running smoothly. Regular checks and repairs help avoid sudden breakdowns. This guide covers key tasks to care for your motor.
Simple motor repairs can extend the life of your tool. Follow these tips to clean, lubricate, and fix common motor issues safely.
Cleaning And Lubricating
Cleaning removes dust and dirt that harm motor parts. Lubricating reduces friction and wear on moving components. Both keep the motor cool and efficient.
- Unplug the grinder before cleaning.
- Use compressed air to blow out dust from vents and motor parts.
- Apply light machine oil to the motor shaft and bearings.
- Wipe away excess oil to avoid attracting dirt.
- Check for worn brushes and clean or replace them if needed.
Replacing Bearings
Bearings support the motor shaft and help it spin smoothly. Old or damaged bearings cause noise and vibration. Replace bearings to restore proper function.
| Tool Needed | Purpose |
| Bearing puller | Remove old bearings |
| Hammer and punch | Tap out stuck bearings |
| Grease | Lubricate new bearings |
| Cleaning cloth | Wipe parts clean |
After removing old bearings, clean the housing before fitting new ones. Apply grease to the new bearings to ensure smooth rotation.
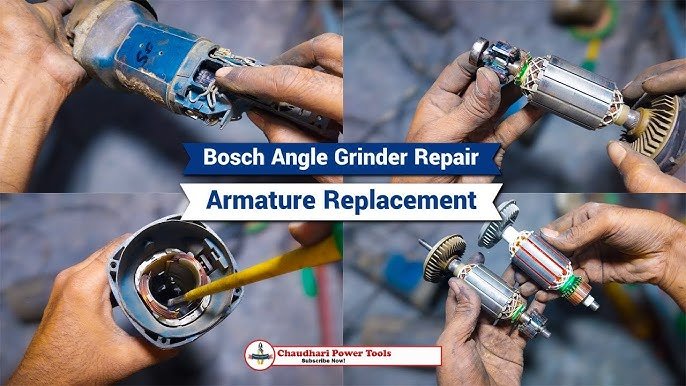
Rewinding The Motor
Rewinding means replacing the copper wire coils inside the motor. It fixes burnt or broken coils that stop the motor from working. This task needs careful work and patience.
- Disassemble the motor to access the stator.
- Remove the old wire coils carefully.
- Count the number of coil turns and note the wire gauge.
- Wind new wire coils matching the original specifications.
- Secure the coils and insulate properly.
- Reassemble the motor and test its operation.
Handling Mechanical Problems
Mechanical issues in angle grinders can cause poor performance or safety risks. Fixing these problems keeps the tool working well and safe to use.
Regular checks and simple repairs help avoid bigger damage. This guide covers how to tighten loose parts, replace worn discs, and align components properly.
Tightening Loose Parts
Loose parts can cause noise, vibration, and unsafe operation. Check all screws, nuts, and bolts regularly. Use the correct size wrench or screwdriver to tighten them.
- Turn off and unplug the angle grinder before fixing.
- Inspect the handle, guard, and body for loose parts.
- Use tools to firmly tighten screws and bolts.
- Do not overtighten to avoid stripping threads.
- Test the grinder after tightening to check stability.
Replacing Worn Discs
Worn discs reduce cutting power and can break during use. Replace discs when they show cracks, chips, or excessive wear. Always use discs that fit your grinder model.
| Sign of Wear | Action |
|---|---|
| Cracks or chips | Replace disc immediately |
| Disc diameter smaller than recommended | Change to new disc |
| Uneven disc edges | Discard and replace |
| Disc not fitting tightly | Check flange and replace disc |
Aligning Components Properly
Proper alignment ensures smooth operation and less wear. Misaligned parts cause vibration and damage. Check the spindle, guard, and handle positions before use.
Follow these tips to align your angle grinder:
- Remove the disc and clean the spindle and flange.
- Place the disc evenly on the spindle without tilting.
- Secure the disc with the correct flange and nut.
- Adjust the guard so it covers the disc properly.
- Fix the handle in the correct position and tighten firmly.
Safety Tips During Repairs
Repairing angle grinders needs care and attention. Safety should always be your top priority. Follow simple rules to avoid accidents and injuries.
Understanding how to protect yourself and others can make the repair process safer and easier. Use these tips every time you work on your tool.
Disconnecting Power Sources
Always unplug the angle grinder before starting any repair. This stops the tool from turning on by mistake. Check if the battery is removed if it is cordless.
- Unplug the power cord from the outlet.
- Remove the battery pack if cordless.
- Press the power button to release stored energy.
- Double-check that the tool will not start.
Using Protective Gear
Wear safety gear to protect yourself from sparks, dust, and sharp parts. Use gloves, goggles, and a dust mask for best protection.
| Protective Gear | Purpose |
| Gloves | Protect hands from cuts and burns |
| Goggles | Shield eyes from sparks and debris |
| Dust Mask | Prevent breathing in dust and particles |
| Long Sleeves | Protect arms from sparks and scratches |
Proper Handling Of Tools
Use the right tools carefully when repairing. Keep your workspace clean and follow instructions to avoid damage and injury.
- Hold tools firmly and keep a steady grip.
- Use tools that fit the job and are in good condition.
- Do not rush repairs; take your time.
- Keep tools away from children and pets.

Credit: www.youtube.com
Preventive Maintenance Practices
Taking care of your angle grinder regularly helps it last longer. Preventive maintenance keeps it safe and reliable.
This guide covers simple steps for cleaning, inspecting, and storing your tool properly. Follow these to avoid costly repairs.
Regular Cleaning
Cleaning your angle grinder after each use removes dust and debris. This prevents damage to moving parts.
- Unplug the grinder before cleaning.
- Use a brush to clear dust from vents and blades.
- Wipe the body with a dry cloth.
- Check for stuck debris and remove it carefully.
- Never use water or liquids directly on the tool.
Scheduled Inspections
Regular inspections catch small problems early. Look for wear and damage on parts and cords.
| Inspection Item | What to Check | Frequency |
| Power Cord | Cracks, cuts, or frays | Every week |
| Grinding Disc | Wear, cracks, or chips | Before each use |
| Guard and Handles | Secure fit and no cracks | Monthly |
| Switch | Works smoothly without sticking | Monthly |
Proper Storage Techniques
Storing your angle grinder correctly protects it from damage and dust. Keep it dry and safe.
- Store the tool in a clean, dry place.
- Keep it in its case or cover to avoid dust buildup.
- Avoid places with high humidity or extreme temperatures.
- Do not place heavy objects on top of the grinder.
- Disconnect power before storing.

Credit: www.youtube.com
Frequently Asked Questions
How Do I Fix A Grinding Wheel That Won’t Spin?
Check if the power is on and the switch works properly. Inspect the wheel for damage or debris. Tighten the flange nut securely. Replace the wheel if it’s cracked or worn out.
Why Is My Angle Grinder Overheating Quickly?
Overheating may occur due to prolonged use without breaks. Ensure proper ventilation and clean dust from vents. Use the correct wheel for the task. Avoid applying excessive pressure during grinding.
What Causes An Angle Grinder To Spark Excessively?
Excessive sparks often indicate worn brushes or a damaged armature. Inspect and replace carbon brushes if needed. Clean the commutator and ensure no debris is inside. Use the right wheel type for your material.
How Do I Replace Carbon Brushes In An Angle Grinder?
Unplug the grinder and locate the brush caps near the motor. Remove the caps and pull out old brushes. Insert new brushes in the same orientation. Secure the caps and test the grinder.
Conclusion
Repairing angle grinders keeps your tools working longer and saves money. Knowing simple fixes helps avoid costly replacements. Always check parts like brushes, switches, and cords carefully. Clean and maintain the grinder regularly to prevent problems. Safety matters—wear gloves and goggles while working.
With these tips, you can handle common repairs confidently. Keep your angle grinder ready for any task ahead. Small efforts make a big difference in tool performance. Stay patient, follow steps, and enjoy smooth repairs every time.