Are you struggling to get a smooth, even surface on your woodworking projects? Using a belt sander can be the secret tool you need to save time and effort while achieving professional results.
But if you’re not sure how to handle it properly, you might end up with uneven spots or damage to your material. This guide will walk you through everything you need to know about using a belt sander for leveling surfaces.
By the end, you’ll feel confident and ready to tackle your next project with precision and ease. Keep reading to discover simple tips that can make a big difference in your sanding skills.

Credit: www.familyhandyman.com
Choosing The Right Belt Sander
Using a belt sander helps level surfaces quickly and smoothly. Picking the right one makes your work easier and better.
Learn about types, grit choices, and power options to find the best belt sander for your project.
Types Of Belt Sanders
Belt sanders come in different shapes and sizes. Each type fits certain tasks better.
- Handheld Belt Sanders:Easy to move, great for small to medium jobs.
- Stationary Belt Sanders:Fixed in one place, good for detailed or heavy work.
- Wide Belt Sanders:Used for large surfaces like tabletops or floors.
Selecting The Correct Grit
The sanding belt’s grit controls how much material you remove. Choosing the right grit keeps your surface smooth.
| Grit Size | Use |
| 40-60 | Rough sanding and fast material removal |
| 80-100 | General sanding and smoothing |
| 120-150 | Fine sanding before finishing |
| 180+ | Very fine sanding or polishing |
Power And Speed Considerations
Power and speed affect how well the sander works on different surfaces. Choose based on your needs.
- Higher power handles tough jobs and hard materials.
- Variable speed lets you adjust sanding speed for control.
- Lower speed is best for delicate surfaces to avoid damage.
- Check the sander’s weight for comfort during long use.
Preparing The Surface
Before using a belt sander, proper surface preparation is key. It helps you get smooth and even results. Taking time to prepare saves effort later.
Focus on cleaning, marking, and safety. These steps protect your work and keep you safe.
Cleaning And Securing The Workpiece
Remove dust, dirt, and grease from the surface. A clean workpiece prevents clogging the sander. Secure the piece firmly to avoid movement.
- Wipe the surface with a dry cloth
- Use a mild cleaner if needed and let it dry
- Clamp the workpiece to a stable workbench
- Check that the clamps hold the piece tight
Marking Uneven Areas
Mark spots that need extra sanding. This guides your work and helps focus on problem areas. Use a pencil or chalk to highlight bumps or dips.
| Marking Tool | Use |
| Pencil | Light marks on wood surfaces |
| Chalk | Visible marks on rough or dark surfaces |
| Marker | Temporary marks on non-porous materials |
Safety Gear Essentials
Wear safety gear to protect yourself from dust and debris. Proper gear reduces risks during sanding.
- Safety glasses to protect eyes
- Dust mask or respirator to avoid breathing dust
- Hearing protection to reduce noise exposure
- Work gloves for hand protection
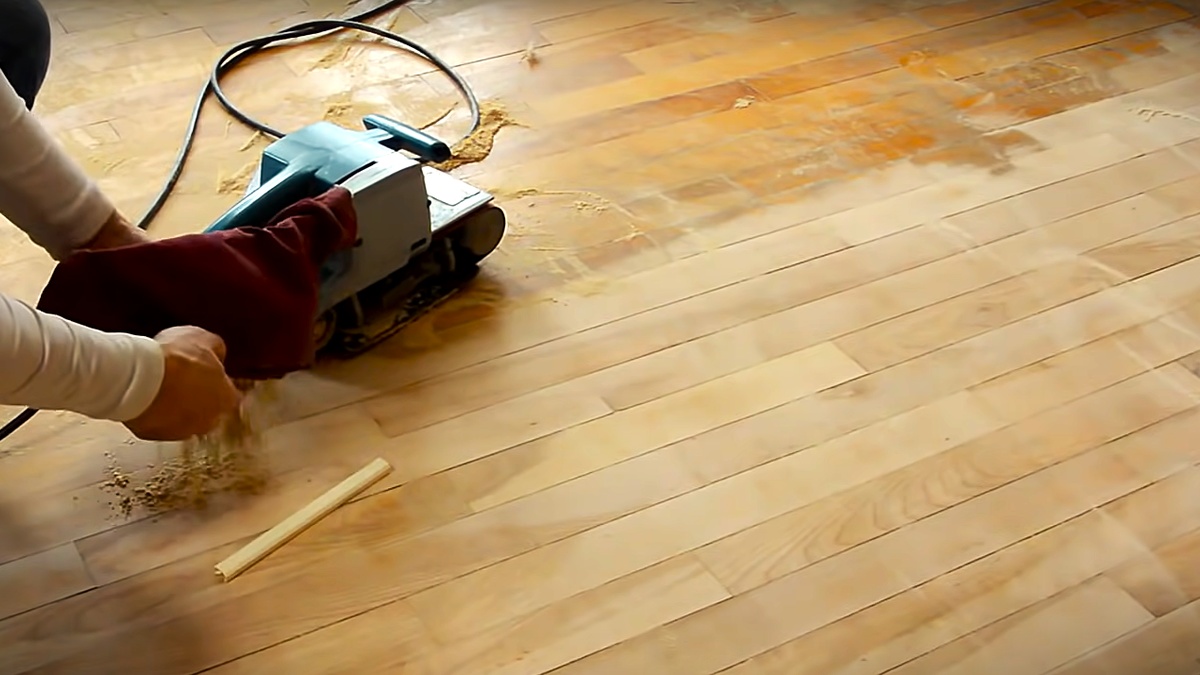
Techniques For Leveling Surfaces
Using a belt sander is an effective way to smooth and level surfaces. The right techniques help you achieve even results without damaging the material.
This guide covers key methods to handle the sander, keep pressure steady, and avoid common errors during the process.
Proper Belt Sander Handling
Hold the belt sander firmly with both hands. Keep your body balanced and move the sander slowly across the surface. Start the sander before touching the material and lift it off before turning it off.
- Grip the handles tightly but not too hard
- Keep the sander flat against the surface
- Move the sander in the direction of the grain
- Do not stay in one spot too long
- Turn off the sander after lifting it from the surface
Maintaining Consistent Pressure
Applying even pressure prevents uneven sanding. Too much pressure can cause grooves or damage, while too little pressure wastes time.
| Pressure Level | Effect on Surface |
|---|---|
| Light | Slow sanding, may leave rough spots |
| Moderate | Even sanding, smooth surface |
| Heavy | Uneven grooves, possible damage |
Avoiding Common Mistakes
Many beginners make errors that affect the finish. Watch out for these to save time and get better results.
- Do not press the sander too hard
- Avoid sanding against the grain
- Keep the sander moving at all times
- Check the belt for wear and replace if needed
- Wear safety gear to protect your eyes and lungs
Advanced Tips For Smooth Finishes
Using a belt sander can speed up your woodworking projects. Getting a smooth finish takes skill and care.
These tips help you avoid mistakes and get even, polished surfaces with your belt sander.
Using Multiple Grits For Refinement
Start sanding with coarse grit to remove rough material fast. Then switch to finer grits step by step.
Each finer grit smooths the surface more. This removes scratches left by the previous grit.
- Begin with 40 or 60 grit for heavy sanding
- Move to 80 or 100 grit for medium smoothing
- Finish with 120 or 150 grit for a polished look
Sanding Patterns For Uniformity
Use steady, even strokes along the wood grain. Avoid staying too long in one spot.
Change your sanding path slightly with each grit. This helps remove marks and blends the surface.
- Sand in the direction of the grain for best results
- Overlap each pass by half the belt width
- Use light pressure to keep the surface flat
Preventing Gouges And Swirl Marks
Keep the sander moving smoothly to avoid digging into the wood. Press lightly and evenly.
Check the belt often for damage. Replace worn belts to stop swirl marks from forming.
- Hold the sander flat to avoid gouges
- Keep the belt clean and replace it if torn
- Use a dust collection system to see your work clearly
Maintaining And Caring For Your Belt Sander
Keeping your belt sander in good shape helps it work better and last longer. Regular care prevents problems and saves time.
Simple maintenance tasks can keep your tool ready for any job. Learn how to clean, store, and fix common issues.
Cleaning And Storage
After each use, clean dust and debris from your belt sander. Use a brush or compressed air to remove build-up.
Store your sander in a dry place away from moisture. Keep it in a case or cover to avoid dust settling on it.
- Unplug the sander before cleaning
- Use a soft brush for dust removal
- Wipe the exterior with a dry cloth
- Store in a cool, dry area
- Cover with a cloth or keep in a case
Replacing Belts
Check the sanding belt for wear or damage before use. Replace the belt if it tears or wears thin.
To replace, unplug the sander and release the tension lever. Remove the old belt and fit the new one in place.
- Unplug the sander for safety
- Release the tension lever
- Remove the worn belt
- Install the new belt correctly
- Re-engage the tension lever
- Test the belt alignment before use
Troubleshooting Common Issues
If your belt sander stops or runs unevenly, check for belt misalignment or dust inside the tool.
Look for unusual noises or overheating. These signs may mean the motor or parts need attention.
- Check belt alignment and tension
- Clean dust from vents and rollers
- Inspect power cord for damage
- Listen for strange sounds during use
- Allow the sander to cool if it overheats
- Seek professional repair if problems continue

Credit: www.familyhandyman.com
Credit: www.ecohome.net
Frequently Asked Questions
What Is The Best Grit Sandpaper For Leveling Surfaces?
Use 60 to 80 grit sandpaper for initial leveling. Finer grits like 120 smooth the surface after. Choose grit based on surface roughness for best results.
How Do I Prevent Gouging With A Belt Sander?
Keep the sander moving steadily and avoid staying in one spot. Use light pressure and let the sander do the work to prevent gouging.
Can A Belt Sander Be Used On Wood And Metal?
Yes, belt sanders work on wood and metal. Use appropriate sandpaper grit and speed settings for each material to avoid damage.
How Do I Maintain A Belt Sander For Optimal Performance?
Regularly clean dust and debris from the sander. Check and replace worn belts. Lubricate moving parts as recommended in the manual.
Conclusion
Using a belt sander can make surface leveling faster and easier. Always keep the sander moving to avoid uneven spots. Choose the right grit sandpaper for best results. Wear safety gear to protect your eyes and hands. Practice on scrap wood before starting your project.
With patience and care, your surfaces will look smooth and even. This tool helps save time and effort when used correctly. Try these tips to get the best finish every time.