Are you struggling to get perfect angles every time you cut? Using a combination square can change that.
This simple tool helps you measure and mark angles with ease and precision. Whether you’re a beginner or want to improve your skills, understanding how to use a combination square will save you time and frustration. In this guide, you’ll discover step-by-step tips to cut angles accurately and confidently.
Keep reading to unlock the secret to cleaner, sharper cuts in your projects.
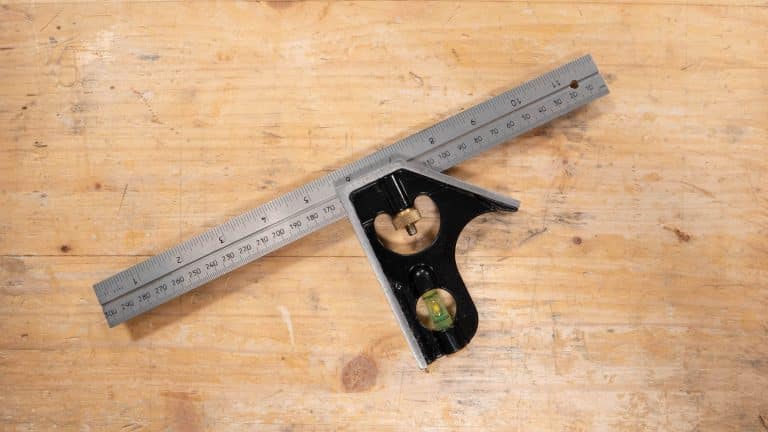
Basics Of A Combination Square
A combination square is a tool used in woodworking and metalworking. It helps measure and mark angles and straight lines.
This tool is useful for cutting angles accurately. It combines different measuring functions in one device.
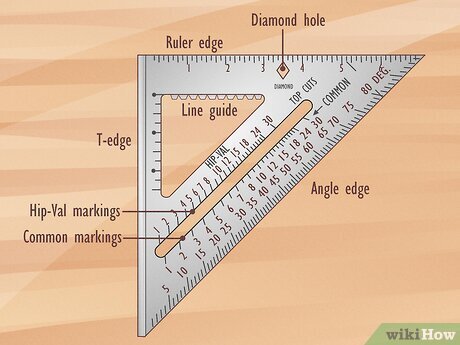
Parts And Features
A combination square has several important parts. Each part has a specific role to help with measuring and marking.
- Blade:A metal ruler that slides through the head. It has measurement marks.
- Head:The main body that holds the blade. It can move to set angles.
- Bubble level:Built into the head to check if surfaces are level or plumb.
- Scriber:A small pointed tool stored in the head to mark materials.
- Locking screw:Tightens to hold the blade at the chosen length or angle.
These features make the combination square versatile for many tasks like measuring, marking, and checking angles.
Types Of Combination Squares
There are different types of combination squares. They vary by size and additional features.
- Standard Combination Square:Has a steel blade, used for general measuring and marking.
- Engineer’s Square:A heavy-duty type used in metalworking for precise 90-degree angles.
- Carpenter’s Combination Square:Usually larger, with woodworker-friendly features.
- Adjustable Protractor:A type with an angle gauge for measuring and marking angles besides 90 degrees.
Choose a type based on your project needs and the materials you work with.
Credit: commonwoodworking.com
Setting Up For Angle Cuts
Using a combination square helps you make precise angle cuts. Setting it up correctly saves time and materials.
Follow simple steps to choose the right angle and adjust the square for accurate cuts.
Choosing The Right Angle
Select the angle you need for your project. Common angles include 45 degrees and 90 degrees.
Use the combination square’s protractor or the adjustable ruler to find the exact angle.
- Check your project plans for required angles
- Set the square to the matching angle mark
- Double-check the angle before marking your cut
Adjusting The Square Accurately
Loosen the locking screw to move the ruler freely. Slide the ruler to the chosen angle.
Tighten the screw firmly to keep the ruler in place. Make sure the ruler does not shift during marking.
- Place the square flat on your workpiece
- Align the ruler edge with the cut line
- Hold the square steady while marking
Measuring Angles Precisely
Using a combination square helps you measure angles accurately for cutting. It combines different tools in one device to make your work easier.
Precise angle measurement is key to fitting pieces together correctly. The protractor head of the combination square is very useful for this task.
Using The Protractor Head
The protractor head lets you set and measure angles from 0° to 180°. Adjust the blade to the angle you need by loosening the knob and sliding the blade.
- Loosen the locking screw on the protractor head.
- Rotate the blade to the desired angle using the scale.
- Tighten the screw to lock the blade in place.
- Double-check the angle using a known reference or a digital angle finder.
Marking The Workpiece
Marking your workpiece clearly helps guide your cuts. Use the combination square to draw straight and accurate angle lines.
| Marking Tool | Purpose |
| Pencil | Make visible, thin lines on wood or metal |
| Knife | Create fine, precise scribe lines for metal |
| Awl | Make small indentations to prevent blade slipping |

Credit: www.wikihow.com
Techniques For Cutting Angles
Cutting angles accurately is important for many woodworking projects. A combination square helps you measure and mark these angles precisely. Using the right techniques ensures clean and exact cuts every time.
This guide covers two key techniques: aligning the saw and maintaining steady cuts. Both steps improve your control and the quality of your work.
Aligning The Saw
Proper saw alignment is the first step for accurate angled cuts. Set your combination square to the desired angle and mark your workpiece clearly. Then, align the saw blade with the marked line before cutting.
- Adjust the combination square to the exact angle needed.
- Use a sharp pencil to draw a clear cutting line.
- Position the saw blade so it touches the line without gaps.
- Check the saw angle twice before starting the cut.
- Secure the workpiece to prevent movement during cutting.
Maintaining Steady Cuts
Keeping your saw steady ensures smooth and accurate angle cuts. Sudden movements can cause uneven edges or change the angle.
| Tip | Reason |
|---|---|
| Hold the saw handle firmly | Prevents wobbling during the cut |
| Keep your arm and wrist steady | Maintains a consistent cutting angle |
| Cut slowly and evenly | Reduces splintering and mistakes |
| Use clamps for stability | Keeps the workpiece from shifting |
Common Mistakes To Avoid
Using a combination square to cut angles can be tricky. Many people make simple errors that affect their work.
Paying attention to details helps you avoid these mistakes and get precise cuts every time.
Misreading Measurements
One common mistake is misreading the ruler or scale on the combination square. This can cause wrong angle cuts.
- Check if you are reading the metric or imperial side.
- Look closely at the markings; small lines mean millimeters or fractions.
- Do not guess between marks; use a magnifier if needed.
- Double-check the measurement before marking your material.
- Keep the ruler clean and free from dust or paint.
Improper Square Calibration
A combination square must be properly calibrated to give accurate angles. Miscalibration leads to errors.
| Calibration Issue | Effect | Fix |
| Loose ruler | Shifts measurement marks | Tighten the locking screw |
| Damaged blade | Wrong angle alignment | Replace or straighten blade |
| Incorrect 90° angle | Square is not truly square | Test on known square surface; adjust if possible |
| Rust or dirt buildup | Blade does not sit flat | Clean and oil parts regularly |

Credit: www.wikihow.com
Maintenance And Care
Keeping your combination square clean and well cared for helps it last longer. Regular maintenance ensures accurate measurements and smooth use.
Simple cleaning and proper storage protect the tool from damage and rust. Follow these tips to maintain your combination square in top condition.
Cleaning Tips
After each use, wipe the combination square with a soft cloth. This removes dust, dirt, and metal shavings that can cause wear.
- Use a dry or slightly damp cloth to clean the tool
- Avoid harsh chemicals that can damage the metal or scale
- Apply a light coat of machine oil to metal parts to prevent rust
- Clean the ruler and head to keep the markings clear and readable
- Check the locking mechanism for dirt and clean if sticky
Storage Recommendations
Store the combination square in a dry place away from moisture. Proper storage helps keep the tool accurate and rust-free.
| Storage Tip | Reason |
| Keep in a protective case or pouch | Prevents dust buildup and physical damage |
| Store in a dry area | Stops rust and corrosion |
| Avoid placing heavy objects on top | Protects the ruler from bending or warping |
| Loosen the locking screw when not in use | Prevents strain on the mechanism |
Frequently Asked Questions
What Is A Combination Square Used For?
A combination square is a versatile tool used for measuring, marking, and checking angles. It helps in ensuring precision in woodworking and metalworking tasks. You can use it to measure 90-degree and 45-degree angles, as well as for depth and height measurements.
It is essential for accurate angle cutting.
How Do You Measure Angles With A Combination Square?
To measure angles, place the square’s head against one edge of the material. Align the ruler with the desired angle, such as 45 degrees. Ensure the ruler is securely fastened. Mark the angle using a pencil or marking tool. This ensures precision in cutting and crafting.
Can A Combination Square Cut Perfect Angles?
A combination square itself doesn’t cut angles but ensures accurate marking for cuts. By providing precise measurements and alignment, it helps guide saws or cutting tools. This results in perfectly cut angles. Its role is crucial for achieving professional and clean cuts in any project.
What Materials Can You Use It On?
You can use a combination square on wood, metal, and plastic. It’s perfect for various construction and crafting projects. Its versatility makes it a must-have tool for carpenters, metalworkers, and DIY enthusiasts. Always ensure the material is stable before marking or measuring.
Conclusion
Using a combination square makes cutting angles easier and more precise. It helps measure and mark angles clearly on your material. Take your time to adjust the tool properly before cutting. Practice with scrap wood to gain confidence. This simple tool can improve your woodworking projects a lot.
Keep it clean and store it safely after use. With patience, your cuts will become neater and more accurate. Give yourself space to learn and grow with each project. A good angle cut starts with the right measurement.