Are you tired of your DIY projects not turning out quite right? Wondering how to make your woodworking layouts flawless?
Meet your new best friend: the combination square. This tool is the secret weapon in a woodworker’s toolbox, and it’s about to change the way you approach your projects. With its precision and versatility, the combination square ensures that your measurements are spot-on and your angles perfect.
Imagine the satisfaction of creating layouts that are accurate and aesthetically pleasing every single time. Intrigued? Let’s dive into this guide and discover how you can master the art of using a combination square to elevate your craftsmanship.
Basics Of A Combination Square
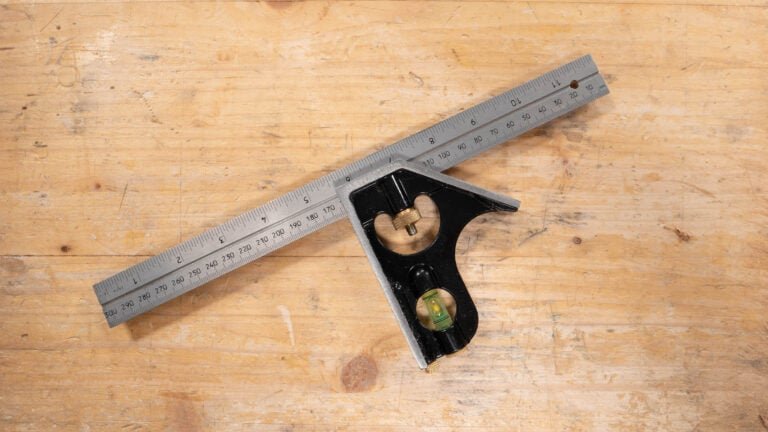
A combination square is a tool used for measuring and marking in woodworking and metalworking. It helps create accurate layouts and check angles.
This tool is easy to use and combines several functions in one device. Learning its parts and types makes it more useful.
Main Components
The combination square has three main parts that work together for precision.
- Blade:A ruler usually marked in inches and millimeters.
- Head:The sliding part that holds the blade at right angles and other angles.
- Bubble level:A small vial in the head that shows if a surface is level.
Types And Sizes
Combination squares come in different sizes and types for various tasks. Choosing the right one depends on your work needs.
| Type | Description | Common Size |
| Standard | Basic model with blade and head for general use | 12 inches (300 mm) |
| Mini | Smaller and lighter for tight spaces and small projects | 6 inches (150 mm) |
| Combination Square with Protractor | Includes a protractor for angle measurement | 12 inches (300 mm) |

Credit: www.reddit.com
Setting Up The Square
A combination square is a useful tool for measuring and marking. Setting it up correctly helps you make accurate layouts.
Start by getting the parts ready. The main parts are the blade and the head. Adjusting these parts is key to using the square well.
Adjusting The Blade
The blade slides through the head. You can move it to the length you need. Make sure the blade is straight and fits well inside the head.
Hold the head firmly while you slide the blade. Check the measurement marks on the blade. Set the blade to the size you want for your layout.
- Loosen the locking knob slightly
- Slide the blade to the desired length
- Check the measurement marks on the blade
- Align the blade with your marking point
Locking Mechanism
The locking mechanism keeps the blade in place. It stops the blade from moving during use. This ensures your measurements stay accurate.
To lock the blade, tighten the knob or screw on the head. Make sure it is tight but do not over-tighten. Check that the blade does not move after locking.
- Hold the blade steady
- Tighten the locking knob firmly
- Test the blade for any movement
- Readjust if the blade shifts
Measuring And Marking Techniques
A combination square is a useful tool for many layout tasks. It helps measure and mark wood or metal accurately.
Using the right techniques with your combination square improves your work quality. It saves time and reduces mistakes.
Straight Lines
To draw straight lines, place the ruler part of the combination square along your workpiece. Make sure the head is tight and aligned.
Hold the tool firmly and use a pencil to mark along the ruler’s edge. This ensures a clean, straight line for cutting or measuring.
Right Angles
The combination square’s head has a 90-degree edge. Place it against the edge of your material for a perfect right angle.
Mark lines along the ruler to create precise perpendicular lines. This is helpful for corners and joints in your projects.
45-degree Angles
The angled side of the combination square head is set at 45 degrees. Use it to mark angles for miter cuts or bevels.
Place the 45-degree edge against the material’s edge and draw along the ruler. This gives an accurate 45-degree line for your layout.
Credit: www.amazon.com
Using The Square For Depth And Height
A combination square is a useful tool for measuring depth and height. It helps you mark exact points on your workpieces. This guide explains how to use it for these measurements.
By using the square’s ruler and head, you can check distances inside and outside your materials. This ensures accuracy in your layouts.
Depth Measurements
To measure depth, place the square’s head flush against the edge of your workpiece. Slide the ruler down into the cut or recess. Read the measurement where the ruler meets the surface.
- Ensure the head is tight and square to the ruler.
- Hold the square firmly to avoid movement.
- Check the ruler’s reading at the point inside the cut.
- Use this measurement to mark or verify depth.
Height Gauging
Height gauging with a combination square lets you check vertical distances from a surface. Set the ruler so it stands upright with the head against the base.
| Step | Action |
| 1 | Place the square’s head on the reference surface. |
| 2 | Extend the ruler upward to the point you want to measure. |
| 3 | Read the height at the ruler’s edge. |
| 4 | Mark the height on your workpiece if needed. |
Common Layout Tasks
A combination square is a versatile tool for many woodworking layouts. It helps you measure, mark, and check angles accurately.
Using this tool correctly makes your projects fit better and look professional. Here are some common tasks you can do with a combination square.
Marking Mortises And Tenons
Mortises and tenons are joints used to connect wood pieces. A combination square helps mark these parts precisely.
Set the ruler to the desired width and use the head to guide your pencil. This method ensures straight and even lines for cutting.
- Adjust the ruler to the mortise width
- Hold the square flat against the wood edge
- Draw lines along the ruler edge for mortise depth
- Repeat marking for tenon length and thickness
Checking Squareness
Checking if edges or corners are square is key in woodworking. A combination square quickly verifies 90-degree angles.
Place the head of the square against one edge and see if the ruler touches the other edge evenly. Gaps mean the corner is not square.
- Align the square’s stock with one edge
- Check if the ruler touches the adjoining edge fully
- Adjust your workpiece if gaps appear
Transferring Measurements
Transferring measurements from one part to another keeps pieces consistent. The combination square helps copy these sizes easily.
Set the ruler to the needed size, then lock it in place. Use the square to mark the same measurement on other wood pieces.
- Adjust the ruler to the required length
- Lock the ruler with the locking screw
- Place the square on the new piece
- Mark the measurement clearly

Credit: www.wikihow.com
Maintenance And Care
Keeping your combination square in good shape helps it last longer. Proper care ensures accurate measurements each time you use it.
Simple maintenance steps can prevent rust and damage. Regular attention keeps the tool ready for your layout tasks.
Cleaning Tips
Clean your combination square after every use. Dirt and dust can affect its accuracy and smooth movement.
Use a soft cloth to wipe all parts. Avoid water as it can cause rust on metal surfaces.
- Remove sawdust or debris with a soft brush
- Wipe metal parts with a dry or slightly oiled cloth
- Clean the blade and the head separately
- Avoid harsh chemicals that damage the finish
Storage Recommendations
Store your combination square in a dry place to stop rust. Keep it away from moisture and extreme temperatures.
Use a protective case or pouch if possible. This prevents damage and keeps all parts together.
- Keep the square in a toolbox or drawer
- Use silica gel packs to absorb moisture
- Do not store under heavy objects to avoid bending
- Check and tighten screws before storing
Troubleshooting Accuracy Issues
A combination square helps measure and mark layouts correctly. If your marks seem off, you need to check the tool’s accuracy.
Fixing accuracy problems keeps your projects neat and precise. Use the tips below to find and solve common issues.
Calibration Checks
Check the square’s calibration to ensure the blade is at a perfect 90 degrees to the body. This step is key for accurate layouts.
Place the square against a known straight edge. Mark a line along the blade, then flip the square and mark again. If lines don’t match, the tool needs adjustment.
- Find a flat, straight surface or metal ruler.
- Hold the body of the square firmly against it.
- Draw a line along the blade’s edge.
- Flip the square and draw a second line.
- Compare the two lines for alignment.
Blade Replacement
If the blade is bent, worn, or damaged, it will cause errors. Replace the blade to restore accuracy.
Use the right blade size for your square. Loosen the locking screw, remove the old blade, and slide in the new one. Tighten the screw firmly but do not over-tighten.
- Buy a replacement blade that fits your model.
- Loosen the blade lock screw carefully.
- Remove the damaged blade from the body.
- Insert the new blade fully into the slot.
- Secure the blade by tightening the screw.
- Recheck calibration after replacement.
Frequently Asked Questions
What Is A Combination Square Used For?
A combination square measures and marks angles, depths, and distances. It helps with 90° and 45° layouts in woodworking and metalworking. It combines ruler, square, and level functions for versatile use. It ensures precise and accurate measurements for various projects.
How Do I Adjust A Combination Square Blade?
Loosen the locking nut to slide the blade. Position the blade at the desired measurement or angle. Tighten the nut to secure the blade firmly. Ensure the blade is straight and stable before marking or measuring.
Can A Combination Square Check Level Surfaces?
Yes, it has a built-in spirit level vial. This helps check horizontal or vertical alignment. It ensures surfaces are level during layouts and installations. It adds convenience to measuring and leveling tasks simultaneously.
How Do I Use A Combination Square For Marking 45 Degrees?
Position the blade against the workpiece edge. The 45-degree angle side of the head aligns with the blade. Draw a line along the blade edge for a precise 45-degree mark. This helps in creating miters and angled cuts.
Conclusion
Using a combination square helps make your layouts clear and accurate. It saves time and reduces mistakes on projects. Practice often to feel confident with this handy tool. Measure and mark straight lines, angles, and depths easily. This tool fits well in any toolbox or workshop.
Keep it clean and check for damage before use. Your projects will look neater and more professional. Try different ways to use it and find what works best. Small steps bring better results in your work.
