
If you want to make precise and clean marks on wood or metal, a combination square is your best friend. But if you’re new to using one, it can feel tricky at first.
This guide will show you exactly how to use a combination square for marking lines with confidence and accuracy. By the end, you’ll know the simple steps to get perfect measurements every time, saving you frustration and wasted materials. Ready to improve your skills and make your projects look sharper?
Let’s dive in.
Choosing The Right Combination Square
A combination square helps you mark lines and measure angles. Picking the right one makes your work easier and more accurate.
Consider the tool’s type, size, material, and your project needs. This guide will help you choose well.
Types And Sizes
Combination squares come in different types and sizes. Some have extra tools like protractors or levels.
- Standard combination square: measures and marks 90° and 45° angles.
- Protractor combination square: adds angle measurement up to 180°.
- Center finder: helps locate the center of round objects.
- Sizes range from 4 inches to 12 inches for different tasks.
Materials And Durability
Materials affect how long a combination square lasts and how well it works. Choose one that fits your budget and needs.
| Material | Features | Durability |
| Steel | Strong, resists bending | High |
| Stainless Steel | Rust-resistant, strong | Very High |
| Aluminum | Lightweight, easy to handle | Moderate |
| Plastic | Cheap, lightweight | Low |
Selecting Based On Project Needs
Think about your project before buying. Size and type depend on what you plan to do.
- For small woodworking, a 6-inch standard square is good.
- Metalworking often needs a stainless steel type for strength.
- Large projects need longer rulers, like 12 inches.
- If you measure angles often, pick one with a protractor.
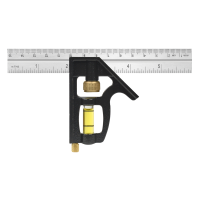
Parts Of A Combination Square
A combination square helps you mark lines and measure angles on wood or metal. It has different parts that work together for accuracy.
Knowing each part helps you use the tool correctly and get better results in your projects.
Blade And Ruler
The blade is the long, flat part of the combination square. It usually has measurements in inches and centimeters. You use it to measure lengths and draw straight lines.
The blade fits into the handle and can slide back and forth. This makes it easy to adjust the size for different tasks.
- Made of metal for durability
- Marked with clear measurement units
- Slides smoothly for quick adjustments
Stock And Handle
The stock is the thick part attached to the blade. It holds the blade at a right angle. This helps you mark perfect 90-degree lines on your workpiece.
The handle is part of the stock that you hold. It is often made of metal or wood. The handle also has a locking mechanism to keep the blade in place.
- Provides a stable base for measurements
- Locks the blade firmly in position
- Helps draw square and angled lines
Scriber And Level Vial
The scriber is a small sharp tool stored in the stock. You use it to mark precise points on wood or metal. It is handy for detailed work.
The level vial is a small glass tube filled with liquid. It helps check if a surface is level or plumb. This feature adds extra usefulness to the combination square.
- Scriber marks fine lines and points
- Level vial shows horizontal or vertical balance
- Both parts add accuracy to your work
Setting Up The Square
Using a combination square correctly starts with proper setup. This tool helps you mark straight and precise lines on wood, metal, or other materials.
Before marking, you need to adjust the blade, lock it firmly, and check the tool’s accuracy. These steps ensure your measurements and lines are exact.
Adjusting The Blade
First, slide the blade out of the handle to the length you need. The blade should extend enough to mark your workpiece clearly.
- Hold the handle firmly.
- Loosen the locking screw slightly.
- Move the blade to the desired length.
- Check the blade edge is clean and sharp.
Locking The Position
Once the blade is set, tighten the locking screw to keep the blade from moving. A loose blade causes inaccurate lines and measurements.
Tip:Use a small wrench or your fingers to tighten the screw. Make sure it is secure but do not overtighten.
Checking For Accuracy
Check the square’s accuracy before use. This step saves time and ensures correct marking.
| Check | What to Do |
|---|---|
| Blade alignment | Place the blade against a flat edge. The blade and handle should form a perfect 90-degree angle. |
| Square edge | Use a known square or try the tool on a test piece to confirm right angles. |
| Lock tightness | Ensure the locking screw holds the blade firmly without slipping. |
Marking Straight Lines
Using a combination square helps you mark straight lines on wood or metal. It gives you a clear guide to cut or measure accurately.
Follow simple steps to get clean, straight lines every time with your combination square.
Aligning The Square On Material
Place the combination square firmly on the edge of your material. Make sure the ruler is flat and tight against the surface.
Check that the square’s head sits flush against the edge. This helps keep the line straight and true.
- Hold the square steady with one hand
- Ensure the ruler does not lift or shift
- Use the edge of the material as a guide
Using The Scriber For Precise Marks
The scriber is a sharp tool attached to the combination square. Use it to scratch fine lines on your material.
Press the scriber gently and draw along the ruler edge. This makes clear, thin lines for cutting or measuring.
- Keep the scriber sharp for clean marks
- Draw slowly to avoid slipping
- Use light pressure to prevent deep scratches
Tips For Consistent Lines
Marking lines the same way each time helps accuracy. Use these tips to stay consistent with your combination square.
- Always start with a clean, smooth surface
- Check the square’s calibration before use
- Hold the square firmly to prevent movement
- Use the same hand pressure when marking
- Practice on scrap material to improve skill
Marking Angled Lines
Using a combination square helps you mark angled lines easily and accurately. This tool has a ruler, a square head, and a protractor for setting angles.
Marking angled lines is useful for cutting wood at specific angles or creating joints. It helps make your woodworking projects precise.
Setting Angles With The Protractor
The protractor on a combination square lets you set the exact angle you need. Loosen the knob to move the ruler to the desired angle.
Once set, tighten the knob to lock the angle. Use the ruler edge to draw your angled line on the wood surface.
- Loosen knob to adjust angle
- Align ruler with desired angle on protractor
- Tighten knob to secure position
- Draw line along ruler edge
Common Angles For Woodworking
Woodworkers often use certain angles for joints and cuts. Knowing these common angles helps you work faster and more accurately.
- 90 degrees for square cuts
- 45 degrees for miters
- 30 and 60 degrees for angled joints
- 22.5 degrees for half miters
Ensuring Stability While Marking
Keep the combination square steady to get straight, clean lines. Hold the square firmly against the wood surface.
Press the ruler flat and avoid moving it while marking. This prevents mistakes and keeps your lines accurate.
- Hold the square tightly against wood
- Apply steady pressure on the ruler
- Use a sharp pencil for clear lines
- Mark slowly to avoid slipping
Credit: www.johnsonlevel.com
Measuring Depth And Height
A combination square is a useful tool for measuring depth and height in woodworking and metalworking. It helps you mark precise lines for cutting and fitting parts together.
Using the combination square correctly can improve your project’s accuracy. This guide explains how to measure depth and height using the tool.
Using The Blade As A Depth Gauge
The blade of a combination square can measure the depth of slots, grooves, and holes. Slide the blade into the space and adjust it until it touches the bottom.
Lock the head in place to keep the measurement. Then, remove the tool and mark the depth on your workpiece.
- Extend the blade to fit the depth needed
- Place the square so the blade reaches the bottom
- Lock the head to hold the measurement
- Use the blade to mark or check the depth
Marking Heights For Cuts
You can use the combination square to mark the height of cuts on wood or metal. Set the blade to the height you want to cut.
Hold the square against the edge of your workpiece and draw a line along the blade’s edge. This line shows where to cut or shape the material.
- Adjust the blade to the correct height
- Place the head flat against the workpiece edge
- Draw a line along the blade’s edge
- Use the line as a guide for your cut
Practical Applications
Measuring depth and height with a combination square helps in many tasks. You can check groove depths or mark where to saw or chisel.
It is useful for fitting joints, installing hardware, and making consistent cuts. The tool saves time and reduces errors in your work.
- Check slot and groove depths
- Mark consistent cut heights
- Align parts for assembly
- Measure small distances accurately
Maintaining Accuracy Over Time
A combination square helps mark precise lines for woodworking and metalworking. Keeping it accurate over time is important for good results.
Regular care and proper handling extend the life of your tool and keep your measurements reliable.
Regular Calibration
Check your combination square often to ensure it stays accurate. Small errors can affect your work.
- Place the square on a flat surface.
- Use a known straight edge to test the blade.
- Adjust the blade if it does not line up correctly.
- Tighten the locking screw securely after adjustment.
- Repeat the test to confirm accuracy.
Cleaning And Storage
Keep your tool clean to avoid rust and dirt buildup. Proper storage protects it from damage.
| Cleaning Step | How to Do It |
| Remove dust | Use a soft brush or cloth |
| Wipe metal parts | Use a lightly oiled cloth |
| Check for rust | Remove with fine steel wool if needed |
| Store properly | Keep in a dry case or toolbox |
Handling Tips To Avoid Damage
Handle your combination square carefully. Rough use can cause misalignment or damage.
- Do not drop or throw the tool.
- Always loosen the blade before sliding it.
- Avoid exposing it to extreme heat or moisture.
- Use the tool only for marking and measuring.
Common Mistakes To Avoid
Using a combination square helps you mark lines accurately. Avoiding mistakes keeps your work clean and precise.
Some errors are easy to fix once you know what to watch for. Learn the common mistakes people make.
Misreading Measurements
Misreading the scale on your combination square can cause wrong marks. Make sure you look at the right side of the ruler.
Double-check the measurement before marking. Small errors add up and ruin your project.
- Look carefully at the numbers and lines on the scale
- Use good light to see the markings clearly
- Check if you are using inches or millimeters
- Confirm the ruler is set firmly before reading
Loose Blade Issues
The blade of the combination square must be tight. A loose blade moves and causes inaccurate marks.
Always tighten the locking screw after adjusting the blade. This keeps your measurements steady and reliable.
- Check the screw before starting your work
- Tighten the blade firmly but not too hard
- Test the blade by holding it against a straight edge
- Adjust if the blade slips or wobbles
Improper Marking Techniques
Marking lines with too much force can damage your tool and wood. Use a light but clear mark instead.
Hold the combination square firmly against the wood. Move the pencil or scribe smoothly along the edge.
- Keep the blade tight against the surface
- Use a sharp pencil or marking tool
- Draw lines in one steady motion
- Avoid lifting the square while marking
Advanced Tips For Precision
Using a combination square correctly can improve the accuracy of your marks. Small adjustments make big differences in your projects.
These tips help you get precise lines for cutting, fitting, and measuring tasks with ease.
Using The Level Vial Effectively
The level vial on a combination square helps check if surfaces are flat or plumb. Use it to keep your lines straight and true.
Place the square on the surface and watch the bubble. Adjust your work until the bubble is centered for best results.
- Check the vial before marking to ensure accuracy
- Use the level on both horizontal and vertical surfaces
- Recheck often on large or uneven pieces
Combining Tools For Complex Layouts
Use your combination square with other tools like a marking gauge or a bevel gauge. This helps create precise angles and lines.
Align the combination square with these tools to mark complex shapes clearly and reduce mistakes.
- Use the bevel gauge to set angles, then transfer with the square
- Combine marking gauges to mark parallel lines quickly
- Check angles with the square and adjust with a protractor if needed
Enhancing Speed Without Sacrificing Accuracy
Practice using the combination square to mark lines quickly. Steady hands and smooth motions save time and keep marks clean.
Set your measurements once and use stops or clamps to repeat marks fast. This cuts down errors and speeds your workflow.
- Lock the ruler tightly to avoid slips
- Use clamps to hold the square in place for repeated marks
- Mark lightly first, then darken for better control

Credit: www.familyhandyman.com

Credit: www.wikihow.com
Frequently Asked Questions
What Is A Combination Square Used For?
A combination square measures and marks angles, depths, and lengths accurately. It helps ensure straight, square, and precise lines during woodworking and metalworking.
How Do You Mark A Line With A Combination Square?
Place the ruler against the workpiece edge. Adjust the head to the desired measurement. Use the pencil to draw a straight line along the ruler’s edge.
Can A Combination Square Measure Angles Accurately?
Yes, it measures 90 and 45-degree angles precisely. This feature helps in marking and verifying right and mitre angles during projects.
How Do You Adjust A Combination Square Ruler?
Loosen the locking nut, slide the ruler to the required length, then tighten the nut securely. This ensures accurate and stable measurements.
Conclusion
Using a combination square makes marking lines easier and more accurate. It helps keep measurements straight and clear. Practice often to feel comfortable with the tool. This simple device saves time and improves your work. Try different ways to use it and see what fits best.
Keep your combination square clean and in good shape. Soon, marking lines will become a quick and easy task. Don’t rush; steady hands give the best results. A reliable tool like this supports your woodworking or metalworking projects well.
