Are you ready to take your woodworking or building projects to the next level? Understanding how to use a framing square can make your work faster, easier, and more precise.
Whether you’re a beginner or just need a refresher, this guide will show you simple, clear steps to master this essential tool. By the end, you’ll feel confident measuring, marking, and checking angles like a pro. Keep reading, and discover how this one tool can transform your projects and save you time and frustration.

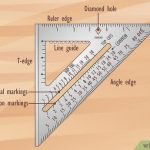
Credit: www.wikihow.com
Choosing The Right Framing Square
A framing square is a tool used in carpentry and construction. It helps measure and mark right angles and straight cuts.
Choosing the right framing square makes your work easier and more accurate. You should pick one that fits your needs and lasts long.
Types Of Framing Squares
There are different types of framing squares. Each type serves a special purpose on the job site.
- Steel Framing Square:The most common type. Strong and durable.
- Aluminum Framing Square:Lightweight and rust-resistant. Easy to carry.
- Plastic Framing Square:Inexpensive and light. Good for light work and beginners.
- Combination Square:Has a ruler and adjustable head. Useful for multiple measurements.
Materials And Durability
Framing squares are made from different materials. The material affects how long the tool lasts and how easy it is to use.
Steel squares are strong and last a long time. They can handle heavy use but may rust if not cared for.
Aluminum squares resist rust and are lighter. They are good for carrying around but can bend if used roughly.
Plastic squares are cheap and light. They are not as strong and can break under pressure.
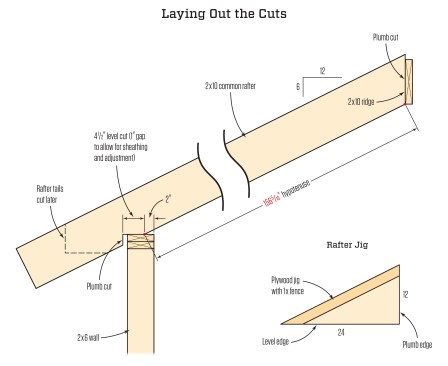
Credit: www.jlconline.com
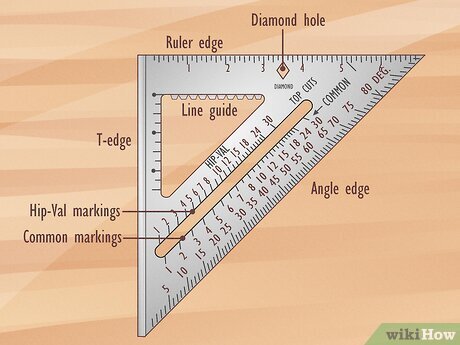
Basic Parts Of A Framing Square
A framing square is a common tool used in woodworking and construction. It helps builders measure and mark angles and straight lines accurately.
Understanding the basic parts of a framing square is important for using it correctly and safely. The two main parts are the blade and the tongue, each with different features.
Blade And Tongue
The blade is the longer part of the framing square. It usually measures 24 inches. The tongue is the shorter part, often 16 inches long. Both parts meet at a right angle.
- Blade:The long arm, used for measuring and marking long straight lines.
- Tongue:The short arm, used for marking smaller angles and measurements.
- Right Angle:The corner where the blade and tongue meet forms a 90-degree angle.
Graduations And Markings
Graduations are the measurement marks on the blade and tongue. They show inches, fractions, and sometimes special markings for framing tasks.
| Marking | Purpose | Description |
|---|---|---|
| Inches | Basic measurement | Numbers and lines show whole inches and fractions. |
| Rafter Tables | Roof framing | Special marks help calculate rafter lengths and angles. |
| Octagon and Circle Layouts | Shape marking | Marks assist in drawing octagons and circles. |
| Common and Hip/Val | Roof angles | Marks for common rafters and hip or valley rafters. |
Setting Up For Accurate Measurements
Using a framing square correctly is important for precise cuts and strong builds. Setting it up right helps avoid mistakes in your work.
This guide covers how to check your square and position it properly for accurate measurements.
Calibrating Your Square
Before you start measuring, make sure your framing square is accurate. A bent or worn square can cause errors.
- Place the square on a flat surface and check if it lies flat without rocking.
- Use a known straight edge or a carpenter’s level to check the 90-degree angle.
- If the square is off, gently bend it back to the correct angle or replace it if damaged.
- Clean the square of dirt and rust to keep markings clear.
Positioning Techniques
How you place the framing square affects the measurement result. Use these tips to position it correctly.
| Technique | Description | Benefit |
| Firm Contact | Press the square firmly against the edge of the wood. | Keeps the square steady and prevents slipping. |
| Align to Mark | Line up the square’s inner edge with your pencil mark. | Ensures accurate measurement from the mark. |
| Use Both Arms | Hold both arms of the square flat on the surface. | Maintains a true 90-degree reference point. |
| Check Visibility | Make sure markings are easy to read and not blocked. | Reduces errors in reading measurements. |
Common Uses In Carpentry
A framing square is a basic tool in carpentry. It helps measure and mark wood precisely.
Carpenters use it for many tasks like checking angles and laying out stairs. It saves time and improves accuracy.
Marking Right Angles
The framing square helps mark perfect right angles on wood. This is important for making strong joints.
To mark a right angle, place the square on the wood edge. Draw along the inside edge to get a 90-degree line.
- Place one leg on the wood edge
- Keep the other leg flat on the surface
- Draw a straight line along the inside edge
Checking Squareness
Carpenters use the framing square to check if corners are square. This means the angle is exactly 90 degrees.
Put the square inside the corner. If both edges touch the square, the corner is square. If not, adjust the frame.
- Place the square inside the corner
- Check if both edges touch the square
- Adjust if there is any gap
Laying Out Stair Stringers
A framing square helps mark stair stringers. Stringers are the supports for stair steps.
Use the square to mark rise and run measurements on wood. This guides cutting the steps accurately.
- Set the rise measurement on the square’s short arm
- Set the run measurement on the long arm
- Slide the square along the wood to mark steps
- Cut along the marks to form stair stringers
Advanced Layout Tips
Using a framing square correctly can improve your project accuracy. This guide covers advanced tips for roof framing tasks.
Learn how to calculate roof pitch and measure hip and valley rafters. These skills help you create precise cuts and fits.
Calculating Roof Pitch
The roof pitch shows the slope of the roof. You measure it as the ratio of rise over run. The framing square helps you find this quickly.
- Place the framing square on the edge of the rafter.
- Align the tongue vertically along the rise.
- Set the body horizontally along the run.
- Read the numbers where the square meets the wood.
- Use the rise and run to write the pitch as “X in 12.”
Knowing the pitch is key for cutting rafters and fitting shingles properly. It also helps with drainage and overall roof strength.
Measuring Hip And Valley Rafters
Hip and valley rafters are angled differently than common rafters. You use the framing square to find their length and angle precisely.
| Rafter Type | Measurement | Framing Square Use |
| Hip Rafter | Length along the diagonal | Use the diagonal scale on framing square for angle and length |
| Valley Rafter | Length along the valley line | Measure rise and run, then adjust angle using framing square |
Make sure to double-check all measurements before cutting. Accurate layout helps your roof fit tight and look professional.
Maintenance And Care
Taking care of your framing square keeps it accurate and lasts longer. Proper maintenance helps avoid mistakes in your work.
Simple cleaning and correct storage protect the tool. Avoiding damage keeps your framing square reliable over time.
Cleaning And Storage
Clean your framing square after each use. Remove dirt, dust, and debris to keep the surface smooth.
Store the square in a dry place to stop rust. Use a case or hang it on a wall to prevent bending.
- Wipe with a dry cloth after use
- Use mild soap and water for tough dirt
- Dry thoroughly before storing
- Keep in a toolbox or hang on a pegboard
- Avoid damp or humid areas
Avoiding Damage
Handle your framing square with care to avoid dents or bends. Do not drop or throw it on hard surfaces.
Do not use the square as a hammer or pry bar. Avoid exposure to extreme heat or chemicals that can weaken the metal.
- Hold the square firmly during use
- Do not lean heavy objects on it
- Keep away from corrosive materials
- Inspect regularly for damage or wear
- Repair or replace if accuracy is affected
Troubleshooting Measurement Errors
Using a framing square correctly is important for accurate cuts and angles. Measurement errors can cause problems in your project.
This guide helps you find common mistakes and fix inaccuracies when using a framing square.
Common Mistakes To Avoid
One common mistake is not placing the framing square flat on the work surface. This can cause wrong angles.
Another error is reading the measurements from the wrong side of the square. This leads to wrong lengths.
- Not checking if the square is damaged or bent
- Using a dirty or worn square that affects precision
- Measuring without holding the square firmly in place
- Ignoring the thickness of the material when marking
How To Correct Inaccuracies
Check the framing square for any bends or damage before use. A bent square gives false readings.
Place the square flat and hold it steady while measuring. Use a pencil to mark clearly at the measurement point.
- Calibrate your square by comparing it to a known right angle
- Clean the square to remove dirt or debris
- Double-check measurements before cutting
- Account for the material thickness when marking lines

Credit: www.amazon.com
Frequently Asked Questions
What Is A Framing Square Used For?
A framing square is used to measure and mark right angles in carpentry. It helps ensure accurate cuts and layouts. This tool is essential for framing walls, roofs, and stairs. Its precise measurements aid in creating strong, level structures efficiently.
How Do You Read A Framing Square?
To read a framing square, align the tool’s edges with your workpiece. Use the marked measurements on the blade and tongue. The numbers indicate inches and fractions for precise cuts. Understanding these measurements ensures accurate angles and dimensions in your project.
Can A Framing Square Measure Angles Other Than 90 Degrees?
Yes, a framing square can measure angles other than 90 degrees. By using the tool’s scales and pivot points, you can mark common angles like 45 degrees. It is versatile for creating rafters, stair stringers, and other angled cuts in framing.
How Do You Maintain A Framing Square?
To maintain a framing square, keep it clean and dry. Wipe it after use to remove dirt and moisture. Store it in a protective case to avoid bending or rust. Regular maintenance ensures accurate measurements and prolongs the tool’s lifespan.
Conclusion
A framing square simplifies many construction tasks. With practice, it becomes an essential tool. It ensures accuracy in measuring and cutting. Remember to handle it with care. Always double-check your measurements. This prevents mistakes and saves time. A framing square is versatile and durable.
It’s a must-have for any toolkit. Whether you’re a beginner or experienced, it’s invaluable. Explore its different uses. You’ll find it handy in various projects. Enjoy the precision it offers. Let it guide your construction tasks smoothly.