Are you tired of struggling with stripped screws and split wood when working on your DIY projects? The secret to smoother, cleaner drilling lies in mastering the art of using a hand drill for pilot holes.
This simple technique can transform your woodworking experience, saving you time, frustration, and even money. Imagine effortlessly guiding screws into place, ensuring a snug fit every time. By learning how to use a hand drill for pilot holes, you’ll not only improve the quality of your work but also boost your confidence in tackling future projects.
Dive into this guide and discover how to unlock the full potential of your hand drill. Your next masterpiece awaits!

Credit: www.youtube.com
Choosing The Right Hand Drill
Using a hand drill for pilot holes makes your work precise and clean. It is important to pick the right hand drill for your task. This guide helps you understand the choices you have.
Knowing the types of hand drills, the right drill bit, and safety gear will make your work easier and safer. Let’s explore these topics in detail.
Types Of Hand Drills
There are several types of hand drills. Each type suits different tasks and skill levels. Choose one that fits your needs for making pilot holes.
- Manual Brace Drill:Uses a crank handle. Best for precise, slow drilling.
- Eggbeater Drill:Has a gear system for faster drilling. Easy to control.
- Hand Crank Drill:Simple and cheap. Good for light jobs.
- Pin Chuck Drill:Holds small drill bits for fine work. Often used in crafts.
Selecting The Drill Bit
Choosing the correct drill bit is key to making clean pilot holes. The bit must match the material and screw size.
| Material | Recommended Drill Bit | Use |
| Wood | Brad Point Bit | Creates clean holes without splintering |
| Metal | High-Speed Steel (HSS) Bit | Drills through metal smoothly |
| Plastic | Twist Bit | Works well for plastic materials |
Safety Gear Essentials
Safety gear protects you from dust, debris, and accidents. Always wear the correct equipment when using a hand drill.
- Safety goggles to protect your eyes
- Dust mask to avoid inhaling particles
- Gloves to protect your hands from splinters
- Hearing protection if working near loud tools
Preparing For Drilling
Using a hand drill to make pilot holes is simple and safe if you prepare well. Preparation helps you drill accurately and avoid mistakes.
Before drilling, focus on marking the spot, securing your workpiece, and checking the drill’s condition. These steps make your work easier.
Marking The Drill Spot
Mark the exact spot where you want to drill the pilot hole. This keeps your hole in the right place and prevents slipping.
Use a pencil or a center punch to make a clear mark. A small dent helps the drill bit stay steady as you start drilling.
- Use a ruler or measuring tape for accuracy
- Make a small indentation with a center punch or nail
- Double-check the spot before drilling
Securing The Workpiece
Hold your workpiece firmly to keep it from moving while drilling. Movement can cause inaccurate holes or injury.
Use clamps or a vise to secure the material on your workbench. Make sure the area around the drill spot is clear and stable.
- Place clamps close to the drill spot
- Check that the workpiece does not wobble
- Keep your hands away from the drill bit
Checking Drill Condition
Inspect your hand drill before use. A well-maintained drill works better and lasts longer.
Check the drill bit for sharpness and damage. Replace dull or bent bits to avoid poor holes or drill slipping.
- Clean dirt or dust from the drill
- Make sure the drill bit is tight in the chuck
- Test the drill on scrap material if unsure
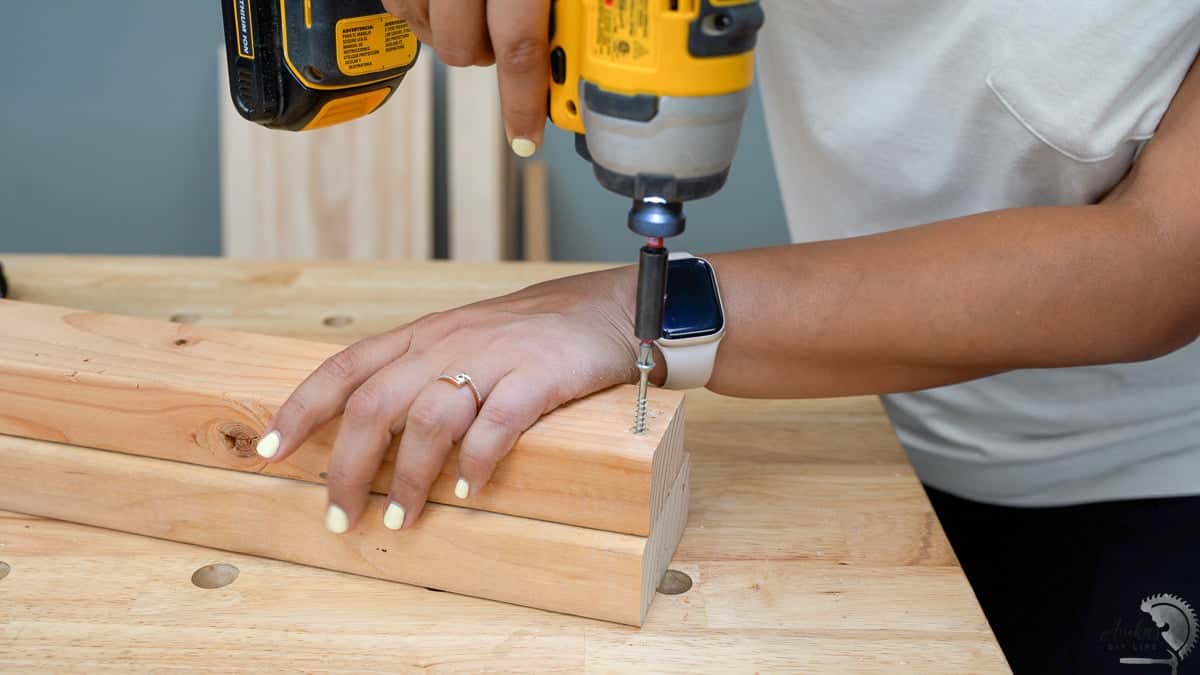
Drilling Pilot Holes
Drilling pilot holes helps guide screws and prevent wood from splitting. It makes fastening easier and more precise.
Using a hand drill correctly ensures clean, straight holes. This guide covers key steps for drilling pilot holes well.
Setting The Drill Angle
Hold the drill so the bit is perpendicular to the wood surface. This keeps the hole straight and accurate.
- Check the angle by looking at the drill from the side.
- Adjust your hand to keep the bit at 90 degrees.
- Use a square tool if you need extra help with angle accuracy.
Applying Proper Pressure
Press the drill firmly but not too hard. Too much pressure can break the bit or damage the material.
| Pressure Level | Effect |
|---|---|
| Light | Bit may slip and cause uneven holes |
| Moderate | Drill cuts smoothly and cleanly |
| Heavy | Bit may overheat or break |
Maintaining Steady Speed
Keep the drill spinning at a steady, moderate speed. This helps the bit cut without overheating or jamming.
Tips for steady speed:
- Start slow to position the bit.
- Increase speed smoothly.
- Avoid sudden stops or bursts.
Credit: www.anikasdiylife.com
After Drilling Steps
After drilling a pilot hole, you should take a few important steps. These ensure your project is strong and clean.
These steps help you prepare the hole for screws and avoid problems like splitting wood.
Cleaning The Hole
Remove all dust and debris from the pilot hole. Clean holes help screws go in smoothly.
Use a small brush or blow air into the hole to clear out any leftover material.
- Brush the hole gently with a wire or paintbrush
- Use compressed air to blow out dust
- Wipe the area around the hole clean
Inspecting The Pilot Hole
Check the hole size and depth before inserting the screw. Make sure it matches your screw size.
Look for cracks or damage around the hole that could weaken the wood.
- Use a ruler or depth gauge to check hole depth
- Compare hole diameter with the screw shank
- Look for wood splits or rough edges
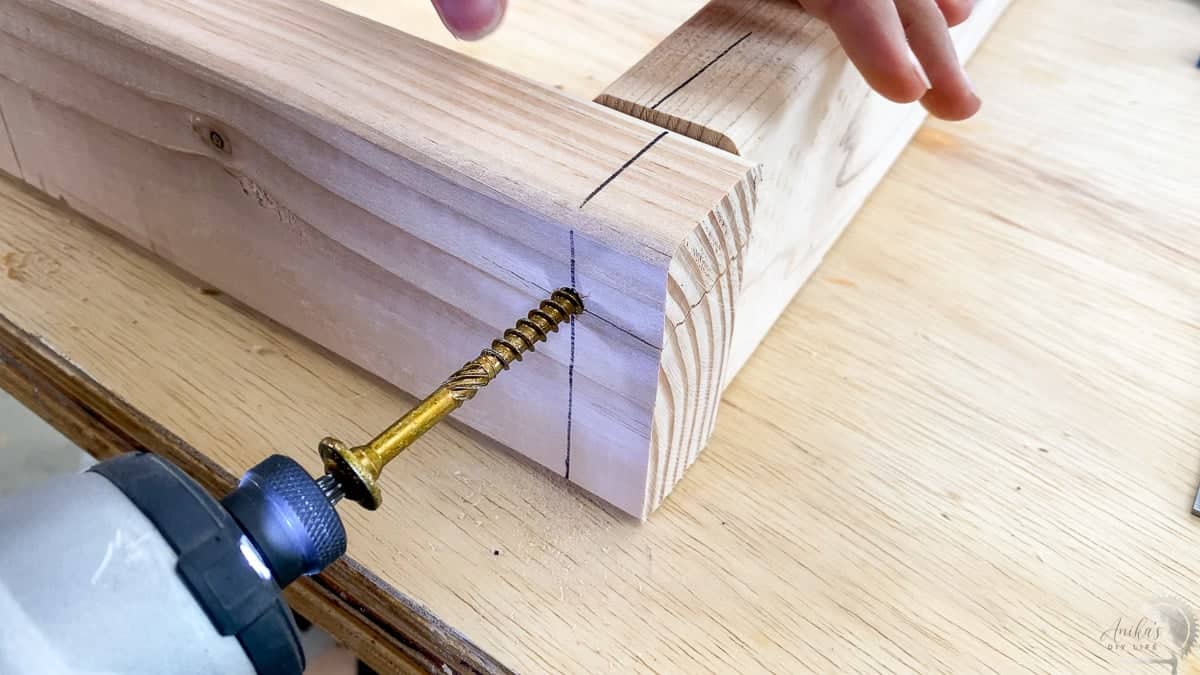
Adjusting For Larger Screws
If you need to use a larger screw, enlarge the pilot hole carefully. This prevents wood from splitting.
Drill slowly and check the hole size often to avoid making it too big.
- Choose a drill bit slightly smaller than the screw’s core
- Drill gently to widen the hole evenly
- Test fit the screw before final assembly
Common Mistakes To Avoid
Using a hand drill for pilot holes requires care and attention. Avoiding common mistakes can save your materials and keep you safe. This guide highlights key errors to watch for.
Learn the risks of overdrilling, using dull bits, and ignoring safety rules. Fixing these mistakes improves your drilling results and prevents damage.
Overdrilling Risks
Drilling too deep can weaken the material and cause cracks. Overdrilling wastes time and may ruin your workpiece. It is important to stop drilling once the pilot hole is the right depth.
- Measure the needed depth before drilling.
- Use a drill stop or tape on the bit to mark depth.
- Drill slowly and check progress often.
- Do not force the drill beyond the set depth.
Using Dull Bits
Dull drill bits cause uneven holes and can damage the material. They require more force and can lead to slipping or breaking the bit. Keep your drill bits sharp and replace them when worn out.
| Sign of Dull Bit | Effect on Drilling | What to Do |
|---|---|---|
| Slow drilling speed | More heat and wear | Sharpen or replace bit |
| Rough or uneven hole edges | Material damage | Use a sharp bit |
| Excessive pressure needed | Bit may break or slip | Change bit before use |
Ignoring Safety Precautions
Not following safety rules can cause injuries. Always wear eye protection and keep hands away from the drill bit. Secure your workpiece firmly to avoid slips. Be aware of your surroundings and do not rush.
- Wear safety goggles to protect eyes.
- Use gloves if needed, but avoid loose clothing.
- Clamp the material securely before drilling.
- Keep fingers and hands clear of the drill bit.
- Work in a well-lit area to see clearly.
Credit: www.anikasdiylife.com
Frequently Asked Questions
What Is The Purpose Of A Pilot Hole In Drilling?
A pilot hole guides screws or larger drill bits accurately. It prevents wood or material from splitting. It ensures the screw goes in straight and reduces material damage during drilling.
How Do You Choose The Right Drill Bit Size?
Select a drill bit slightly smaller than the screw’s diameter. This allows the screw threads to grip firmly. The pilot hole should fit the screw shaft without forcing.
Can I Use A Hand Drill For Pilot Holes?
Yes, a hand drill is perfect for making pilot holes. It offers better control and precision than power drills. Hand drills reduce the risk of drilling too deep or off-angle.
How Deep Should A Pilot Hole Be Drilled?
Drill the pilot hole at least as deep as the screw length. This ensures the screw fits completely without resistance. Proper depth avoids splitting and secures materials tightly.
Conclusion
Using a hand drill for pilot holes makes your work easier and neater. Start with the right drill bit size for your screws. Keep the drill steady and drill straight to avoid mistakes. Take your time and check the depth often.
This simple step helps screws go in smoothly and prevents wood from splitting. Practice a little, and you will get better fast. Hand drills are handy tools for small projects or tight spots. Remember, careful drilling means stronger, cleaner results every time.
Give it a try on your next project!