Are you struggling to hang doors or install windows perfectly straight? Even a small tilt can cause big problems like sticking, gaps, or drafts.
Using a level is the simple secret to getting it right every time. In this guide, you’ll learn exactly how to use a level for doors and windows, so your installations look professional and work smoothly. Keep reading, and you’ll save time, avoid costly mistakes, and enjoy the satisfaction of a job done perfectly.
Choosing The Right Level
Using a level helps you install doors and windows properly. It ensures they are straight and work well. Picking the right level is important for good results.
This guide covers types of levels, features to look for, and accuracy ratings. Understanding these will help you choose a level that fits your needs.
Types Of Levels
There are different levels for various tasks. Each type has its own use and size. Knowing the types helps you pick the best one for doors and windows.
- Carpenter’s Level:A long, straight level with one or more bubble vials. Good for larger doors and windows.
- Torpedo Level:Small and portable. Fits in tight spaces and corners.
- Laser Level:Projects a laser beam to show a straight line. Useful for precise alignment.
- Box Beam Level:Strong and heavy. Used for heavy-duty jobs and big frames.
Features To Look For
Good features make a level easier and more accurate to use. Look for these when choosing your tool.
- Material:Aluminum is light and strong. Wood is traditional but can warp. Plastic is cheap but less durable.
- Vials:Clear and easy to read vials help you see the bubble well.
- Magnetic Base:Helps hold the level on metal surfaces.
- Length:Longer levels cover more area but can be harder to carry.
- Grip:Non-slip grips improve handling and control.
Level Accuracy Ratings
Accuracy is how close the level shows true horizontal or vertical lines. It is measured in millimeters per meter (mm/m).
| Accuracy Rating | Meaning |
| ± 0.5 mm/m | Very precise for fine work like window framing |
| ± 1 mm/m | Good for most door and window installations |
| ± 2 mm/m | Acceptable for rough work and general use |
Preparing Doors And Windows
Using a level correctly ensures doors and windows fit well. Proper preparation helps avoid problems later.
Before measuring, take time to prepare the surfaces carefully. This makes your work more accurate and easier.
Cleaning The Surfaces
Clean doors and windows to remove dirt and dust. A clean surface helps the level sit flat and steady.
Use a soft cloth and mild cleaner. Avoid water pooling, as it can cause slipping.
Checking For Warps
Look closely at doors and windows for bends or twists. Warps can cause wrong measurements with a level.
Hold the door or window up and check from different angles. Note any areas that do not sit flat.
- Warped edges affect level placement
- Warped frames need fixing before installation
- Mark warped spots for repair or adjustment
Marking Reference Points
Mark spots on the door or window frame to guide your leveling. These points help keep measurements consistent.
Use a pencil or light marker that is easy to erase. Mark where the level edges line up for clear reference.
- Mark top, bottom, and sides of frames
- Note spots where the level reads perfectly horizontal
- Use marks to check alignment during installation
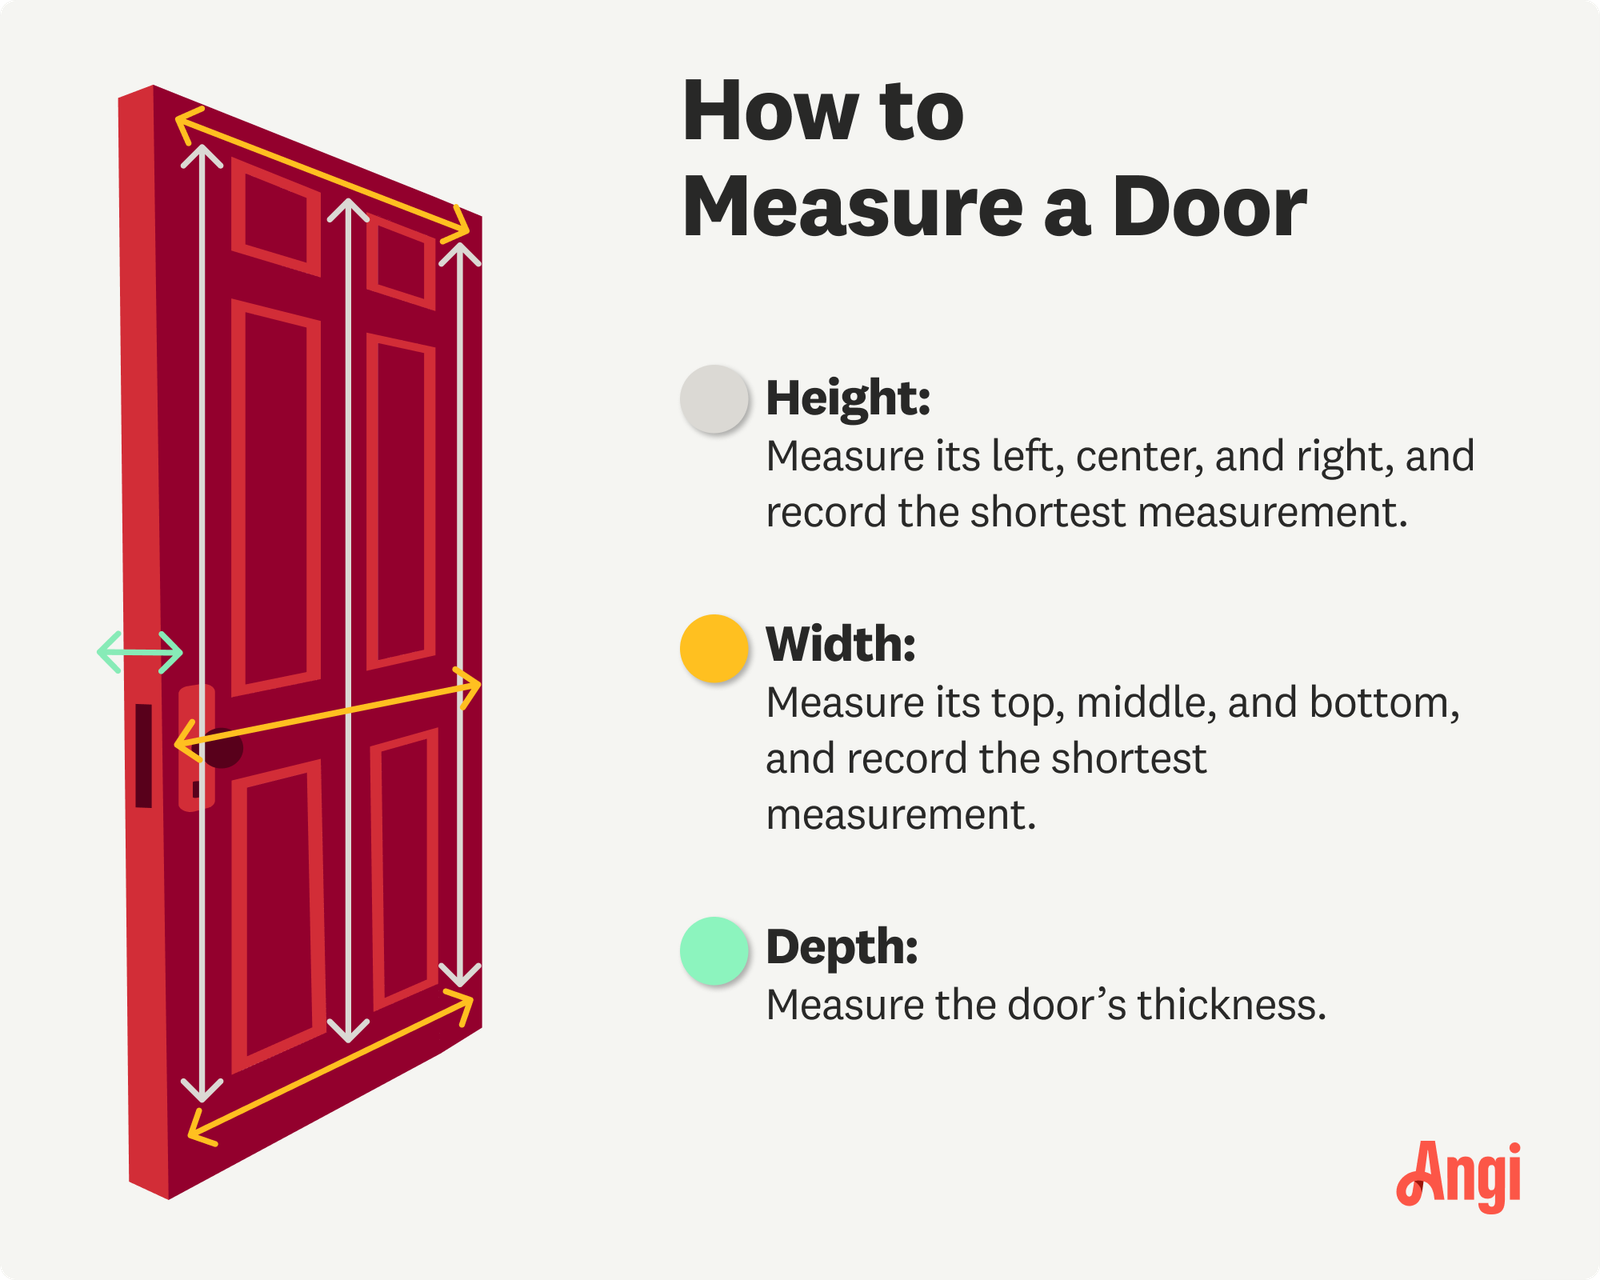
Positioning The Level
Using a level properly helps ensure doors and windows are straight and work well. Positioning the level correctly is key for accurate measurements.
This guide covers how to place the level horizontally, vertically, and on frames for best results.
Horizontal Placement
Place the level on the top edge of the door or window frame. Make sure it sits flat without gaps. Check the bubble to see if the surface is level.
- Hold the level steady on the horizontal surface.
- Look at the bubble in the vial.
- If the bubble is centered, the surface is level.
- If it moves, adjust the frame until the bubble centers.
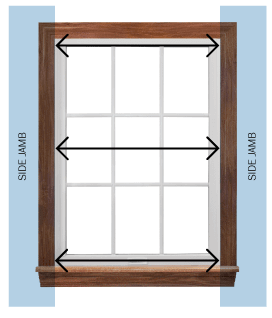
Vertical Placement
To check vertical alignment, place the level against the side edge of the frame. The level must touch the surface completely. This checks if the door or window stands straight up.
| Position | Level Placement | What to Check |
| Top edge | Horizontal | Level surface |
| Side edge | Vertical | Plumb or straight up |
| Frame corners | Diagonal (optional) | Squareness |
Using The Level On Frames
Frames must be level and plumb for doors and windows to fit and operate well. Use the level on all sides of the frame.
Follow these tips:
- Place the level on the top and bottom horizontal frame edges.
- Check the vertical sides for plumb.
- Use the level diagonally across corners to check squareness.
- Make small adjustments until all sides are correct.
Credit: modernize.com
Reading The Bubble Correctly
Using a level for doors and windows helps ensure they are straight. The bubble inside the level shows if the surface is even or slanted. Understanding how to read the bubble is important for a good installation.
This guide explains how to read the bubble correctly. It also gives tips to center the bubble and shows common mistakes to avoid.
Bubble Centering Tips
To get an accurate reading, place the level on the door or window frame. The bubble should rest between the two lines in the vial. When the bubble is centered, the surface is level.
- Check the level on a flat surface before use.
- Hold the level steady without tilting.
- Make sure the vial is clean and free of dust.
- Look straight down at the bubble to avoid errors.
- Use multiple points to confirm the level.
Common Misreads To Avoid
Many mistakes happen when reading the bubble. Avoid these to get the right measurement.
| Mistake | Explanation |
| Not eye-level | Viewing the bubble at an angle can mislead the reading. |
| Dirty vial | Dirt or fog inside the vial makes it hard to see the bubble. |
| Moving level | Shifting the level while reading can move the bubble. |
| Ignoring calibration | Using a damaged or uncalibrated level gives wrong results. |
| Parallax error | Looking from the side instead of from above causes false readings. |
Adjusting Doors And Windows
Using a level helps you adjust doors and windows correctly. It ensures they open and close smoothly.
Proper adjustments prevent drafts and improve energy efficiency in your home.
Shimming Techniques
Shims fill gaps between the frame and wall. They help level the door or window for a perfect fit.
- Place shims behind hinges to adjust height.
- Use thin shims to fix small gaps.
- Remove or add shims to align the frame evenly.
- Check alignment with a level after each adjustment.
Hinge Adjustments
Tighten or loosen hinge screws to adjust door or window fit. This changes the alignment and swing.
| Adjustment | Effect |
| Tighten top hinge screws | Raises the door or window |
| Loosen bottom hinge screws | Shifts door or window down |
| Adjust middle hinge screws | Moves door or window sideways |
Ensuring Even Gaps
Even gaps around doors and windows stop air leaks and ensure smooth operation.
Check gaps using these tips:
- Use a level on all sides of the door or window.
- Look for equal spacing between the frame and moving part.
- Adjust shims or hinges if gaps are uneven.
- Test the door or window by opening and closing it several times.
Credit: steeldoor.org
Troubleshooting Common Issues
Using a level is key to fitting doors and windows right. Sometimes, the level may not work as expected. This guide covers common problems you might see.
We explain how to spot and fix issues with your level. This helps you get doors and windows aligned perfectly every time.
Level Not Sitting Flat
If the level does not sit flat, your readings will be wrong. Dirt or debris on the level or surface can cause this issue.
Check both the level and the door or window frame for dust or bumps. Clean them before measuring again.
- Wipe the level with a clean cloth
- Remove any paint drips or debris on the frame
- Use a flat surface to test the level’s accuracy
Uneven Surfaces
Uneven surfaces can cause false level readings. Door and window frames often have small bumps or warps.
Check the surface carefully and use shims if needed. Shims fill gaps and create a flat base for the level.
- Use a straight edge to find uneven spots
- Place thin shims under the frame where needed
- Double-check the level after adding shims
Persistent Misalignment
Sometimes, doors or windows stay misaligned even after leveling. This may be due to frame warping or loose hardware.
Tighten hinges and screws. If the frame is warped, you may need to adjust or replace parts.
- Inspect hinges and tighten screws
- Check the frame for bends or twists
- Replace warped parts if needed
- Re-level after fixing hardware or frame
Maintaining Your Level
Using a level for doors and windows needs care to keep it accurate. A well-maintained level helps you get perfect results every time.
Simple maintenance steps can extend the life of your level. Keep it clean, store it right, and check its calibration often.
Storage Tips
Store your level in a dry, safe place to avoid damage. Avoid leaving it where it can fall or get crushed.
- Keep the level flat to prevent bending
- Use a protective case if possible
- Avoid extreme temperatures and moisture
- Keep it away from heavy tools or objects
Calibration Checks
Check your level’s calibration regularly to ensure accuracy. A quick test can tell if it needs adjustment.
- Place the level on a flat surface and note the bubble position
- Turn the level 180 degrees and check the bubble again
- If the bubble is not in the same spot, recalibrate or replace the level
Cleaning And Care
Clean your level after each use to remove dust and dirt. Dirt can affect the bubble and the surface of the tool.
- Use a soft cloth to wipe the surface
- Avoid harsh chemicals that can damage the level
- Check the bubble vial for cracks or leaks
- Dry the level fully before storing it

Credit: www.angi.com
Frequently Asked Questions
How Do You Use A Level On Doors?
To use a level on doors, place it vertically along the door’s edge. Check for alignment by ensuring the bubble is centered. Adjust the door if needed for proper alignment, ensuring a smooth operation and preventing any gaps.
Why Is Leveling Windows Important?
Leveling windows ensures they operate smoothly, preventing drafts and water leaks. Proper alignment enhances energy efficiency and prolongs the window’s lifespan. It also ensures a better overall aesthetic and functionality of your home’s exterior and interior.
Can A Level Help With Window Installations?
Yes, a level is crucial for window installations. It ensures the window is perfectly aligned and prevents future operational issues. Proper leveling avoids air leaks, water infiltration, and enhances energy efficiency, contributing to a well-functioning window system.
What Type Of Level Is Best For Doors?
A carpenter’s level is ideal for doors. It’s long enough for accurate readings and helps ensure the door hangs correctly. This tool is essential for preventing misalignment and maintaining the door’s functionality and appearance over time.
Conclusion
Using a level helps ensure your doors and windows fit right. It prevents problems like gaps or uneven frames. Check the level often during installation for best results. A straight door or window improves your home’s look and function. Take your time and measure carefully to avoid mistakes.
A simple tool can make a big difference in your work. Keep practicing, and you will get better each time. This guide gives you the basics to start with confidence.